2024年CKS考试准备
Start : 2024.1.15
DDL1:2024.2.3 15:00 (Rescheduled)
DDL2:2024.2.8 20:00 (Failed)
DDL3: 2024.2.23 23:30 (Success)
学习环境搭建
# Other prerequisites
# swap,br_netfilter....

# Configure containerd
$ containerd config default | sed 's|SystemdCgroup = false|SystemdCgroup = true|g' | sudo tee /etc/containerd/config.toml > /dev/null
$ sudo systemctl restart containerd && systemctl status containerd

# Hosts
$ echo "127.0.0.1 kube.multipass.local" | sudo tee -a /etc/hosts > /dev/null

# Initialize Kubernetes cluster
$ kubeadm init --pod-network-cidr=10.244.0.0/16 --control-plane-endpoint kube.multipass.local

# untaint master node
$ kubectl get node --no-headers | grep control-plane | awk '{cmd="kubectl taint node "$1" node-role.kubernetes.io/control-plane-";system(cmd)}'

# Install Calico CNI which supports Network Policy
$ kubectl create -f https://raw.githubusercontent.com/projectcalico/calico/v3.27.0/manifests/tigera-operator.yaml
$ curl https://raw.githubusercontent.com/projectcalico/calico/v3.27.0/manifests/custom-resources.yaml | sed 's|192.168|10.244|g' | kubectl apply -f -
There may be lots of impediments to setting up this kubernetes cluster successfully due to network conditions or some misconfigurations, but those above can be solved step by step. Finally, node(s) is(are) ready as follows:
$ kubectl get node
NAME          STATUS   ROLES           AGE   VERSION
kube-master   Ready    control-plane   21m   v1.28.3
做题工具
alias
alias k=kubectl                         # will already be pre-configured
export do="--dry-run=client -o yaml"    # k create deploy nginx --image=nginx $do
export now="--force --grace-period 0"   # k delete pod x $now
vim
set tabstop=2
set expandtab
set shiftwidth=2
jsonpath
https://kubernetes.io/docs/reference/kubectl/jsonpath/
| Function | Description | Example | Result |
|---|---|---|---|
text |
the plain text | kind is {.kind} |
kind is List |
@ |
the current object | {@} |
the same as input |
. or [] |
child operator | {.kind}, {['kind']} or {['name\.type']} |
List |
.. |
recursive descent | {..name} |
127.0.0.1 127.0.0.2 myself e2e |
* |
wildcard. Get all objects | {.items[*].metadata.name} |
[127.0.0.1 127.0.0.2] |
[start:end:step] |
subscript operator | {.users[0].name} |
myself |
[,] |
union operator | {.items[*]['metadata.name', 'status.capacity']} |
127.0.0.1 127.0.0.2 map[cpu:4] map[cpu:8] |
?() |
filter | {.users[?(@.name=="e2e")].user.password} |
secret |
range, end |
iterate list | {range .items[*]}[{.metadata.name}, {.status.capacity}] {end} |
[127.0.0.1, map[cpu:4]] [127.0.0.2, map[cpu:8]] |
'' |
quote interpreted string | {range .items[*]}{.metadata.name}{'\t'}{end} |
127.0.0.1 127.0.0.2 |
\ |
escape termination character | {.items[0].metadata.labels.kubernetes\.io/hostname} |
127.0.0.1 |
Examples using kubectl and JSONPath expressions:
kubectl get pods -o json
kubectl get pods -o=jsonpath='{@}'
kubectl get pods -o=jsonpath='{.items[0]}'
kubectl get pods -o=jsonpath='{.items[0].metadata.name}'
kubectl get pods -o=jsonpath="{.items[*]['metadata.name', 'status.capacity']}"
kubectl get pods -o=jsonpath='{range .items[*]}{.metadata.name}{"\t"}{.status.startTime}{"\n"}{end}'
kubectl get pods -o=jsonpath='{.items[0].metadata.labels.kubernetes\.io/hostname}'
yq
examples
# Read a value
yq '.a.b[0].c' file.yaml

# Pipe from STDIN
yq '.a.b[0].c' < file.yaml

# Update a yaml file, in place
yq -i '.a.b[0].c = "cool"' file.yaml

# Find and update an item in an array
yq '(.[] | select(.name == "foo") | .address) = "12 cat st"'
- jq
- tr
- truncate
- crictl
- cut
awk
常规使用
组装命令并执行
kubectl get svc | awk '{cmd="kubectl get svc "$1" -oyaml";system(cmd)}'
- sed
- sha512sum
- podman(to build image)
日志查看
https://kubernetes.io/docs/concepts/cluster-administration/logging/#system-component-logs
对 kubelet 组件:journalctl -xefu kubelet
对以容器形式启动的 kubernetes 组件:在/var/log/pods下(当把kube-apiserver的yaml弄坏起不来之后,应该可以在这个目录下查看启动失败的原因)
group缩写问题
group为空时表示core group,此时的 gv 缩写只有 v,即
$ kubectl api-resources --api-group=''
NAME                     SHORTNAMES   APIVERSION   NAMESPACED   KIND
bindings                              v1           true         Binding
componentstatuses        cs           v1           false        ComponentStatus
configmaps               cm           v1           true         ConfigMap
endpoints                ep           v1           true         Endpoints
events                   ev           v1           true         Event
limitranges              limits       v1           true         LimitRange
namespaces               ns           v1           false        Namespace
nodes                    no           v1           false        Node
persistentvolumeclaims   pvc          v1           true         PersistentVolumeClaim
persistentvolumes        pv           v1           false        PersistentVolume
pods                     po           v1           true         Pod
podtemplates                          v1           true         PodTemplate
replicationcontrollers   rc           v1           true         ReplicationController
resourcequotas           quota        v1           true         ResourceQuota
secrets                               v1           true         Secret
serviceaccounts          sa           v1           true         ServiceAccount
services                 svc          v1           true         Service
常见的控制器资源基本属于apps group
NAME                  SHORTNAMES   APIVERSION   NAMESPACED   KIND
controllerrevisions                apps/v1      true         ControllerRevision
daemonsets            ds           apps/v1      true         DaemonSet
deployments           deploy       apps/v1      true         Deployment
replicasets           rs           apps/v1      true         ReplicaSet
statefulsets          sts          apps/v1      true         StatefulSet
常见的几种需要填充group的地方
rbac
role.rules.apiGroups 只需要填写group
audit policy
rules.resources.group 只需要填写group
做题方法论
客观局限
- 网络卡顿,导致做题时及其不流畅;
- 题量大,总共有
16道题,需要在120分钟内完成,完成一道题的平局时间应该120/16=7分钟;
主观局限
- 对安全相关的操作不熟练;
- 无做题策略,选择按顺序,从头做到尾;
- 开始做题前,未对该题进行自我评估,不确定能否短时间内搞定,做了一半,发现搞不定,非常浪费时间;
改进措施
- 改用香港/澳门移动网络漫游来做题(如果这次还是考不过,有网络卡顿的原因,下次得肉身跑到香港去了23333);
- 及格分数需要
67,粗略估计取得证书,需要做完67/(100/16)=11道题,可以允许5道题不做,但每题的平均用时为10分钟多一点。 - 做题步骤
- 花
1分钟浏览全题,理解题意,并评估是否有把握能完成; - 没把握的用flag标记,跳过,下一题;
- 优先去做的题目类型
- audit policy
- apparmor
- pod security standard
- runtime class
- image policy webhook
- trivy & kube-bench
- rbac & opa
- secret
- security context
主题
RBAC
Reference: https://kubernetes.io/docs/reference/access-authn-authz/rbac/
创建sa、role、rolebinding
kubectl create sa shs-sa
kubectl create role shs-role --resource=pods,secrets --verb=*
kubectl create rolebinding shs-rolebinding --role=shs-role --serviceaccount=default:shs-sa
使用该ServiceAccount
kubectl patch -p '{"spec":{"template":{"spec":{"serviceAccountName":"shs-saax","serviceAccount":"shs-saax"}}}}' deployment shs-dep
Tips:
- 如果sa异常(如:不存在),则deployment的pod不会建出来,因为rs控制器已经检测到了异常,所以未建pod。
deploy.spec.template.spec.serviceAccount与deploy.spec.template.spec.serviceAccountName都需要修改。
NetworkPolicy
Pod Isolation
- Egress, outbound connection from pod, non-isolated by default. If NetworkPolicy selects this pod and was
Egresstype, then only out connections mentioned in it allowed. If lots of NetworkPolicy select the same pod, then all connections mentoined in those list are allowed. Additive. - Ingress, inbound connection to pod, non-isolated by default. Effects are as the same as Egress. Only connections mentioned by NetworkPolicy can connect to this Pod successfully. Examples
apiVersion: networking.k8s.io/v1
kind: NetworkPolicy
metadata:
  name: test-network-policy
  namespace: default
spec:
  # Indicates which pods this NetworkPolicy will apply to, selecting by pod's label
  # podSelector: {} indicates this NetworkPolicy apply to all pods in default ns.
  podSelector:
    matchLabels:
      role: db
  policyTypes:
    - Ingress
    - Egress
  # Defines which pod can connect to this pod.
  ingress:
  # both `from` and `port` rules are satitisfied, then allowed
    - from:
        # 1. IP CIDR, connections from pod whose IP in this CIDR are allowd to connect
        - ipBlock:
            cidr: 172.17.0.0/16
            except:
              - 172.17.1.0/24
        # 2. Namespace, connection from pod whose namespace has following labels are allowed to connect
        - namespaceSelector:
            matchLabels:
              project: myproject
        # 3. Pod, connections from pod which has following labels are allowed to connect
        - podSelector:
            matchLabels:
              role: frontend
     # Based on `from`, if the target port of those connection was 6379 and protocl was TCP, allowed.
      ports:
        - protocol: TCP
          port: 6379
  # Defines which pod can be connected by this pod
  # both `to` and `port` rules are satitisfied, then allowed
  egress:
    - to:
       # 1. Connections from this pod can connect to this CIDR
        - ipBlock:
            cidr: 10.0.0.0/24
      # Based on `to`, if the target port and protocol of this connection was 5978 and TCP, allowed.
      ports:
        - protocol: TCP
          port: 5978
parameters of to and from was the same, as follows(irrelevant informations are omitted):
$ kubectl explain networkpolicy.spec.ingress
  from	<[]NetworkPolicyPeer>
  ports	<[]NetworkPolicyPort>
$ kubectl explain networkpolicy.spec.egress
   to	 <[]NetworkPolicyPeer>
   ports <[]NetworkPolicyPort>
details of NetworkPolicyPeer are as follows:
$ kubectl explain networkpolicy.spec.egress.to
  ipBlock	<IPBlock>
  namespaceSelector	<LabelSelector>
  podSelector	<LabelSelector>
As for details of IPBlock and LabelSelector, just kubectl explain before coding yamls.
Tips
NetworkPolicywas namespaced, and only works in the namespace to which it belongs.NetworkPolicycan define only allowed rules.NetworkPolicyselects pod by labels only.
Default network policy
Deny all in & out bound traffics for a pod
apiVersion: networking.k8s.io/v1
kind: NetworkPolicy
metadata:
  name: default-deny-all
spec:
  podSelector: {}
  policyTypes:
  - Ingress
  - Egress
The OPA(Open Policy Agent) Gatekeeper
Ref: https://kubernetes.io/blog/2019/08/06/opa-gatekeeper-policy-and-governance-for-kubernetes
gatekeeper admission controller 拦截所有资源的创建、更新、删除请求,并针对相关资源,做所配置的校验。
定义校验模板
apiVersion: templates.gatekeeper.sh/v1beta1
kind: ConstraintTemplate
metadata:
  name: k8srequiredlabels
spec:
  crd:
    spec:
      names:
        kind: K8sRequiredLabels
        listKind: K8sRequiredLabelsList
        plural: k8srequiredlabels
        singular: k8srequiredlabels
      validation:
        # Schema for the `parameters` field
        openAPIV3Schema:
          properties:
            labels:
              type: array
              items: string
  targets:
    - target: admission.k8s.gatekeeper.sh
      rego: |
        package k8srequiredlabels

        deny[{"msg": msg, "details": {"missing_labels": missing}}] {
          provided := {label | input.review.object.metadata.labels[label]}
          required := {label | label := input.parameters.labels[_]}
          missing := required - provided
          count(missing) > 0
          msg := sprintf("you must provide labels: %v", [missing])
        }
创建具体约束
每个命名空间都需要一个标签hr
apiVersion: constraints.gatekeeper.sh/v1beta1
kind: K8sRequiredLabels
metadata:
  name: ns-must-have-hr
spec:
  match:
    kinds:
      - apiGroups: [""]
        kinds: ["Namespace"]
  parameters:
    labels: ["hr"]
审计
Gatekeeper stores audit results as violations listed in the status field of the relevant Constraint.
apiVersion: constraints.gatekeeper.sh/v1beta1
kind: K8sRequiredLabels
metadata:
  name: ns-must-have-hr
spec:
  match:
    kinds:
      - apiGroups: [""]
        kinds: ["Namespace"]
  parameters:
    labels: ["hr"]
status:
  #...
  violations:
  - enforcementAction: deny
    kind: Namespace
    message: 'you must provide labels: {"hr"}'
    name: default
  - enforcementAction: deny
    kind: Namespace
    message: 'you must provide labels: {"hr"}'
    name: gatekeeper-system
  - enforcementAction: deny
    kind: Namespace
    message: 'you must provide labels: {"hr"}'
    name: kube-public
  - enforcementAction: deny
    kind: Namespace
    message: 'you must provide labels: {"hr"}'
    name: kube-system
Apparmor
https://kubernetes.io/docs/tutorials/security/apparmor/
Confine programs or containers to limited set of resources, such as Linux capabilities, network access, file permissions, etc.
Works in 2 Modes
- enforcing, blocks access
- complain, only reports invalid access
Prerequisites
- works on kubernetes v1.4 +
- AppArmor kernel moduls enabled
- Container Runtime supports AppArmor
- Profile is loaded by kernel
Usage
Add annotations to pod which needed to be secured with key, name of container in Pod should be referred in key:
container.apparmor.security.beta.kubernetes.io/<container_name>: <profile_ref>
container.apparmor.security.beta.kubernetes.io/<container_name>: <profile_ref>
The profile_ref can be one of:
runtime/defaultto apply the runtime's default profilelocalhost/<profile_name>to apply the profile loaded on the host with the name<profile_name>unconfinedto indicate that no profiles will be loaded
Works
- View Pod Events
kubectl exec <pod_name> -- cat /proc/1/attr/current
Helpful commands
- Show AppArmor Status
$ apparmor_status
- Load Profile to kernel
$ apparmor_parser /etc/apparmor.d/nginx_apparmor
$ sudo apparmor_parser -q <<EOF
#include <tunables/global>

profile k8s-apparmor-example-deny-write flags=(attach_disconnected) {
  #include <abstractions/base>

  file,

  # Deny all file writes.
  deny /** w,
}
EOF
Audit Policy
Reference: https://kubernetes.io/docs/reference/config-api/apiserver-audit.v1/#audit-k8s-io-v1-Policy
Stage
RequestReceived- Before handled by handler chainResponseStarted- After response header sent, but before response body sentResponseComplete- After response body sentPanic- After panic occurred.
Audit Level
None- don't log events that match this ruleMetadata- log request metadata only(user, timestamp,resource,vert) but not request or response body.Request- log event metadata plus request bodyRequestResponse- log event metadata plus request, response bodies.
Example
apiVersion: audit.k8s.io/v1
kind: Policy
omitStages:
- ResponseStarted
- ResponseComplete
- Panic
rules:
- level: Metadata
  resources:
  - group: ""
    resources: ["pods"]
Configure it to kube-apiserver, see audit log.
Tips
If the Policy doesn't work as expected, check kube-apiserver logs as below, make sure the Policy was loaded successfully. Since it seems to load a default AuditPolicy when failled to load the AuditPolicy passed in parameters of kube-apiserver. Logs are as below:
W0122 16:00:29.139016 1 reader.go:81] Audit policy contains errors, falling back to lenient decoding: strict decoding error: unknown field "rules[0].resources[0].resource"
Pod Security Standard
Reference
- https://kubernetes.io/docs/concepts/security/pod-security-standards
- https://kubernetes.io/docs/concepts/security/pod-security-admission
Policies
The Pod Security Standards define three different policies to broadly cover the security spectrum. These policies are cumulative and range from highly-permissive to highly-restrictive. This guide outlines the requirements of each policy.
3种策略,每种策略只是定义了检查、校验哪些字段、即校验范围。此3种策略,从上至下,校验范围依次增大。具体校验内容,可参考文档。
| Profile | Description |
|---|---|
| Privileged | Unrestricted policy, providing the widest possible level of permissions. This policy allows for known privilege escalations. |
| Baseline | Minimally restrictive policy which prevents known privilege escalations. Allows the default (minimally specified) Pod configuration. |
| Restricted | Heavily restricted policy, following current Pod hardening best practices. |
Levels
有3种针对不符合上述3种Policy的处理方式,即强制要求(否则拒绝创建)、记录到审计日志中、用户可见警告。
| Mode | Description |
|---|---|
| enforce | Policy violations will cause the pod to be rejected. |
| audit | Policy violations will trigger the addition of an audit annotation to the event recorded in the audit log, but are otherwise allowed. |
| warn | Policy violations will trigger a user-facing warning, but are otherwise allowed. |
Usage
在命名空间上打标签
# The per-mode level label indicates which policy level to apply for the mode.
#
# MODE must be one of `enforce`, `audit`, or `warn`.
# LEVEL must be one of `privileged`, `baseline`, or `restricted`.
pod-security.kubernetes.io/<MODE>: <LEVEL>

# Optional: per-mode version label that can be used to pin the policy to the
# version that shipped with a given Kubernetes minor version (for example v1.29).
#
# MODE must be one of `enforce`, `audit`, or `warn`.
# VERSION must be a valid Kubernetes minor version, or `latest`.
pod-security.kubernetes.io/<MODE>-version: <VERSION>
SecurityContext
Reference: https://kubernetes.io/docs/tasks/configure-pod-container/security-context/
总共有两个安全配置的地方,位置分别为
pod.spec.securityContext属于PodSecurityContext这个结构体,表示pod中所有的容器都使用这个配置;pod.spec["initContainers","containers"].securityContext属于SecurityContext这个结构体,只限于当前容器使用此配置,且优先级高于上面的配置。
上述两种不同位置的安全配置中,有的字段是重复的,SecurityContext 的优先级更高。两者之间值的差异(都存在的字段已加粗):
| PodSecurityContext | SecurityContext |
|---|---|
| fsGroup | allowPrivilegeEscalation |
| fsGroupChangePolicy | capabilities |
| runAsGroup | privileged |
| runAsNonRoot | procMount |
| runAsUser | readOnlyRootFilesystem |
| seLinuxOptions | runAsGroup |
| seccompProfile | runAsNonRoot |
| supplementalGroups | runAsUser |
| sysctls | seLinuxOptions |
| windowsOptions | seccompProfile |
| windowsOptions |
来源:https://www.mrdadong.com/archives/cks-securitycontext
按照如下要求修改 sec-ns 命名空间里的 Deployment secdep
一、用 ID 为 30000 的用户启动容器(设置用户 ID 为: 30000 runAsUser)
二、不允许进程获得超出其父进程的特权(禁止 allowPrivilegeEscalation)
三、以只读方式加载容器的根文件系统(对根文件的只读权限readOnlyRootFilesystem)
注意点:
readOnlyRootFilesystem和allowPrivilegeEscalation只存在于SecurityContext中,因此需要为各个容器都配置上,需注意容器数量,避免漏配;runAsUser存在于PodSecurityContext和SecurityContext中,可只配PodSecurityContext
RuntimeClass
Reference: https://kubernetes.io/docs/concepts/containers/runtime-class/
- Create
RuntimeClass - Specify created
RuntimeClassinpod.spec.runtimeClassName
Secret
Reference: https://kubernetes.io/docs/concepts/configuration/secret
- Secret Type
- Mount to a pod
练手速【来源】
在 namespace istio-system 中获取名为 db1-test 的现有 secret 的内容。将 username 字段存储在名为 /cks/sec/user.txt 的文件中,并将 password 字段存储在名为 /cks/sec/pass.txt 的文件中。
注意:你必须创建以上两个文件,他们还不存在。
注意:不要在以下步骤中使用/修改先前创建的文件,如果需要,可以创建新的临时文件。
在istio-system namespace 中创建一个名为 db2-test 的新 secret,内容如下:
username : production-instance
password : KvLftKgs4aVH
- 最后,创建一个新的 Pod,它可以通过卷访问 secret
db2-test
Pod 名称 secret-pod
Namespace istio-system
容器名 dev-container
镜像 nginx
卷名 secret-volume
挂载路径 /etc/secret
ServiceAccount
Reference: https://kubernetes.io/docs/concepts/security/service-accounts/
- Prevent kubernetes from injecting credentials for a pod
$ kubectl explain sa.automountServiceAccountToken
$ kubectl explain pod.spec.automountServiceAccountToken
Set one of fields above to false to prevent auto injection for a pod.
Restrict access to SecretsSet annotation kubernetes.io/enforce-mountable-secrets to true for a ServiceAccount, then only secrets in the field of sa.secrets of this ServiceAccount was allowed to use in a pod, such as a secret volume, envFrom, imagePullSecrets.
How to use ServiceAccount to connect to apiserver? reference
curl --cacert /var/run/secrets/kubernetes.io/serviceaccount/ca.crt --header "Authorization: Bearer $(cat /var/run/secrets/kubernetes.io/serviceaccount/token)" -X GET https://kubernetes.default.svc/api/v1/namespaces/default/secrets
# or
curl -k -XGET --header "Authorization: Bearer $(cat /var/run/secrets/kubernetes.io/serviceaccount/token)"  https://kubernetes.default.svc/api/v1/namespaces/default/secrets
整个kubeAPIServer提供了三类API Resource接口:
- core group:主要在
/api/v1下; - named groups:其 path 为
/apis/$GROUP/$VERSION; - 系统状态的一些 API:如
/metrics、/version等;
而API的URL大致以 /apis/{group}/{version}/namespaces/{namespace}/{resources}/{name} 组成,结构如下图所示:
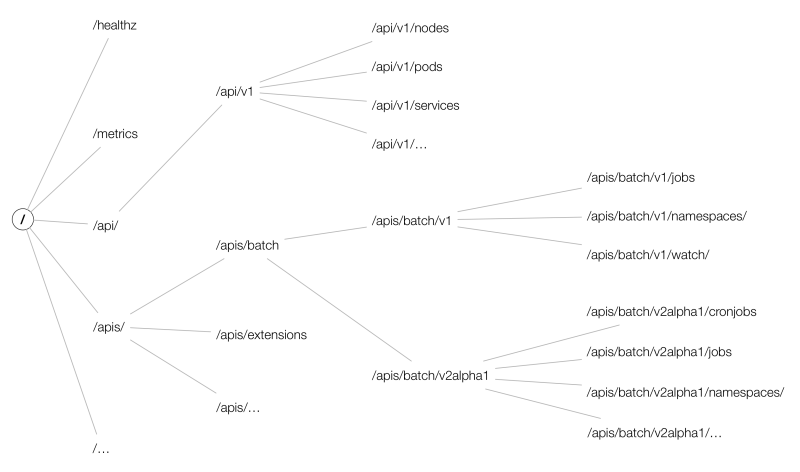
Tips:
在apiserver的URL中,资源需要用复数形式,如:
curl -k -H "Authorization: Bearer $(cat /run/secrets/kubernetes.io/serviceaccount/token)" \
https://kubernetes.default.svc/api/v1/namespaces/default/pods/shs-dep-b56c568d6-n8h6d
etcd
How to use etcdctl to get raw data from etcd?
ETCDCTL_API=3 etcdctl --cacert=/etc/kubernetes/pki/etcd/ca.crt \
--cert=/etc/kubernetes/pki/etcd/peer.crt \
--key=/etc/kubernetes/pki/etcd/peer.key \
get /registry/secrets/default -w=json | jq .
Upgrade kubernetes version
Follow these steps:
for master
k drain controller-planeapt-mark unhold kubeadmapt-mark hold kubelet kubectlapt update && apt upgrade -ykubeadm upgrade plankubeadm upgrade apply v1.2x.xkubeadm upgrade plan(for check purpose)apt-mark hold kubeadmapt-mark unhold kubelet kubectlapt install kubectl=1.2x.x kubelet=1.2x.xapt-mark hold kubelet kubectlsystemctl restart kubeletsystemctl status kubeletk uncordon controller-plane
for node
k drain nodeapt updateapt-mark unhold kubeadmapt-mark hold kubectl kubeletapt install kubeadm=1.2x.xkubeadm upgrade plankubeadm upgrade nodeapt-mark hold kubeadmapt-mark unhold kubectl kubeletapt install kubectl=1.2x.x kubelet=1.2x.xsystemctl restart kubeletsystemctl status kubeletk uncordon kubelet
check upgrade result
k get node
ImagePolicyWebhook
https://kubernetes.io/docs/reference/access-authn-authz/admission-controllers/#imagepolicywebhook
安全工具使用
kube-bench
A tool to detect potential security issues and give the specific means to solve the issue.
Reference:
# Simple way in a kubernetes cluster created by kubeadm
$ kubectl apply \
    -f https://raw.githubusercontent.com/aquasecurity/kube-bench/main/job.yaml
Contents Consists of the following topics:
- master
- etcd
- controlplane
- node
- policies
Each topic starts with a list of items which was checked with checked status, then a list of remediations to FAIL or WARN items given. You can fix those issues under the given instructions. At last, check summary of this topic.
Here is a output example for topic master
[WARN] 1.1.9 Ensure that the Container Network Interface file permissions are set to 600 or more restrictive (Manual)
[WARN] 1.1.10 Ensure that the Container Network Interface file ownership is set to root:root (Manual)

== Remediations master ==
1.1.9 Run the below command (based on the file location on your system) on the control plane node.
For example, chmod 600 <path/to/cni/files>
1.1.10 Run the below command (based on the file location on your system) on the control plane node.
For example,
chown root:root <path/to/cni/files>

== Summary master ==
38 checks PASS
9 checks FAIL
13 checks WARN
0 checks INFO
Full contexts can be touch by this link
trivy
Reference: https://github.com/aquasecurity/trivy
Scan a docker image
trivy image --severity LOW,MEDIUM ghcr.io/feiyudev/shs:latest
扫描某命名空间下所有pod所使用的镜像包含 HIGH, CRITICAL 类型漏洞,并删除该pod
k get pod -A -ojsonpath="{range .items[*]}{.spec['initContainers','containers'][*].image} {.metadata.name} {'#'} {end}" | sed 's|#|\n|g' | sed 's|^ ||g' | sed 's| $||g' | awk '{cmd="echo "$2"; trivy -q image "$1" --severity HIGH,CRITICAL | grep Total";system(cmd)}'
该命令的注意点:
jsonpathrangeawksystem(cmd)sedreplace
sysdig
Reference: https://github.com/draios/sysdig
Installation(Based on Ubuntu 22.04)
- Download
debfrom sysdig-release sudo dpkg -i sysdig-0.34.1-x86_64.debsudo apt -f install
Output format
%evt.num %evt.outputtime %evt.cpu %proc.name (%thread.tid) %evt.dir %evt.type %evt.info
173884 15:06:10.075401786 7 sudo (1453517.1453517) > read fd=9(<f>/dev/ptmx) size=65536
Notes:
evt.diraka event direction, < represents out, > represents in.evt.typeaka event type, perceiving it as a name of system call.
Chisels
predefined function sets based on sysdig events, to implements complex situation. Locates in /usr/share/sysdig/chisels on Linux machine.
What are those chisels?
- To see chisels.
sysdig -cl
# or
sysdig --list-chisels
- To use a chisel
# See HTTP log
sysdig -c httplog
2024-01-25 23:06:16.423272777 < method=GET url=:8080/health response_code=200 latency=0ms size=2B
2024-01-25 23:06:16.423299653 > method=GET url=:8080/health response_code=200 latency=0ms size=2B
# See CPU usage ranking
sysdig -c topprocs_cpu
CPU%                Process             PID
--------------------------------------------------------------------------------
8.01%               kube-apiserver      39124
3.00%               kubelet             25007
3.00%               etcd                1613
2.00%               sysdig              102489
2.00%               kube-controller     38957
2.00%               calico-node         4705
1.00%               containerd          874
1.00%               vmtoolsd            790
1.00%               kube-scheduler      39017
0.00%               svlogd              2505
- Advanced usage about a chisel
$ sysdig -i spy_file

Category: I/O
-------------
spy_file        Echo any read/write made by any process to all files. Optionall
                y, you can provide the name of one file to only intercept reads
                /writes to that file.

This chisel intercepts all reads and writes to all files. Instead of all files,
 you can limit interception to one file.
Args:
[string] read_or_write - Specify 'R' to capture only read event
                s; 'W' to capture only write events; 'RW' to capture read and w
                rite events. By default both read and write events are captured
                .
[string] spy_on_file_name - The name of the file which the chis
                el should spy on for all read and write activity.

$ sysdig -c spy_file "RW /root/spy_file_test.txt"
23:53:25.592303985 date(112109) W 32B /root/spy_file_test.txt
Thu Jan 25 11:53:25 PM HKT 2024

23:53:43.333152845 cat(112206) R 32B /root/spy_file_test.txt
Thu Jan 25 11:53:25 PM HKT 2024

23:53:43.333166670 cat(112206) R 0B /root/spy_file_test.txt NULL
23:53:51.856062624 date(112270) W 32B /root/spy_file_test.txt
Thu Jan 25 11:53:51 PM HKT 2024

23:53:56.965894638 cat(112307) R 64B /root/spy_file_test.txt
Thu Jan 25 11:53:25 PM HKT 2024
Thu Jan 25 11:53:51 PM HKT 2024

23:53:56.965902094 cat(112307) R 0B /root/spy_file_test.txt NULL
Usage
- Save events to a file
sysdig -w test.scap
- Read events from a file while analyzing (by chisels)
sysdig -r test.scap -c httptop
- Specify the format to be used when printing the events -p , --print= Specify the format to be used when printing the events. With -pc or -pcontainer will use a container-friendly format. With -pk or -pkubernetes will use a kubernetes-friendly format. With -pm or -pmesos will use a mesos-friendly format. See the examples section below for more info.
sysdig -r test.scap -c httptop -pc
- Specify the number of events Sysdig should capture by passing it the -n flag. Once Sysdig captures the specified number of events, it’ll automatically exit:
sysdig -n 5000 -w test.scap
- Use the -C flag to configure Sysdig so that it breaks the capture into smaller files of a specified size. The following example continuously saves events to files < 10MB:
sysdig -C 10 -w test.scap
- Specify the maximum number of files Sysdig should keep with the -W flag. For example, you can combine the -C and -W flags like so:
sysdig -C 10 -W 4 -w test.scap
- You can analyze the processes running in the WordPress container with:
sysdig -pc -c topprocs_cpu container.name=wordpress-sysdig_wordpress_1
- -M Stop collecting after reached.
Help
关于filter可用的字段,可以通过sysdig -l来查看所有支持的字段。例如查看容器相关的过滤字段,有:
ubuntu@primary:~$ sysdig -l | grep "^container."
container.id                  The truncated container ID (first 12 characters), e.g. 3ad7b26ded6d is extracted from the
container.full_id             The full container ID, e.g.
container.name                The container name. In instances of userspace container engine lookup delays, this field
container.image               The container image name (e.g. falcosecurity/falco:latest for docker). In instances of
container.image.id            The container image id (e.g. 6f7e2741b66b). In instances of userspace container engine
container.type                The container type, e.g. docker, cri-o, containerd etc.
container.privileged          'true' for containers running as privileged, 'false' otherwise. In instances of userspace
container.mounts              A space-separated list of mount information. Each item in the list has the format
container.mount               (ARG_REQUIRED) Information about a single mount, specified by number (e.g.
container.mount.source        (ARG_REQUIRED) The mount source, specified by number (e.g. container.mount.source[0]) or
container.mount.dest          (ARG_REQUIRED) The mount destination, specified by number (e.g. container.mount.dest[0])
container.mount.mode          (ARG_REQUIRED) The mount mode, specified by number (e.g. container.mount.mode[0]) or
container.mount.rdwr          (ARG_REQUIRED) The mount rdwr value, specified by number (e.g. container.mount.rdwr[0])
container.mount.propagation   (ARG_REQUIRED) The mount propagation value, specified by number (e.g.
container.image.repository    The container image repository (e.g. falcosecurity/falco). In instances of userspace
container.image.tag           The container image tag (e.g. stable, latest). In instances of userspace container engine
container.image.digest        The container image registry digest (e.g.
container.healthcheck         The container's health check. Will be the null value ("N/A") if no healthcheck
container.liveness_probe      The container's liveness probe. Will be the null value ("N/A") if no liveness probe
container.readiness_probe     The container's readiness probe. Will be the null value ("N/A") if no readiness probe
container.start_ts            Container start as epoch timestamp in nanoseconds based on proc.pidns_init_start_ts and
container.duration            Number of nanoseconds since container.start_ts.
container.ip                  The container's / pod's primary ip address as retrieved from the container engine. Only
container.cni.json            The container's / pod's CNI result field from the respective pod status info. It contains
可以看出,container.id只能取前12个字符,另外也可以用容器id的全名,即container.full_id。另外k8s可支持的字段有:
ubuntu@primary:~$ sysdig -l | grep "^k8s."
k8s.ns.name                   The Kubernetes namespace name. This field is extracted from the container runtime socket
k8s.pod.name                  The Kubernetes pod name. This field is extracted from the container runtime socket
k8s.pod.id                    [LEGACY] The Kubernetes pod UID, e.g. 3e41dc6b-08a8-44db-bc2a-3724b18ab19a. This legacy
k8s.pod.uid                   The Kubernetes pod UID, e.g. 3e41dc6b-08a8-44db-bc2a-3724b18ab19a. Note that the pod UID
k8s.pod.sandbox_id            The truncated Kubernetes pod sandbox ID (first 12 characters), e.g 63060edc2d3a. The
k8s.pod.full_sandbox_id       The full Kubernetes pod / sandbox ID, e.g
k8s.pod.label                 (ARG_REQUIRED) The Kubernetes pod label. The label can be accessed either with the
k8s.pod.labels                The Kubernetes pod comma-separated key/value labels. E.g. 'foo1:bar1,foo2:bar2'. This
k8s.pod.ip                    The Kubernetes pod ip, same as container.ip field as each container in a pod shares the
k8s.pod.cni.json              The Kubernetes pod CNI result field from the respective pod status info, same as
Traps
此处有坑
使用container.id过滤时,注意id的长度需要为12,不然数据出不来。通过crictl ps看到的container id是13位的,使用sysdig时,需要注意长度。
ubuntu@primary:~$ crictl ps | grep -v ^C | awk '{print $1,$2,$6,$7}'
0fd88042f1ddf 848c5b919e8d3 Running calico-apiserver
ad81cac0dbf9e 848c5b919e8d3 Running calico-apiserver
f6d6b81c75f69 4e87edec0297d Running calico-kube-controllers
87c4fbddeb123 d36ef67f7b24c Running csi-node-driver-registrar
46095b3ea4bf6 91c1c91da7602 Running calico-csi
51e65353815dc cbb01a7bd410d Running coredns
7fc6f4ad4aafa cbb01a7bd410d Running coredns
de42d610f5530 1843802b91be8 Running calico-node
21ae9adf53e47 b33768e0da1f8 Running calico-typha
a2f7701ceae6c 7bc79e0d3be4f Running tigera-operator
d91edc95d2edf 9344fce2372f8 Running kube-proxy
5f7d85179ade0 6fc5e6b7218c7 Running kube-scheduler
d40dd28cc171c 138fb5a3a2e34 Running kube-controller-manager
c71d33c5aea6e 8a9000f98a528 Running kube-apiserver
0cdeff9542f15 a0eed15eed449 Running etcd
falco
Reference: https://falco.org/docs
strace
监控进程的系统调用和信号量,基础的使用方式
- 监听某个已存在的进程
strace -p <pid> - 直接启动一个二进制
strace <binary-name> - 对输出结果进行过滤
strace -e trace=file
考试说明书
Handbook of CKS exam
Requirments of your computer, microphone, camera, speaker, etc.
Don't use headphone, earbuds.
- [PSI Bridge FAQ] System Requirements
- System Requirements to take the exam
- Browser recommand Google Chrome
Exam Details
Online tests, 15-20 performance-based tasks, 2 hours to complete the tasks.
Don't cheat, audio,camera,screen capture of the test will be reviewed.
