Iterator、Iterable、ListIterator与ArrayList
Iterable从前文的继承关系图来看,Collection继承自Iterable。其接口详情如下:实现这个接口,就可以使用"for-each"循环来遍历其中的元素. 参考For-each Loop.// 此处返回一个Iterator,以遍历集合public Iterator&l
Iterable
从前文的继承关系图来看,Collection继承自Iterable。其接口详情如下:
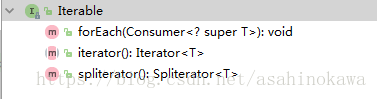
实现这个接口,就可以使用"for-each"循环来遍历其中的元素. 参考For-each Loop.
// 此处返回一个Iterator,以遍历集合
public Iterator<E> iterator() {
    return new Itr();// 此处的Itr请看后续解析
}
// 顾名思义,对每个元素都执行相应的操作action
public void forEach(Consumer<? super E> action) {
    Objects.requireNonNull(action);//判空
    final int expectedModCount = modCount;//遍历时,不能对size更改,详细说明见下面说明
    @SuppressWarnings("unchecked")
    final E[] elementData = (E[]) this.elementData;//获取所有元素
    final int size = this.size;
    for (int i=0; modCount == expectedModCount && i < size; i++) {
        action.accept(elementData[i]);//对每个元素执行相应的操作
    }
    if (modCount != expectedModCount) {// modCount终于派上用场
        throw new ConcurrentModificationException();
    }
}
对于其中的modCount,它记录的是这个list被结构性改变的次数。结构性修改是指那些改变了list的size的操作。这段代码恰好解释了其的作用,如果遍历的过程中,修改了list导致size变化了,那么将会引起modCount的改变,所以此时会造成modCount != expectedModCount成立,即抛出异常。
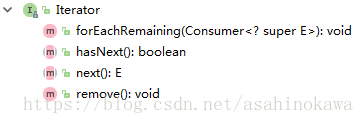
Iterator
上文中的Itr便实现了Iterator这个接口,这个接口的详情如下:
Itr的具体实现如下:
private class Itr implements Iterator<E> {
    int cursor;       // 下一个元素的位置,可能会越界
    int lastRet = -1; // 上一个返回了的元素的位置
    int expectedModCount = modCount;// 获取初始化此类时的modCount值

    public boolean hasNext() {
        return cursor != size;// cursor的最大值貌似只会到达size
    }

    @SuppressWarnings("unchecked")
    public E next() {
        checkForComodification();
        int i = cursor;//获取下一个元素的位置
        if (i >= size)
            throw new NoSuchElementException();
        // 获取存有所有元素的数组
        Object[] elementData = ArrayList.this.elementData;
        if (i >= elementData.length)
            throw new ConcurrentModificationException();
        cursor = i + 1;// 指向下一个
        return (E) elementData[lastRet = i];// 获取元素
    }

    public void remove() {
        if (lastRet < 0)
            throw new IllegalStateException();
        checkForComodification();

        try {
            ArrayList.this.remove(lastRet);// 调用ArrayList的方法删除
            cursor = lastRet;// 删除lastRet项后,元素前移,游标指向该项。
            lastRet = -1;// 指向-1
            expectedModCount = modCount;// 同步条件
        } catch (IndexOutOfBoundsException ex) {
            throw new ConcurrentModificationException();
        }
    }

    @Override @SuppressWarnings("unchecked")
    public void forEachRemaining(Consumer<? super E> consumer) {
        Objects.requireNonNull(consumer);
        final int size = ArrayList.this.size;
        int i = cursor;
        if (i >= size) {
            return;
        }
        final Object[] elementData = ArrayList.this.elementData;
        if (i >= elementData.length) {
            throw new ConcurrentModificationException();
        }
        while (i != size && modCount == expectedModCount) {
            consumer.accept((E) elementData[i++]);// 对每个元素执行相应的动作。
        }
        cursor = i;
        lastRet = i - 1;
        checkForComodification();
    }
	// 检查在遍历期间,是否被修改。
    final void checkForComodification() {
        if (modCount != expectedModCount)
            throw new ConcurrentModificationException();
    }
}
因此,使用Iterator遍历,是一个单向的遍历过程,且在过程中不能进行修改size的操作,否者会报错。一些错误的示例代码如下:
cursor==size时继续执行next()
public static void main(String[] args) {
	ArrayList<String> list = new ArrayList<>(Arrays.asList("Hello", "world"));
	Iterator it = list.iterator();
	it.next();
	it.next();
	// 此时cursor等于size,再执行next()操作会触发异常
	it.next();
}
------
Exception in thread "main" java.util.NoSuchElementException
	at java.util.ArrayList$Itr.next(ArrayList.java:854)
	at Main.main(Main.java:10)
- 遍历过程中执行改变
size的操作
public static void main(String[] args) {
	ArrayList<String> list = new ArrayList<>(Arrays.asList("Hello", "world"));
	Iterator it = list.iterator();
	it.next();
	list.add("too young");// 会导致modCount++
	it.next();// modCount与expectedModCount不一致,抛异常
}
------
Exception in thread "main" java.util.ConcurrentModificationException
at java.util.ArrayList$Itr.checkForComodification(ArrayList.java:901)
at java.util.ArrayList$Itr.next(ArrayList.java:851)
at Main.main(Main.java:9)
- 关于
forEach()的使用 使用Iterato时,可以使用其中的forEachRemaining(),效果类似,只是对象是后续剩下的元素。
public static void main(String[] args) {
	ArrayList<String> list = new ArrayList<>(Arrays.asList("Hello", "world"));
	list.forEach(System.out::println);
	list.forEach(item->{
	    System.out.println("for each : "+item);
    });
}
------
Hello
world
for each : Hello
for each : world
ListIterator
简易的继承关系图、接口主要方法如下图所示:

之前并没有使用过ListIterator,但是在看Itr时,看到了这个实现,还是挺想知道这是干什么的。 获取ListIterator的方式如下:
public ListIterator<E> listIterator(int index) {
    if (index < 0 || index > size)
        throw new IndexOutOfBoundsException("Index: "+index);
    return new ListItr(index);
}
public ListIterator<E> listIterator() {
    return new ListItr(0);
}
其实现的源码如下:
// 继承自Itr,实现了ListIterator接口
private class ListItr extends Itr implements ListIterator<E> {
    ListItr(int index) {
        super();
        cursor = index;// 指定cursor
    }
    public boolean hasPrevious() {
        return cursor != 0;// cursor为0时,没有前驱
    }

    public int nextIndex() {
        return cursor;// cursor就是下一个元素的下标
    }
    public int previousIndex() {
        return cursor - 1;//
    }
    @SuppressWarnings("unchecked")
    public E previous() {// 移动cursor向前,调整遍历的方向,并返回前一个元素。这是Itr中未实现的功能
        checkForComodification();
        int i = cursor - 1;
        if (i < 0)
            throw new NoSuchElementException();
        Object[] elementData = ArrayList.this.elementData;
        if (i >= elementData.length)
            throw new ConcurrentModificationException();
        cursor = i;
        return (E) elementData[lastRet = i];
    }
	// 将最后一个返回的元素替换成e
    public void set(E e) {
        if (lastRet < 0)
            throw new IllegalStateException();
        checkForComodification();
		// 调用ArrayList的set方法
        try {
            ArrayList.this.set(lastRet, e);
        } catch (IndexOutOfBoundsException ex) {
            throw new ConcurrentModificationException();
        }
    }
	// 添加元素到当前游标的位置
    public void add(E e) {
        checkForComodification();
        try {
            int i = cursor;// 位置为当前cursor
            ArrayList.this.add(i, e);// 调用ArrayList的add方法
            cursor = i + 1;
            lastRet = -1;
            expectedModCount = modCount;// 修改条件
        } catch (IndexOutOfBoundsException ex) {
            throw new ConcurrentModificationException();
        }
    }
}
