折腾自建博客系列
今年年初由 wordpress 迁移到 halo,主要是觉得懂点 Java,有什么定制化的需求,自己改代码会方便一些。但是也没有什么特别的需求需要定制,反而被这种东西折腾得忘记了写博客的初心。技术博客就应该简简单单,只写技术,博客怎么好看、怎么炫酷,都不重要。配置说明&前置条件在 Halo
从CSDN迁移到Github Pages
打算将CSDN上的博客迁移到GitHub Pages上去,怕有一天所有的博客都不见了的时候,自己会有一个备份. 其中,上传到CSDN网站上的图片,是必须要自己有一个备份的。所以,便有了这一篇记录博客。
了解Scrapy
Scrapy是一个Python包,是一个爬取网页的框架。顾名思义,可以理解成Java中的抽象类。它负责流程性的逻辑,我们自己编写具体的处理逻辑。经过此次的使用,发现它确实是一个比较厉害的框架。首先,在爬取网页的过程中,你可能会遇到的问题,网上都有相应的解答;其次,我们只需要编写处理网页的逻辑和小的流程逻辑,这样我们可以更加专注爬取这件事本身,而不用关注使用什么技术来怎么爬。
简易使用
网上的使用方法很多,这里只写一些关键性的步骤以及自己遇到的问题、解决办法。
初始化项目:scrapy startproject CSDNBlogMover
各个文件及目录的作用:
items.py
# 定义所需数据的属性,比如说,想爬取每一篇文章,此文件中则定义一些文章属性,如下:
class CsdnblogmoverItem(scrapy.Item):
    # define the fields for your item here like:
    # name = scrapy.Field()
    link = scrapy.Field()
    title = scrapy.Field()
    time = scrapy.Field()
    tags = scrapy.Field()
    categories = scrapy.Field()
    content = scrapy.Field()
    comments = scrapy.Field()
pipelines.py
# 此文件可以理解成在某些关键时候,所要执行的操作,比如打开、关闭、处理爬虫这3个关键时候,与Android中Activity的生命周期类似
class CsdnblogmoverPipeline(object):
    def open_spider(self, spider):
        self.myconn = mysql_connection()

    def close_spider(self, spider):
        self.myconn.conn.close()

    def process_item(self, item, spider):
        self.myconn.reconnect()
        sql = 'INSERT INTO wp_posts(post_author, post_excerpt, to_ping, pinged, post_content_filtered, post_date, post_date_gmt, post_content, post_title, post_modified, post_modified_gmt) VALUES (1, " "," ", " ", "", %s, %s, %s, %s, %s, %s)'
        vars = (get_uniformed_datetime(item['time'], DATE_FORMAT_CN), get_gmt_datetime(item['time'], DATE_FORMAT_CN), '<!-- wp:html -->\n'+item['content'] + item['comments'] + '\n<!-- /wp:html -->', item['title'], get_now_datetime(), get_gmt_datetime(get_now_datetime()))
        self.myconn.cursor.execute(sql, vars)

        self.myconn.conn.commit()
        print(item)
        return item
middlewares.py
这个文件的作用在此次爬取博客中未使用到,但是也了解了部分内容,其实就是可以在这里面加上selenium,来处理动态加载的数据。
settings.py
这是一个配置类,里面有很多项,并且都有相应的注释,可以仔细看看。
BOT_NAME = 'CSDNBlogMover'

SPIDER_MODULES = ['CSDNBlogMover.spiders']
NEWSPIDER_MODULE = 'CSDNBlogMover.spiders'
FEED_EXPORT_ENCODING = 'utf-8'

ROBOTSTXT_OBEY = True

ITEM_PIPELINES = {
   'CSDNBlogMover.pipelines.CsdnblogmoverPipeline': 300,
}
爬取的关键:spiders/CSDNBlogSpider.py
import json
import math

import scrapy

# 需要更换相应的Cookie,来确定你对此博客的拥有权,否则会抓取失败。
# 直接从浏览器的开发者工具中,打开编辑器时,所发出的请求的Cookie即可
raw_cookie = 'xxx'
items = raw_cookie.split('; ')
cookies = {}
for item in items:
    kv = item.split('=')
    cookies[kv[0]] = kv[1]

print(cookies)

class CSDNBlogSpider(scrapy.Spider):
    # 名字,用来使用scrapy crawl csdn_spider来调用此爬虫
    name = 'csdn_spider'
    # 限定爬取的域名,如果域名不为此,则会爬取失败
    allowed_domains = ['blog.csdn.net', 'mp.csdn.net']
    author = ''

    def __init__(self):
        # self.browser = webdriver.Chrome()
        # self.browser.set_page_load_timeout(30)
        pass

    def closed(self, spider):
        print("spider closed")

    # 爬虫入口
    def start_requests(self):
        urls = [
            'https://blog.csdn.net/asahinokawa'
        ]
        for url in urls:
            self.author = url.split('/')[-1]
            # 返回一个Request,并指明:当请求发送成功,收到响应后,执行self.parse()回调
            yield scrapy.Request(url=url, callback=self.parse)

    # 只负责爬取页数
    def parse(self, response):
        # 获取总博客数
        total_blog_cnt = response.xpath(
            '//*[@id="mainBox"]/aside/div[@id="asideProfile"]/div[2]/dl[1]/dd/a/span/text()').get()
        if total_blog_cnt is None or total_blog_cnt == '':
            raise Exception('total blog number parse error')
        else:
            total_blog_cnt = int(total_blog_cnt)
        # 获取第1页的博客总数
        if response.status == 200:
            links = response.xpath('//*[@id="mainBox"]/main/div[2]/div[@data-articleid]/h4/a/@href')
            raw_links = []
            for link in links:
                if link.get().__contains__(self.author):
                    # yield scrapy.Request(link.get(), callback=self.parse_content)
                    raw_links.append(link.get())
                else:
                    print('%s not belong to author %s' % (link, self.author))
            # 获取第1页博客数量
            first_page_blog_cnt = len(raw_links)

            if first_page_blog_cnt <= total_blog_cnt:  # 不止一页
                # 通过总页数与第一页页数,来计算总共有多少页
                pages = int(math.ceil(total_blog_cnt / first_page_blog_cnt)) + 1
                for idx in range(1, int(pages)):
                    page_url = '%s/article/list/%d' % (response.url, idx)
                    print(page_url)
                    # 返回爬取某页页面的请求
                    yield scrapy.Request(url=page_url, callback=self.parse_page)
            else:
                self.parse_page(self, response)
        else:
            print('对CSDN主页访问的响应异常,请检查URL')
    # 爬取某页页面的请求
    def parse_page(self, response):
        if response.status == 200:
            links = response.xpath('//*[@id="mainBox"]/main/div[2]/div[@data-articleid]/h4/a/@href')
            # 依次遍历所有的博客请求,并第每一个博客链接(即所有文章),进行文章页面爬取
            for link in links:
                # 包含作者
                if link.get().__contains__(self.author):
                    yield scrapy.Request(url=link.get(), callback=self.parse_content)
                else:
                    print('%s not belong to author %s, skipped' % (link.get(), self.author))
        else:
            print('对CSDN中某页访问出错')

    # 爬取页面
    @staticmethod
    def parse_content(self, response):
        if response.status == 200:
            data =  {
                'link': response.url,
                'title': response.xpath(
                    '//*[@id="mainBox"]/main/div[@class="blog-content-box"]/div[@class="article-header-box"]/div[@class="article-header"]/div[@class="article-title-box"]/h1/text()').get(),
                # //*[@id="mainBox"]/main/div[1]/div/div/div[2]/div[1]/span[1]
                'time': response.xpath(
                    '//*[@id="mainBox"]/main/div[@class="blog-content-box"]/div[@class="article-header-box"]/div[@class="article-header"]/div[@class="article-info-box"]/div[@class="article-bar-top"]/span[@class="time"]/text()').get(),
                # //*[@id="mainBox"]/main/div[1]/div/div/div[2]/div[1]/span[3]/a
                'tags': response.xpath(
                    '//*[@id="mainBox"]/main/div[@class="blog-content-box"]/div[@class="article-header-box"]/div[@class="article-header"]/div[@class="article-info-box"]/div[@class="article-bar-top"]/span[@class="tags-box artic-tag-box"]/a/text()').get(),
                # //*[@id="mainBox"]/main/div[1]/div/div/div[2]/div[1]/div/a
                'categories': response.xpath(
                    '//*[@id="mainBox"]/main/div[@class="blog-content-box"]/div[@class="article-header-box"]/div[@class="article-header"]/div[@class="article-info-box"]/div[@class="article-bar-top"]/div[@class="tags-box space"]/a/text()').get(),
                # //*[@id="mainBox"]/main/div[1]/article
                # class="blog-content-box"
                'content': response.xpath('//*[@id="mainBox"]/main/div[@class="blog-content-box"]/article').get(),
                # //*[@id="mainBox"]/main/div[3]/div[2]
                'comments': response.xpath(
                    '//*[@id="mainBox"]/main/div[@class="comment-box"]/div[@class="comment-list-container"]').get()
            }
            # 获取markdown文档
            mark_down_url = 'https://mp.csdn.net/mdeditor/getArticle?id=' + str(response.url.split('/')[-1])
            yield scrapy.Request(url=mark_down_url,
                                 callback=self.get_markdown_content,
                                 meta=data,
                                 # Headers模拟浏览器的头部
                                 headers={
                                     'accept-encoding': 'gzip, deflate, br',
                                     'accept': '*/*',
                                     'accept-language': 'zh,en;q=0.9,ja;q=0.8,zh-TW;q=0.7,fr;q=0.6,zh-CN;q=0.5',
                                     'user-agent': 'Mozilla/5.0 (Windows NT 10.0; Win64; x64) AppleWebKit/537.36 (KHTML, like Gecko) Chrome/73.0.3683.103 Safari/537.36',
                                 },
                                 # 需要更换相应的Cookie,来确定你对此博客的拥有权,否则会抓取失败
                                 cookies=cookies)
        else:
            print('对CSDN中某篇文章访问出错')
    # 接收markdown内容,并作为Item的属性
    @staticmethod
    def get_markdown_content(response):
        content = json.loads(response.body_as_unicode())
        data = content['data']
        if 'markdowncontent' in data:
            content = data['markdowncontent']
            # print('$$$$ == ' + content)
            response.meta['content'] = content
            response.meta['tags'] = data['tags']
            response.meta['categories'] = data['categories']
            # 此处返回的是一个完整的Item
            return response.meta
        else:
            print('获取失败 : '+response.meta['link'])
关键性的API获取
在上面的处理中,对于Hexo来说,最为关键的API是获取markdown的API,这里记录一下发现的过程。此处要求原文是markdown格式,否则得到的markdown数据为空。
第一步、在登录状态下,点开编辑
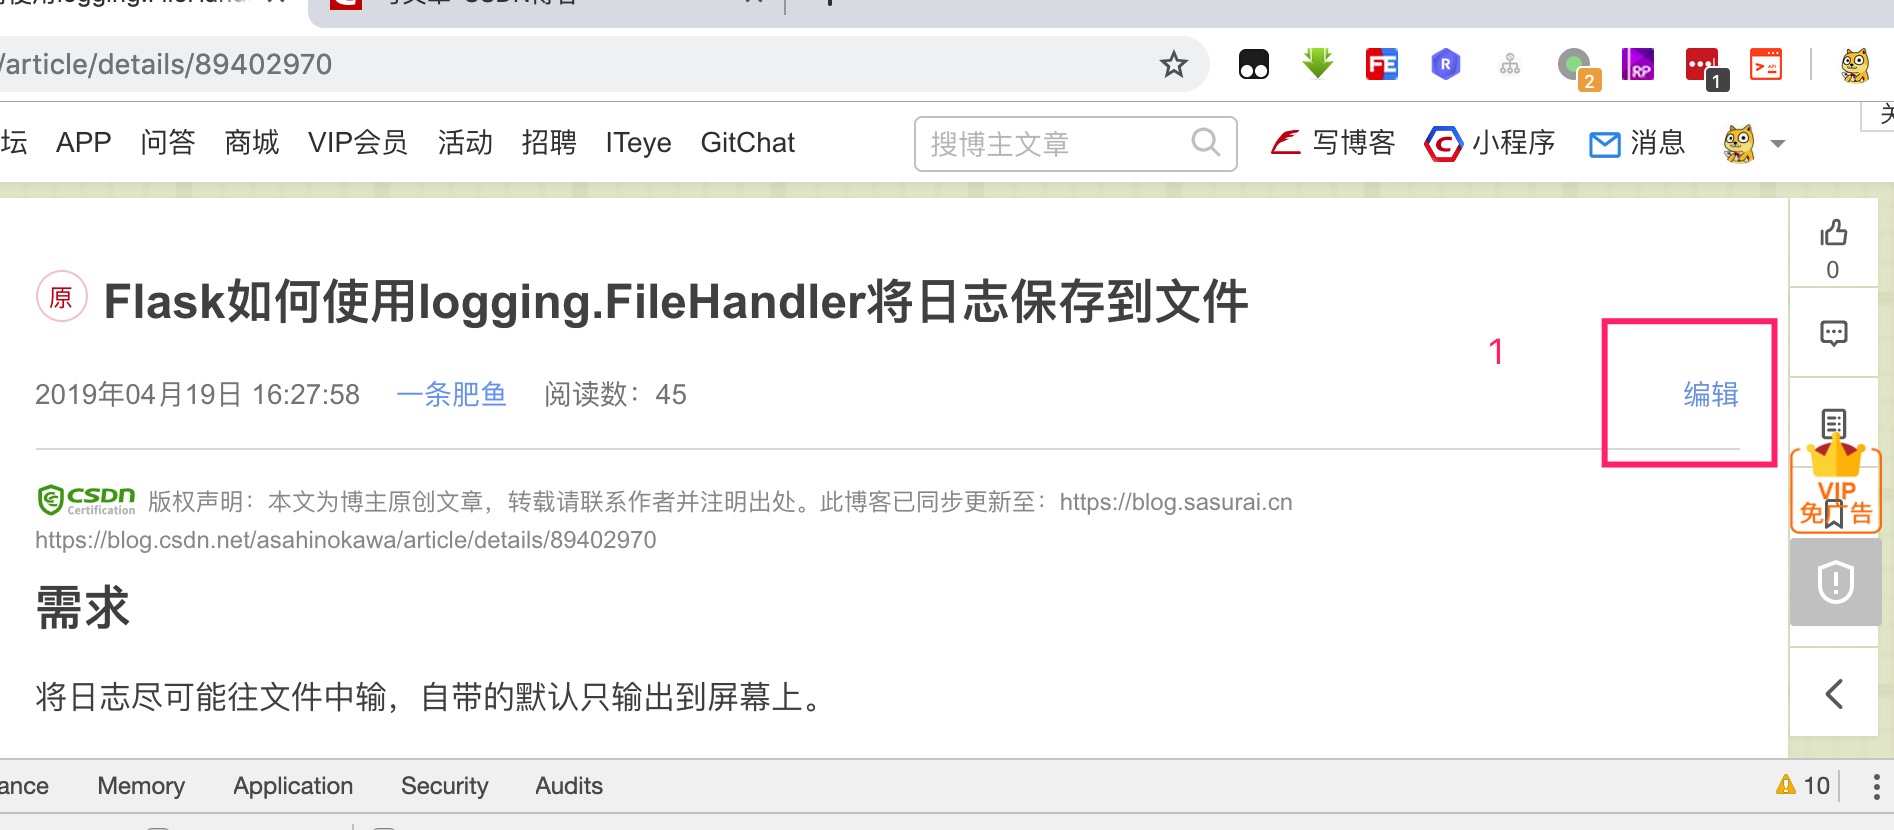
观察API
链接:https://mp.csdn.net/mdeditor/getArticle?id=89402970

入参为一个id加一些Headers(这里选择与浏览器保持一致),返回的参数为一个JSON串,里面的数据如下:
{
    "data": {
        "id": "89402970",
        "title": "Flask如何使用logging.FileHandler将日志保存到文件",
        "articleedittype": 1,
        "description": "需求\n将日志尽可能往文件中输,自带的默认只输出到屏幕上。\n代码\n获取文件名\ndef get_custom_file_name():\n    def make_dir(make_dir_path):\n        path = make_dir_path.strip()\n        if not os.path.exists(path):\n            os.makedirs(pat...",
        "content": "<h2><a id=\"_0\"></a>需求</h2>\n<p>将日志尽可能往文件中输,自带的默认只输出到屏幕上。</p>\n<h2><a id=\"_3\"></a>代码</h2>\n<p>获取文件名</p>\n....",
        "markdowncontent": "## 需求\n将日志尽可能往文件中输,自带的默认只输出到屏幕上。\n\n## 代码\n获取文件名\n```python\ndef get_custom_file_name():\n    def make_dir(make_dir_path):\n        path = make_dir_path.strip()\n        if not os.path.exists(path):\n            os.makedirs(path)\n        return path\n    log_dir = \"ac_logs\"\n    file_name = 'logger-' + time.strftime('%Y-%m-%d', time.localtime(time.time())) + '.log'\n    file_folder = os.path.abspath(os.path.dirname(__file__)) + os.sep + log_dir\n    make_dir(file_folder)\n    return file_folder + os.sep + file_name\n```\n配置logging\n\n```python\ndictConfig({\n    'version': 1,\n    'formatters': {'default': {\n        'format': '%(asctime)s - %(levelname)s - %(filename)s - %(funcName)s - %(lineno)s - %(message)s',\n    }},\n    'handlers': {\n        'default': {\n            'class': 'logging.StreamHandler',\n            'stream': 'ext://flask.logging.wsgi_errors_stream',\n            'formatter': 'default'\n        },\n        'custom': {\n            'class' : 'logging.FileHandler',\n            'formatter': 'default',\n            'filename' : get_custom_file_name(),\n            'encoding' : 'utf-8'\n        },\n    },\n    'root': {\n        'level': 'INFO',\n        'handlers': ['custom']\n    }\n})\n```\n## 代码分析...",
        "private": 0,
        "tags": "Flask,日志",
        "categories": "Python",
        "channel": "31",
        "type": "original",
        "status": 1,
        "read_need_vip": 0
    },
    "error": "",
    "status": true
}
对图片的处理
至此,所有格式为markdown的CSDN博客都被抓取下来,接下来就是对其中图片的处理。对于图片,初步的想法是,先把markdown中的图片下载下来,再随机命名,然后把原来markdown中的图片链接修改成改名之后的,图片的baseUrl使用gitee前缀,也就是说,把所有下载下来的图片都存到一个仓库中,(也算是作为一种备份吧)然后通过如下形式的地址,来访问该图片:https://eucham.me/content/images/pics/xxx.jpg。处理代码:
import os
import random
import re
import string

import filetype as filetype

dir = "C:\\Users\\yangyu\\sasuraiu.github.io\\source\\_posts"
img_dir = "C:\\Users\\yangyu\\sasuraiu.github.io\\source\\_posts\\images"
mds = os.listdir(dir)
pattern = re.compile('!\[.*\]\(([^\)]+)\)')

# 读取markdown内容
def get_file_content(path):
    content = ''
    if not os.path.isdir(path):
        with open(path, 'r', encoding='utf-8') as f:
            for line in f:
                content = content + line
        return content
    else:
        return None
# 修改markdown中的图片原地址
def parse_content(content):
    changed = False
    for pic in pattern.findall(content):
        # print(pic)
        new_pic_link = download_pic(pic, img_dir, random_name())
        if new_pic_link is not None:
            content = content.replace(pic, 'https://eucham.me/content/images/pics/' + new_pic_link)
            changed = True

    return changed, content
# 随机名称
def random_name():
    return ''.join(random.sample(string.ascii_letters + string.digits, 32)).upper()
# 下载图片并重命名
def download_pic(url, path, name):
    import requests
    r = requests.get(url)
    if r.status_code == 200:
        filepath = path + '\\' + name
        # 下载
        with open(filepath, 'wb') as f:
            f.write(r.content)
        # 重命名,通过文件魔数确定图片类型
        # 这里进行类型判断是为了避免格式错误导致的图片无法展示
        kind = filetype.guess(filepath)
        if kind is None:
            print('Cannot guess file type!')
            os.remove(filepath)
            return None
        else:
            os.rename(filepath, filepath+'.'+kind.extension)
            return name+'.'+kind.extension
    else:
        print(url)
        print('下载图片失败,请手动确认\n\n')
        return None
# 修改后保存回文件
def write_back_file(filepath, content):
    with open(filepath, 'w', encoding='utf-8') as f:
        f.write(content)

if __name__ == '__main__':
    for md in mds:
        print('当前正在处理的文件为:' + md)
        filepath = dir + "\\" + md
        # 获取文件内容
        content = get_file_content(filepath)
        # 解析文件中是否含有图片链接
        if content is not None and content != '':
            changed, content = parse_content(content)
            # 替换回原文件
            if changed:
                write_back_file(filepath, content)
                print('replaced original file with the latest link')
后记
至此,大部分重复性质的工作已经完成了,剩下就是对每一个篇文章进行格式检查。此爬虫的代码地址为(欢迎fork):https://github.com/sasuraiu/CSDNBlogMover
wordpress添加https访问
docker中的wordpress
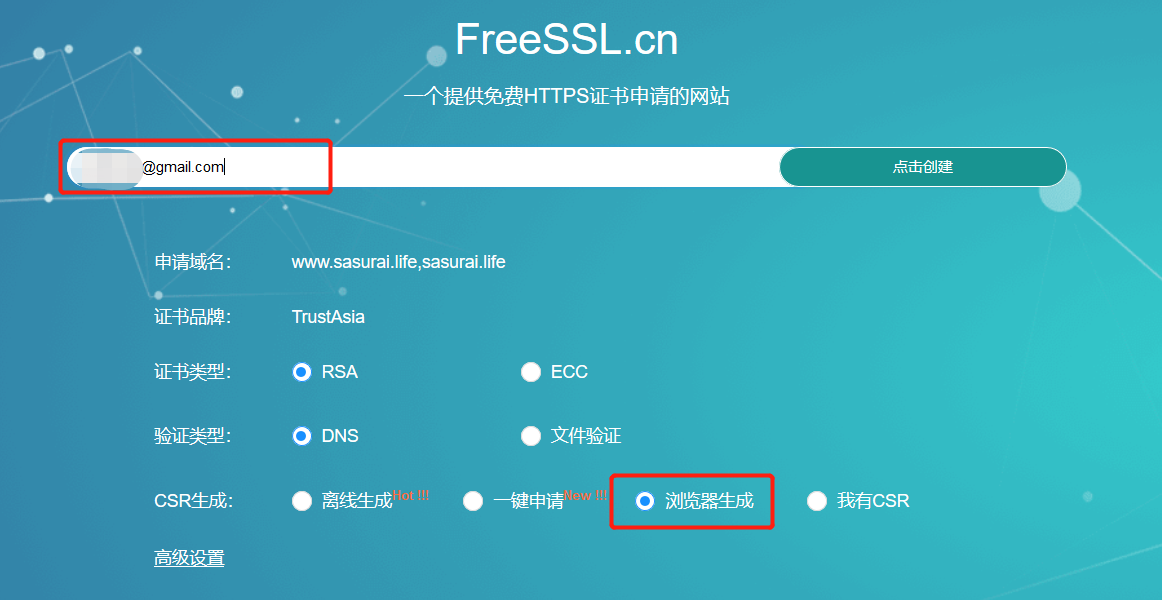
申请证书
可以从freessl.cn免费申请。免费的SSL证书时间长度为1年,但是只能对单个域名,不支持多域名通配符,选择的话以个人需求为准。
选择浏览器生成
点击确认创建后,得到如下信息:
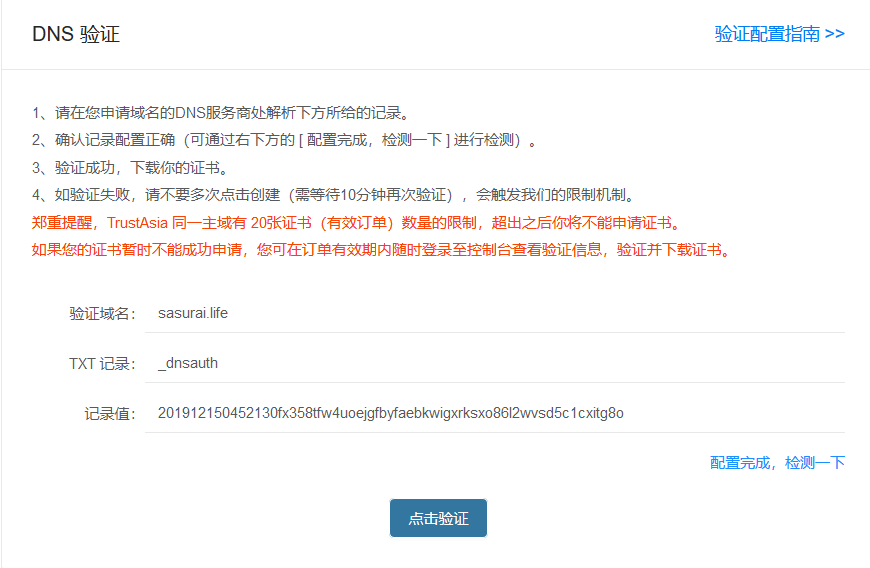
接下来到域名管理里面,按上述信息配置域名的信息,可以参考上面的验证配置指南,如下:
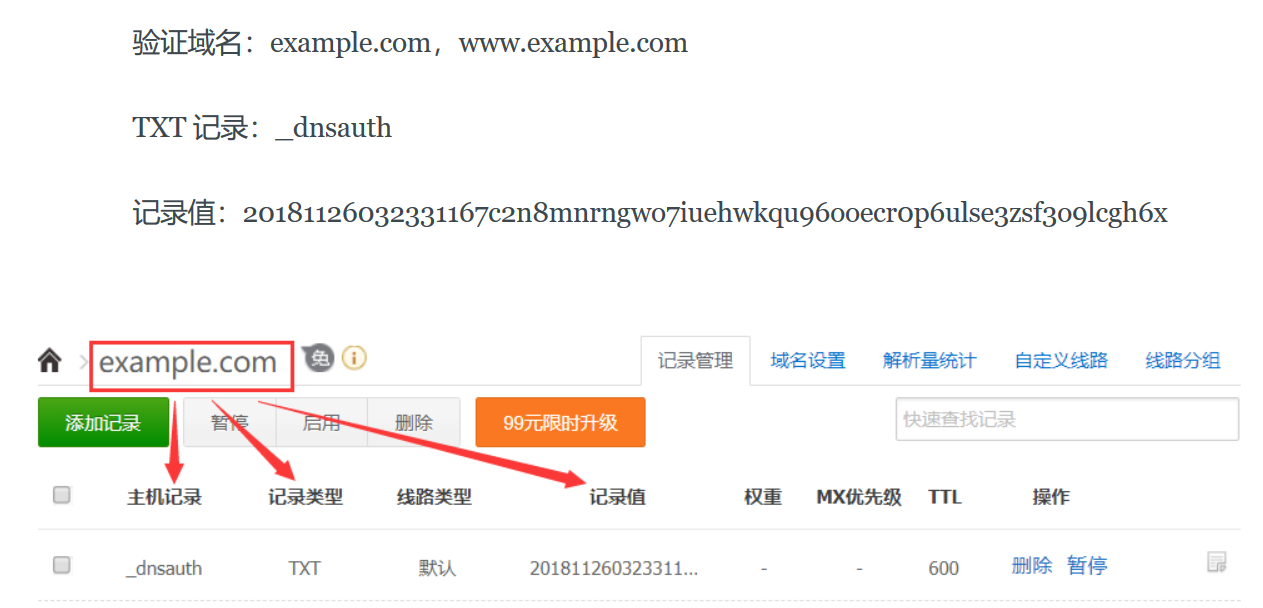
配置完了之后,不一定会立马生效,取决于配置改解析项的TTL。
apache配置
- 将容器里面的443端口映射到宿主机的443端口。如果已启动了容器,可能需要重新创建。
- 将申请好的证书和私钥上传到宿主机中,并将其挂载到容器中。
docker run --name wp \
-p 80:80 \
-p 443:443 \
-e WORDPRESS_DB_HOST=host \
-e WORDPRESS_DB_USER=user \
-e WORDPRESS_DB_PASSWORD="" \
-v /root/wordpress:/var/www/html \
-v /root/ssl:/ssl \
-d wordpress
- 先进入容器中
docker container exec -it wp bash
- 加载apache的ssl模块
a2enmod ssl
- 修改证书和私钥路径
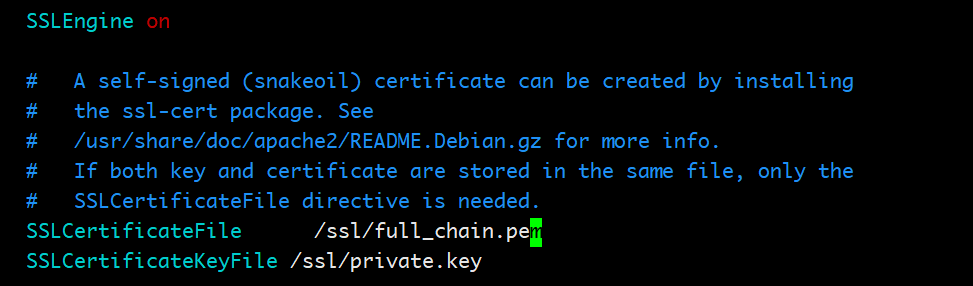
vim /etc/apache2/sites-available/default-ssl.conf
找到SSLCertificateFile和SSLCertificateKeyFile这两个配置项,改成把私钥和证书挂载进容器里面后的路径,这里都在/ssl/目录下。修改后为:
- 让ssl配置被apache加载
ln -s /etc/apache2/sites-available/default-ssl.conf /etc/apache2/sites-enabled/default-ssl.conf
退出容器,并重启容器。 docker container restart wp
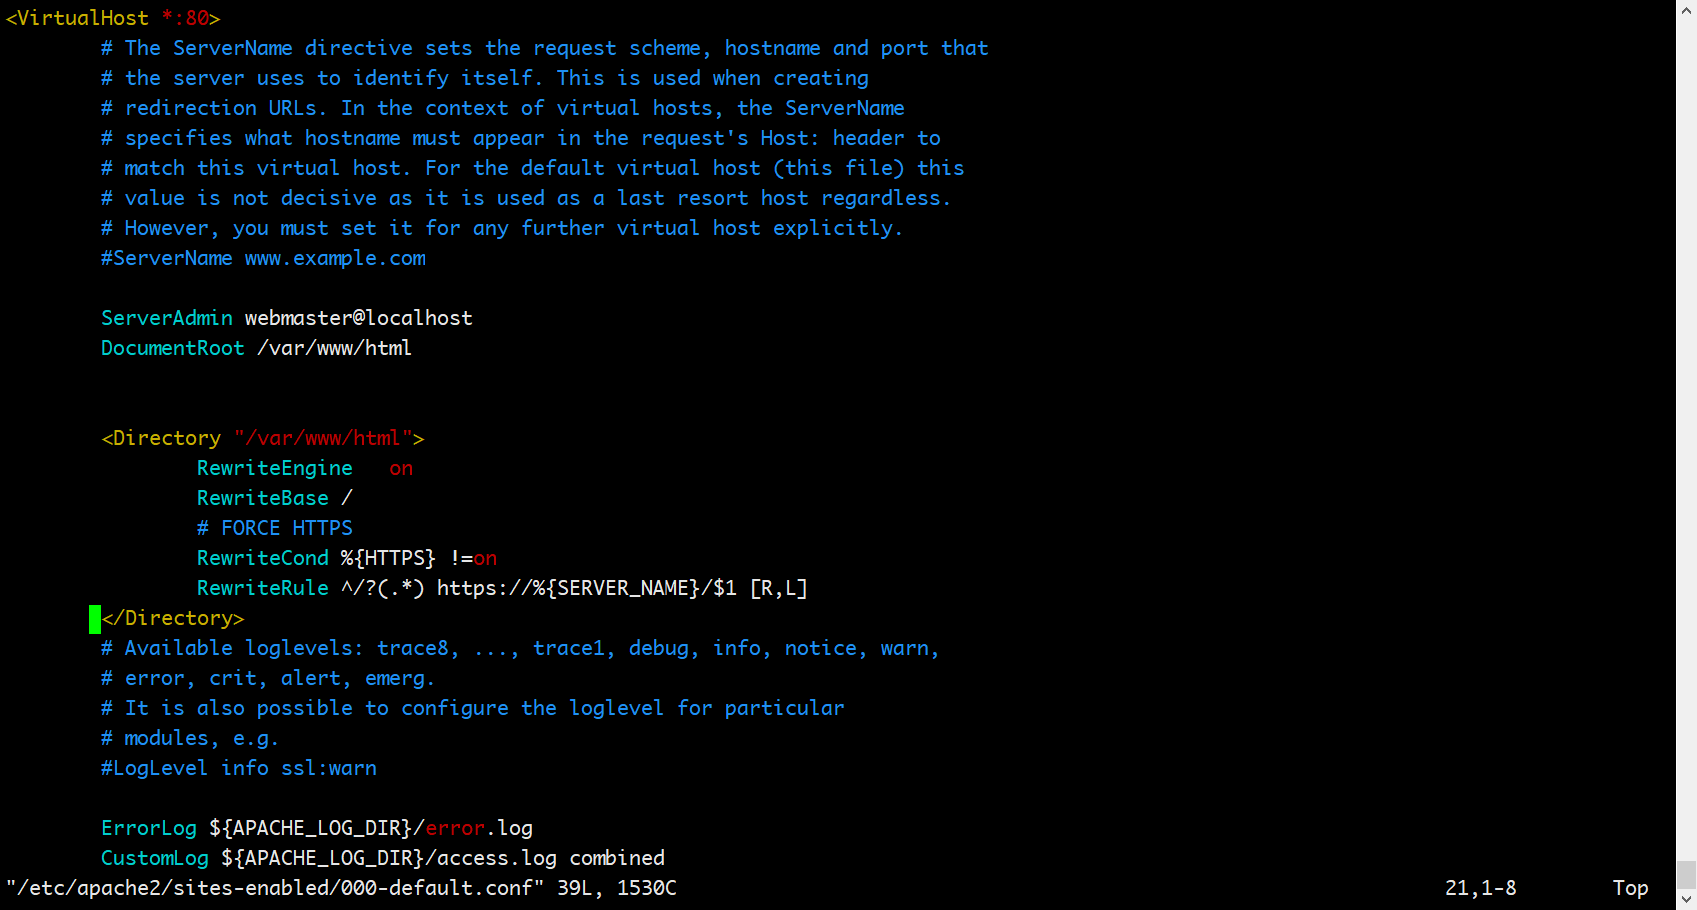
强制http请求转到https 编辑 /etc/apache2/sites-available/000-default.conf,找到<VirtualHost *:80> </VirtualHost>标签中增加下面的配置:
<Directory "/var/www/html">
    RewriteEngine   on
    RewriteBase /
    # FORCE HTTPS
    RewriteCond %{HTTPS} !=on
    RewriteRule ^/?(.*) https://%{SERVER_NAME}/$1 [R,L]
</Directory>
如下:
- 退出容器,并重启容器。
docker container restart wp
检验
如果不能访问,可以往如下两方面考虑:
- 查看容器的日志,看报什么错误信息:
docker container logs -f wp
- 看宿主机的443端口是否开放
参考: https://blog.csdn.net/yori_chen/article/details/88577249
从hexo批量迁移到wordpress
感觉"业务"有扩展,hexo不能动态添加文章有点不太适应
wordpress添加markdown支持
选择了WP Editor.md这个插件,新增post,测试markdown能够生效。
获取hexo博客的md文档
在source/_posts下有所有的markdown文件,全都是博客的内容,并且是有一定的格式规律的。这里我需要的关于博客的数据有标题、发布日期、标签以及目录,当然还有博客正文。非常好解析。
读取所有md文件的代码如下:
dir = "/xxxxx/blog-source/source/_posts"
files = os.listdir(dir)
count = 0
if __name__ == '__main__':
    files = os.listdir(dir)
    can_go_on = False
    for file in files:
        full_path = dir + '/' + file
        print(full_path)
		parse_md_file(full_path)
        # if count >= 10:
        # break;
        count = count + 1
        print("Count: ", count)
    print(count)
解析每个md文档
首先,是文件最开始有两个---,在这两个---之间的全部是文章的属性,之外的全是文章的内容。解析文章属性的时候,需要对文章的标签、目录做可能存在多个处理,所以用list存储。其中post_meta_data_status的各值的含义如下:
| post_meta_data_status | 含义 |
|---|---|
| 0 | 初始状态,刚开始解析md文件 |
| 1 | 正在解析文章属性状态 |
| 2 | 文章属性解析完成,正在解析文章内容 |
解析md文件的代码如下:
def get_property(line, splitter=':'):
    items = line.split(splitter)
    item = items[len(items) - 1].strip()
    return item

def parse_md_file(file_path, print_content=False):
    title = ""
    tag = []
    category = []
    last_item = []
    date = ""
    post_content = ""
    with open(file_path, encoding='utf8') as f:
        post_meta_data_status = 0
        for line in f:
            if post_meta_data_status == 2:
                post_content += line
                # print(line, end='')
            else:
                if line.__contains__("---"):
                    if post_meta_data_status == 0:
                        post_meta_data_status = 1
                    else:
                        post_meta_data_status = 2
                else:
                    if line.__contains__("title"):
                        title = get_property(line).strip()
                    elif line.__contains__("date"):
                        date = get_property(line, ': ').strip()
                    elif line.__contains__("tags"):
                        item = get_property(line)
                        if item!='':
                            tag.append(item)
                        last_item = tag
                    elif line.__contains__("categories"):
                        item = get_property(line)
                        if item != '':
                            category.append(item)
                        last_item = category
                    elif line.__contains__('-'):
                        item = get_property(line, '-')
                        if item != '':
                            last_item.append(item)
        print("title: ", title)
        print("date: ", date)
        print("tags: ", tag)
        print("categories: ", category)
        date=datetime.datetime.strptime(date, "%Y-%m-%d %H:%M:%S")
将解析后的数据上传到wordpress
上传主要用到了wordpress-xmlrpc。其基本操作可参看该官网上的用例。
安装方式:pip install python-wordpress-xmlrpc
from wordpress_xmlrpc import Client, WordPressPost
from wordpress_xmlrpc.methods.posts import GetPosts, NewPost
from wordpress_xmlrpc.methods.users import GetUserInfo

wp = Client('http://www.wordpress.site/xmlrpc.php', 'username', 'password')

def add_post(title, date, content, tag, category):
    post = WordPressPost()
    post.title = title
    post.content = content
    post.post_status = 'publish'
	# date为python的datetime类型
    post.date = date
    post.terms_names = {
        'post_tag': tag,
        'category': category,
    }
    post_id = wp.call(NewPost(post))
    print(post_id)
如果需要更新更多的post相关的信息,可参看WordPressPost文档。
从halo迁移到hexo

今年年初由 wordpress 迁移到 halo,主要是觉得懂点 Java,有什么定制化的需求,自己改代码会方便一些。但是也没有什么特别的需求需要定制,反而被这种东西折腾得忘记了写博客的初心。技术博客就应该简简单单,只写技术,博客怎么好看、怎么炫酷,都不重要。
配置说明&前置条件
- 在 Halo 中,数据库使用的是 MySQL 5.7,并将 halo 服务所用数据库,内容导入到本地的数据库中,这样速度会快一些。
- hexo 所用主题是 Icarus
编码
总体思路:将 halo 的数据,导出成 hexo 所需要的格式。总体分为下面几个步骤:
- halo 字段与 hexo 字段对比 参考 hexo 文档,与之一一对应即可。后续根据 Icarus 的几个配置,又在 front-matter 里面添加了几个属性。
| 参数 | 描述 | 默认值 |
|---|---|---|
layout |
布局 | |
title |
标题 | 文章的文件名 |
date |
建立日期 | 文件建立日期 |
updated |
更新日期 | 文件更新日期 |
comments |
开启文章的评论功能 | true |
tags |
标签(不适用于分页) | |
categories |
分类(不适用于分页) | |
permalink |
覆盖文章网址 |
将 halo 的 tags、categories 转化成 hexo 里面的 tags、categories
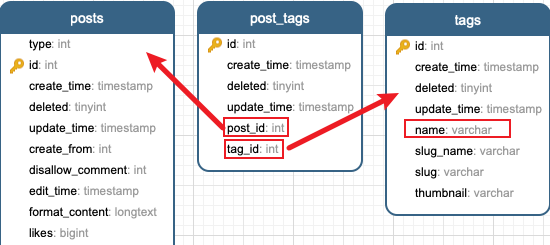
category 与 tag 类似,都是通过一个关联表,与 post 建立关联关系。转换的逻辑自然变成了:根据 post_id 查 post_tags 表中的关联关系,得到 tag_id,再从 tag 表中获取 tag 的名称。
转化文章预览 这部分不太好转,直接用 markdown 有些 markdown 的语法符号,没办法过滤掉、或者过滤起来很难受。这里的做法是这样的:
- 在 front-matter 中添加 excerpt 属性
- 如果原文章(halo)中存在 summary,直接赋值给 excerpt
- 没有 summary,则先将 markdown 转化成 HTML,然后获取 HTML 中的前几个 dom 元素。
文章属性
type Post struct {
	Title      string
	Content    string
	Password   string
	Date       string
	Updated    string
	Thumbnail  string
	Tags       []string
	Categories []string
	Summary    string
	Priority   string
}
主流程
package main

import (
	"fmt"
	_ "github.com/go-sql-driver/mysql"
	"github.com/gomarkdown/markdown"
	"html"
	"io/ioutil"
	"path"
	"regexp"
	"strings"
	"xorm.io/xorm"
)

func main() {
	basePath := "/Users/akina/hexo-blog/source/_posts"
	db, _ := xorm.NewEngine("mysql", "root:root@tcp(localhost:3306)/halodb-tmp")
	db.ShowSQL(true)
	queriedPosts, _ := db.Query("select * from posts")
	for _, qp := range queriedPosts {
		pid := qp["id"]
		post := Post{
			Title:     string(qp["title"]),
			Content:   html.UnescapeString(string(qp["original_content"])),
			Password:  string(qp["password"]),
			Date:      string(qp["create_time"]),
			Updated:   string(qp["update_time"]),
			Thumbnail: string(qp["thumbnail"]),
			Summary:   string(qp["summary"]),
			Priority:  string(qp["top_priority"]),
		}
		// 处理标签
		queriedTagIds, _ := db.Query("select tag_id from post_tags where post_id = " + string(pid))
		if len(queriedTagIds) > 0 {
			tagIds := make([]string, 0)
			for _, tagId := range queriedTagIds {
				tagIds = append(tagIds, string(tagId["tag_id"]))
			}
			queriedTagNames, _ := db.Query(fmt.Sprintf("select name from tags where id in (%s)", strings.Join(tagIds, ",")))
			tagNames := make([]string, 0)
			for _, tagName := range queriedTagNames {
				tagNames = append(tagNames, string(tagName["name"]))
			}
			post.Tags = tagNames
		}
		// 处理分类
		queriedCategoryIds, _ := db.Query("select category_id from post_categories where post_id = " + string(pid))
		if len(queriedCategoryIds) > 0 {
			categoryIds := make([]string, 0)
			for _, categoryId := range queriedCategoryIds {
				categoryIds = append(categoryIds, string(categoryId["category_id"]))
			}
			queriedCategoryNames, _ := db.Query(fmt.Sprintf("select name from categories where id in (%s)", strings.Join(categoryIds, ",")))
			categoryNames := make([]string, 0)
			for _, categoryName := range queriedCategoryNames {
				categoryNames = append(categoryNames, "- ["+string(categoryName["name"])+"]")
			}
			post.Categories = categoryNames
		}
		// 写文件
		postHexoData := strings.Join([]string{
			"---",
			"title: \"" + post.Title + "\"",
			"date: " + post.Date,
			"updated: " + post.Updated,
			"tags: [" + strings.Join(post.Tags, ",") + "]",
			"categories: \n" + strings.Join(post.Categories, "\n"),
			"thumbnail: " + post.Thumbnail,
			"password: " + post.Password,
			"excerpt: \"" + getPostSummary(post) + "\"",
			"top: " + post.Priority,
			"toc: true",
			"---",
			post.Content,
		}, "\n")
		ioutil.WriteFile(path.Join(basePath, post.Title+".md"), []byte(postHexoData), 0666)
	}
}
获取文章的预览
func getPostSummary(post Post) string {
	var res string
	if post.Summary != "" {
		res = post.Summary
	} else {
		htmlContent := string(markdown.ToHTML([]byte(post.Content), nil, nil))

		for i := 1; i <= 4; i++ {
			re := regexp.MustCompile("<.*?>.*?</.*?>")
			label := string(re.Find([]byte(htmlContent)))
			if label == "" {
				break
			}
			res = res + label

			htmlContent = strings.ReplaceAll(htmlContent, label, "")
			if htmlContent == "" {
				break
			}
		}
	}

	for _, ch := range []string{
		"\n",
	} {
		res = strings.ReplaceAll(res, ch, " ")
	}
	res = strings.ReplaceAll(res, "\"", "'")
	res = strings.TrimPrefix(res, " ")
	res = strings.TrimSuffix(res, " ")

	fmt.Println(res)

	return res
}
Conclusion
后续有几个需要改一下预览的内容,貌似不能通过 hexo g,原因是转义符的问题、单、双引号的问题等,只有少量,手动改了改,还算可以接受。
