2 | Spring:BeanPostProcessor执行时机与实现原理
这一篇主要学到了一种新的看源代码的方法。之前都是从最开始的代码开始,然后一步一步step into。这样会比较浪费时间,并且会因为代码多而容易搞混淆,抓不住重点。这篇主要是看BeanPostProcessor的执行时机与相应的源代码,目前对于它是合适执行的,并不知道,但是可以明确的是我们继承的Bea
这一篇主要学到了一种新的看源代码的方法。之前都是从最开始的代码开始,然后一步一步step into。这样会比较浪费时间,并且会因为代码多而容易搞混淆,抓不住重点。
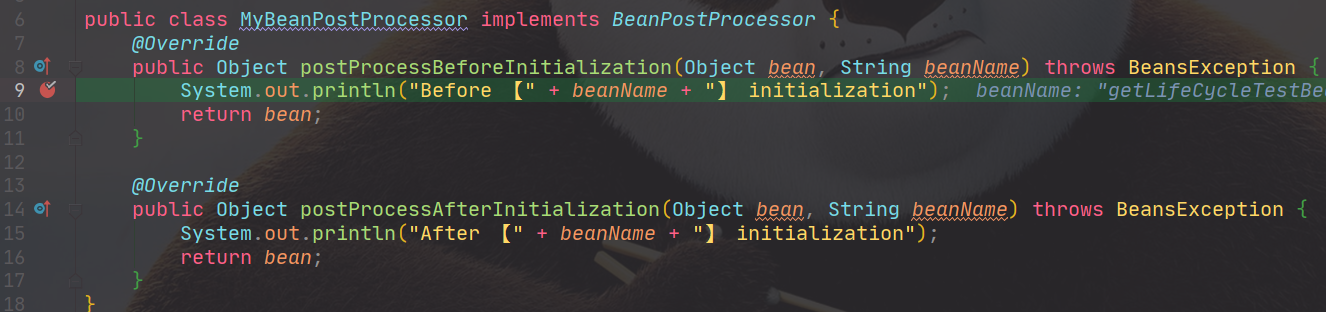
这篇主要是看BeanPostProcessor的执行时机与相应的源代码,目前对于它是合适执行的,并不知道,但是可以明确的是我们继承的BeanPostProcessor一定会执行。因此可以完全将断点放在我们写的类MyBeanPostProcessor的函数里面。
看源码的另一种姿势
打开调试,进入断点。如下图所示:
然后逐帧查看其调用栈,慢慢找到关键代码:
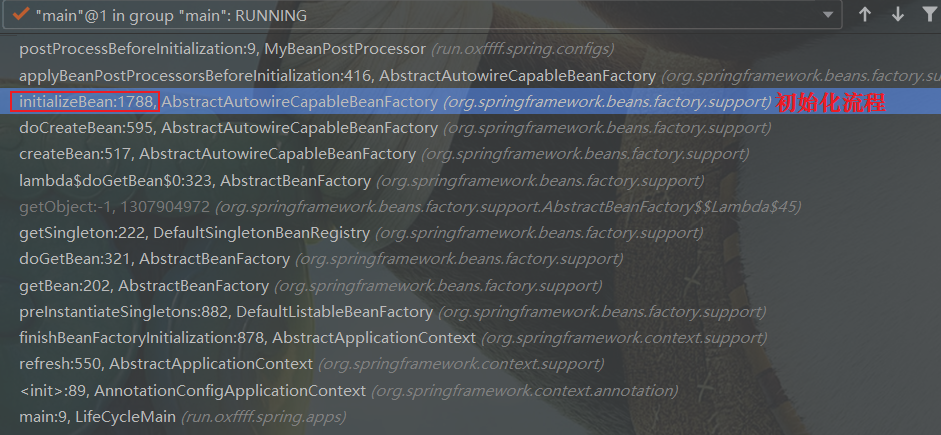
初始化流程
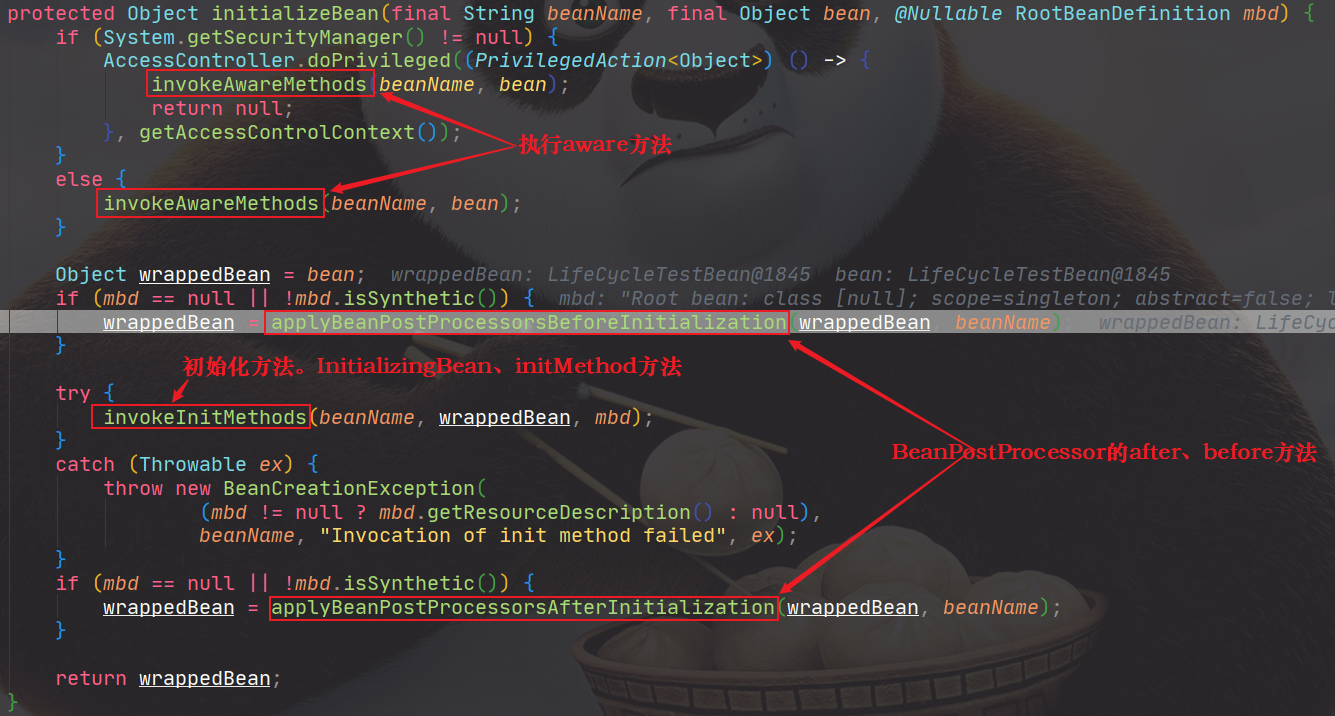
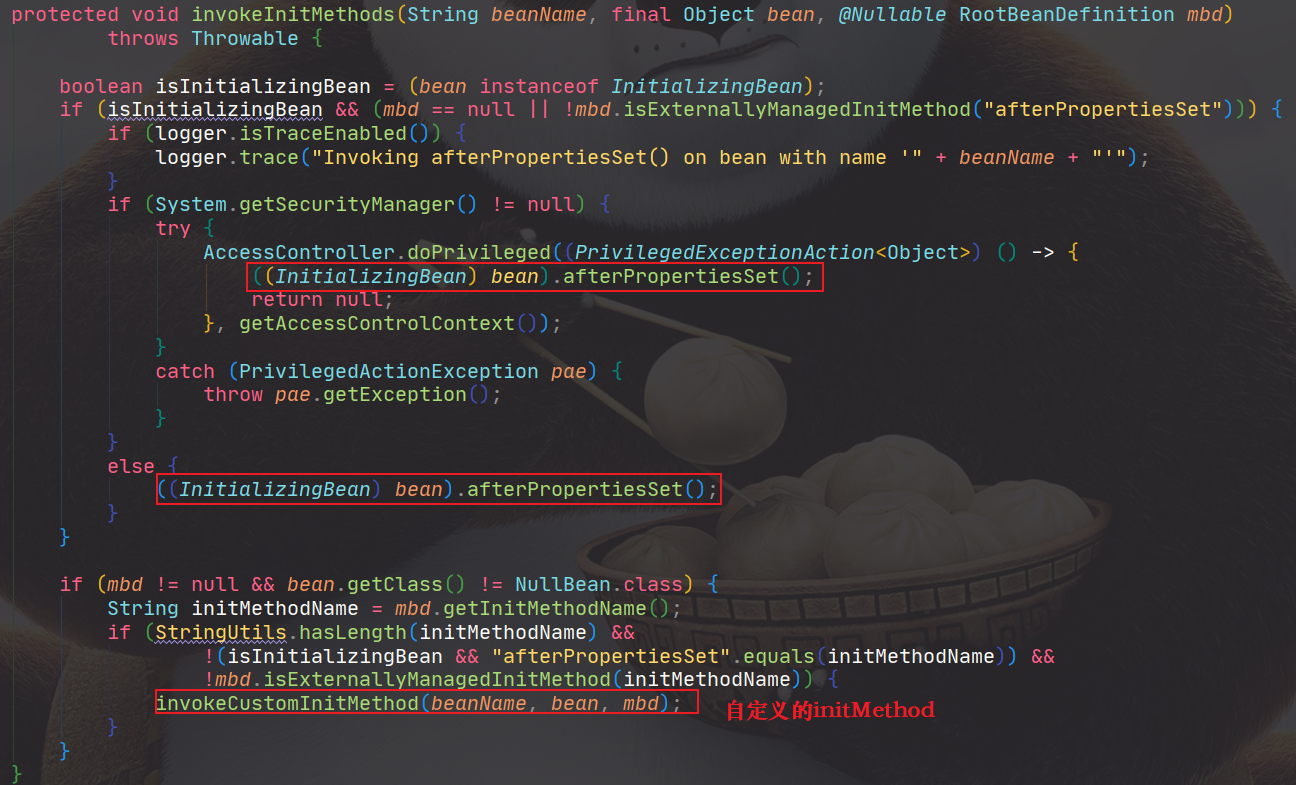
主要的初始化流程包括:XXXAware方法执行、BeanPostProcessor.beforeXX()、InitilizingBean、initMethod、BeanPostProcessor.afterXX()。
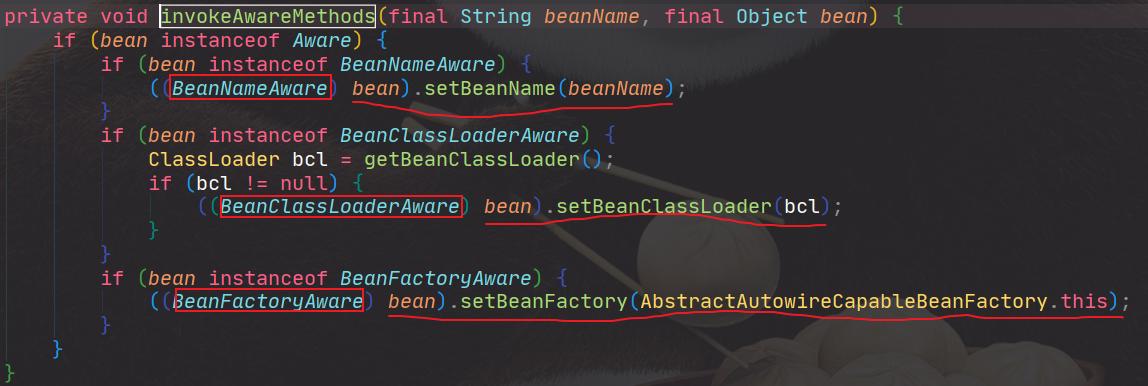
执行AwareXX的顺序如下:
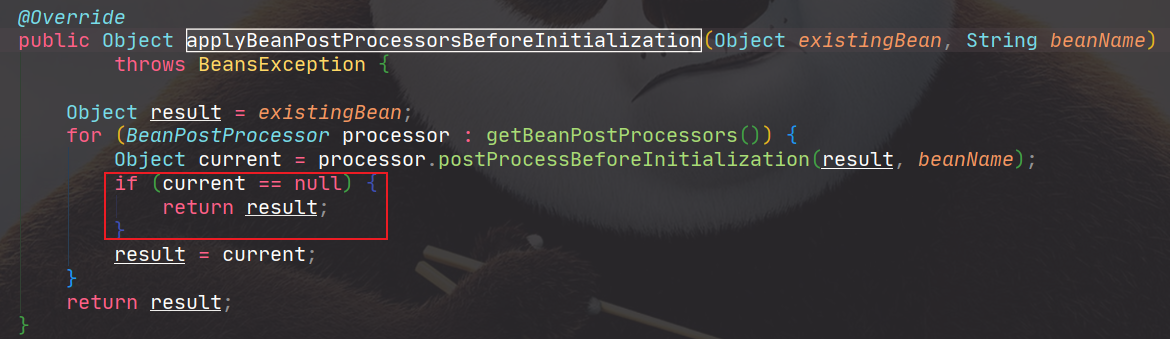
执行applyBeanPostProcessorsBeforeInitialization时,如果BeanPostProcessor返回的是null,那么将不会执行后续的BeanPostProcessor。
然后先执行InitializingBean,再调用自定义初始化方法initMethod。
最后执行BeanPostProcessor.afterXX(),与before的类似。
在Spring中的用途
先看两个比较简单的,会直接调用BeanPostProcessor的两个方法,达到spring的相应功能。
ApplicationContextAwareProcessor
在bean中,实现ApplicationContextAware接口,这个后置处理器会在bean初始化前,设置进ApplicationContext。
@Override
@Nullable
public Object postProcessBeforeInitialization(Object bean, String beanName) throws BeansException {
	if (!(bean instanceof EnvironmentAware || bean instanceof EmbeddedValueResolverAware ||
			bean instanceof ResourceLoaderAware || bean instanceof ApplicationEventPublisherAware ||
			bean instanceof MessageSourceAware || bean instanceof ApplicationContextAware)){
		return bean;
	}

	AccessControlContext acc = null;

	if (System.getSecurityManager() != null) {
		acc = this.applicationContext.getBeanFactory().getAccessControlContext();
	}

	if (acc != null) {
		AccessController.doPrivileged((PrivilegedAction<Object>) () -> {
			invokeAwareInterfaces(bean);
			return null;
		}, acc);
	}
	else {
		invokeAwareInterfaces(bean);
	}

	return bean;
}

private void invokeAwareInterfaces(Object bean) {
	if (bean instanceof EnvironmentAware) {
		((EnvironmentAware) bean).setEnvironment(this.applicationContext.getEnvironment());
	}
	if (bean instanceof EmbeddedValueResolverAware) {
		((EmbeddedValueResolverAware) bean).setEmbeddedValueResolver(this.embeddedValueResolver);
	}
	if (bean instanceof ResourceLoaderAware) {
		((ResourceLoaderAware) bean).setResourceLoader(this.applicationContext);
	}
	if (bean instanceof ApplicationEventPublisherAware) {
		((ApplicationEventPublisherAware) bean).setApplicationEventPublisher(this.applicationContext);
	}
	if (bean instanceof MessageSourceAware) {
		((MessageSourceAware) bean).setMessageSource(this.applicationContext);
	}
	if (bean instanceof ApplicationContextAware) {
		((ApplicationContextAware) bean).setApplicationContext(this.applicationContext);
	}
}
BeanValidationPostProcessor
此方法默认在初始化数据之前进行数据校验。
private boolean afterInitialization = false;

@Override
public Object postProcessBeforeInitialization(Object bean, String beanName) throws BeansException {
	if (!this.afterInitialization) {
		doValidate(bean);
	}
	return bean;
}

@Override
public Object postProcessAfterInitialization(Object bean, String beanName) throws BeansException {
	if (this.afterInitialization) {
		doValidate(bean);
	}
	return bean;
}

protected void doValidate(Object bean) {
	Assert.state(this.validator != null, "No Validator set");
	Object objectToValidate = AopProxyUtils.getSingletonTarget(bean);
	if (objectToValidate == null) {
		objectToValidate = bean;
	}
	Set<ConstraintViolation<Object>> result = this.validator.validate(objectToValidate);

	if (!result.isEmpty()) {
		StringBuilder sb = new StringBuilder("Bean state is invalid: ");
		for (Iterator<ConstraintViolation<Object>> it = result.iterator(); it.hasNext();) {
			ConstraintViolation<Object> violation = it.next();
			sb.append(violation.getPropertyPath()).append(" - ").append(violation.getMessage());
			if (it.hasNext()) {
				sb.append("; ");
			}
		}
		throw new BeanInitializationException(sb.toString());
	}
}
InitDestroyAnnotationBeanPostProcessor
执行被@PostConstruct和@PreDestroy注解的方法,参与生命周期。
初始化方法执行
@PostConstruct执行过程比较直接,因为此类直接实现了BeanPostProcessor的初始化方法。
@Override
public Object postProcessBeforeInitialization(Object bean, String beanName) throws BeansException {
	LifecycleMetadata metadata = findLifecycleMetadata(bean.getClass());
	try {
        // 执行初始化方法
		metadata.invokeInitMethods(bean, beanName);
	}
	catch (InvocationTargetException ex) {
		throw new BeanCreationException(beanName, "Invocation of init method failed", ex.getTargetException());
	}
	catch (Throwable ex) {
		throw new BeanCreationException(beanName, "Failed to invoke init method", ex);
	}
	return bean;
}

@Override
public Object postProcessAfterInitialization(Object bean, String beanName) throws BeansException {
	return bean;
}
具体的初始化方法如下:
public void invokeInitMethods(Object target, String beanName) throws Throwable {
	Collection<LifecycleElement> checkedInitMethods = this.checkedInitMethods;
	Collection<LifecycleElement> initMethodsToIterate =
			(checkedInitMethods != null ? checkedInitMethods : this.initMethods);
	if (!initMethodsToIterate.isEmpty()) {
		for (LifecycleElement element : initMethodsToIterate) {
			if (logger.isTraceEnabled()) {
				logger.trace("Invoking init method on bean '" + beanName + "': " + element.getMethod());
			}
			element.invoke(target);
		}
	}
}
寻找bean中初始化、销毁方法
所有的checkedInitMethods来自对initMethods中函数的遍历。包括destroy方法也是类似的。
public void checkConfigMembers(RootBeanDefinition beanDefinition) {
	Set<LifecycleElement> checkedInitMethods = new LinkedHashSet<>(this.initMethods.size());
	for (LifecycleElement element : this.initMethods) {
		String methodIdentifier = element.getIdentifier();
		if (!beanDefinition.isExternallyManagedInitMethod(methodIdentifier)) {
			beanDefinition.registerExternallyManagedInitMethod(methodIdentifier);
			checkedInitMethods.add(element);
			if (logger.isTraceEnabled()) {
				logger.trace("Registered init method on class [" + this.targetClass.getName() + "]: " + element);
			}
		}
	}
	Set<LifecycleElement> checkedDestroyMethods = new LinkedHashSet<>(this.destroyMethods.size());
	for (LifecycleElement element : this.destroyMethods) {
		String methodIdentifier = element.getIdentifier();
		if (!beanDefinition.isExternallyManagedDestroyMethod(methodIdentifier)) {
			beanDefinition.registerExternallyManagedDestroyMethod(methodIdentifier);
			checkedDestroyMethods.add(element);
			if (logger.isTraceEnabled()) {
				logger.trace("Registered destroy method on class [" + this.targetClass.getName() + "]: " + element);
			}
		}
	}
	this.checkedInitMethods = checkedInitMethods;
	this.checkedDestroyMethods = checkedDestroyMethods;
}
只要是被@PostConstruct注解过的函数,都会被加入到initMethods中。destroy也类似。
do {
	final List<LifecycleElement> currInitMethods = new ArrayList<>();
	final List<LifecycleElement> currDestroyMethods = new ArrayList<>();

	ReflectionUtils.doWithLocalMethods(targetClass, method -> {
        // 被initAnnotationType注解
		if (this.initAnnotationType != null && method.isAnnotationPresent(this.initAnnotationType)) {
			LifecycleElement element = new LifecycleElement(method);
			currInitMethods.add(element);
			if (logger.isTraceEnabled()) {
				logger.trace("Found init method on class [" + clazz.getName() + "]: " + method);
			}
		}
        // 被destroyAnnotationType注解
		if (this.destroyAnnotationType != null && method.isAnnotationPresent(this.destroyAnnotationType)) {
			currDestroyMethods.add(new LifecycleElement(method));
			if (logger.isTraceEnabled()) {
				logger.trace("Found destroy method on class [" + clazz.getName() + "]: " + method);
			}
		}
	});

	initMethods.addAll(0, currInitMethods);
	destroyMethods.addAll(currDestroyMethods);
	targetClass = targetClass.getSuperclass();
}
while (targetClass != null && targetClass != Object.class);

return (initMethods.isEmpty() && destroyMethods.isEmpty() ? this.emptyLifecycleMetadata :
		new LifecycleMetadata(clazz, initMethods, destroyMethods));
具体的类型为:
init

destroy

销毁方法执行
对@PreDestroy注解方法的执行,逻辑都放在了DisposableBeanAdapter中,它实现了DisposableBean,
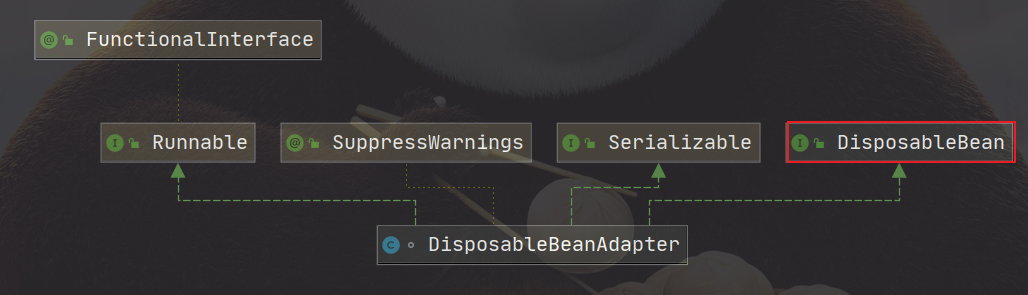
并实现了destroy()方法,执行所有的DestructionAwareBeanPostProcessor方法。

进入InitDestroyAnnotationBeanPostProcessor的postProcessBeforeDestruction,它完成了对所有的销毁方法的调用。
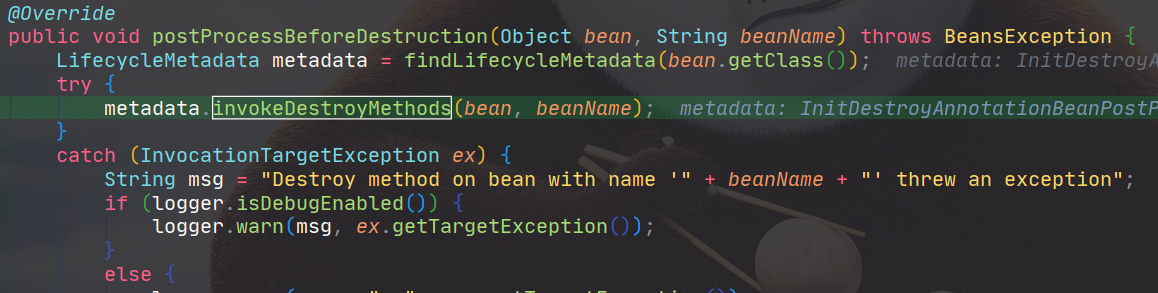
具体的执行销毁方法的逻辑与初始化类似

