【转载-摘要】彻底搞懂 Git-Rebase
rebase的主要功能就是改变commit历史,在这篇文章中,场景一是改变未push的commit历史,场景二是在合并分支时,改变当前分支的历史,从而达到简化commit历史的目的,让历史一目了然。对强迫症患者来说简直就是福音。
Rebase 场景一:如何合并多次提交纪录?
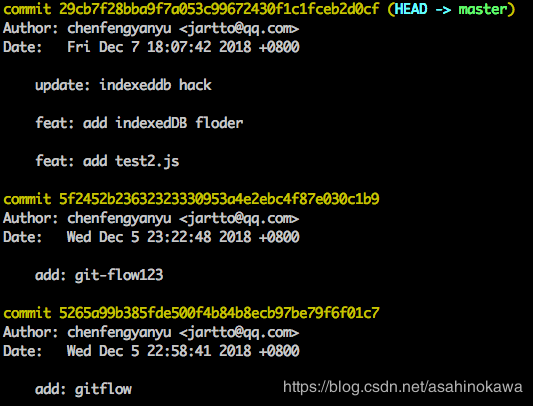
1.我们来合并最近的 4 次提交纪录,执行: git rebase -i HEAD~42.这时候,会自动进入 vi 编辑模式:
s cacc52da add: qrcode
s f072ef48 update: indexeddb hack
s 4e84901a feat: add indexedDB floder
s 8f33126c feat: add test2.js
# Rebase 5f2452b2..8f33126c onto 5f2452b2 (4 commands)
#
# Commands:
# p, pick = use commit
# r, reword = use commit, but edit the commit message
# e, edit = use commit, but stop for amending
# s, squash = use commit, but meld into previous commit
# f, fixup = like "squash", but discard this commit's log message
# x, exec = run command (the rest of the line) using shell
# d, drop = remove commit
#
# These lines can be re-ordered; they are executed from top to bottom.
#
# If you remove a line here THAT COMMIT WILL BE LOST.
#
# However, if you remove everything, the rebase will be aborted.
#
有几个命令需要注意一下:
p, pick = use commit
r, reword = use commit, but edit the commit message
e, edit = use commit, but stop for amending
s, squash = use commit, but meld into previous commit
f, fixup = like “squash”, but discard this commit’s log message
x, exec = run command (the rest of the line) using shell
d, drop = remove commit
按照如上命令来修改你的提交纪录:
s cacc52da add: qrcode
s f072ef48 update: indexeddb hack
s 4e84901a feat: add indexedDB floder
p 8f33126c feat: add test2.js
3.如果保存的时候,你碰到了这个错误: error: cannot 'squash' without a previous commit注意不要合并先前提交的东西,也就是已经提交远程分支的纪录。
4.如果你异常退出了 vi 窗口,不要紧张:
git rebase --edit-todo这时候会一直处在这个编辑的模式里,我们可以回去继续编辑,修改完保存一下:
git rebase --continue5.查看结果
git log
三次提交合并成了一次,减少了无用的提交信息。
Rebase 场景二:分支合并
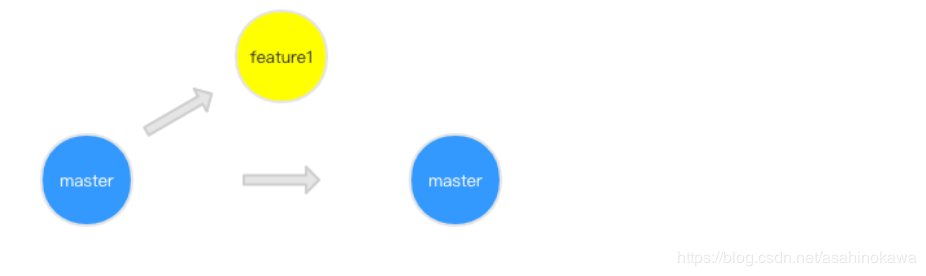
1.我们先从 master 分支切出一个 dev 分支,进行开发:
git:(master) git checkout -b feature1
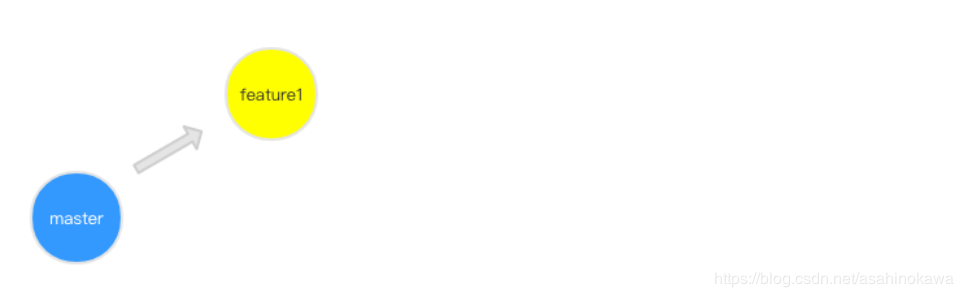
2.这时候,你的同事完成了一次 hotfix,并合并入了 master 分支,此时 master 已经领先于你的 feature1 分支了:
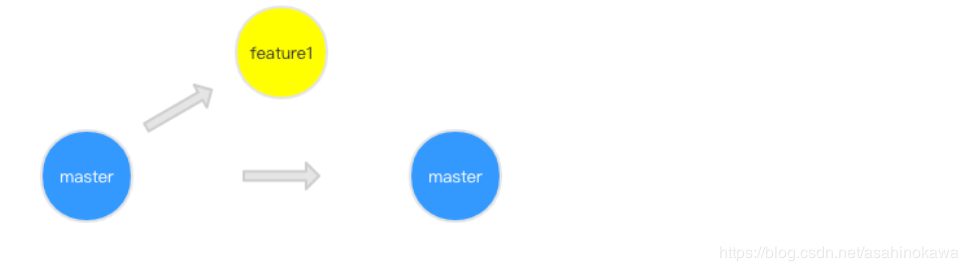
3.恰巧,我们想要同步 master 分支的改动,首先想到了 merge,执行:
git:(feature1) git merge master
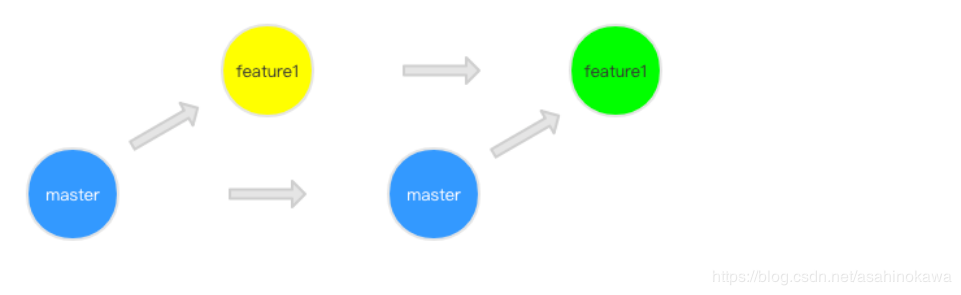
图中绿色的点就是我们合并之后的结果,执行:
git:(feature1) git log就会在记录里发现一些 merge 的信息,但是我们觉得这样污染了 commit 记录,想要保持一份干净的 commit,怎么办呢?这时候,git rebase 就派上用场了。
4.让我们来试试 git rebase ,先回退到同事 hotfix 后合并 master 的步骤:
5.使用 rebase 后来看看结果:
git:(feature1) git rebase master这里补充一点:rebase 做了什么操作呢?
首先,git 会把 feature1 分支里面的每个 commit 取消掉; 其次,把上面的操作临时保存成 patch 文件,存在 .git/rebase 目录下; 然后,把 feature1 分支更新到最新的 master 分支; 最后,把上面保存的 patch 文件应用到 feature1 分支上;

从 commit 记录我们可以看出来,feature1 分支是基于 hotfix 合并后的 master ,自然而然的成为了最领先的分支,而且没有 merge 的 commit 记录,是不是感觉很舒服了。
6.在 rebase 的过程中,也许会出现冲突 conflict。在这种情况,git 会停止 rebase 并会让你去解决冲突。在解决完冲突后,用 git add 命令去更新这些内容。
注意,你无需执行 git-commit,只要执行 continue
git rebase --continue这样 git 会继续应用余下的 patch 补丁文件。
7.在任何时候,我们都可以用 --abort 参数来终止 rebase 的行动,并且分支会回到 rebase 开始前的状态。
git rebase —abort
不足
只要你的分支上需要 rebase 的所有 commits 历史还没有被 push 过,就可以安全地使用 git-rebase来操作。
因为push到远程仓库后,你再次提交时,git对比会发现两个仓库的历史不一致。
