Linux中的特殊符号以及特殊语法

辨别||、&&、;、$*等符号在linux中的含义与或# 将&&前后的两个命令当做一个表达式,如果表达式出错,那么可以认为该表达式为false➜ ~ ls / && datebin boot dev etc home initrd.img
阅读更多

解决web端登录时等待过久并偶尔抛出事务相关异常

问题描述

在这里插入图片描述

在这里插入图片描述

分析

登录函数中有一个事务,如下:
在这里插入图片描述

在这里插入图片描述


事务里面有一个有可能操作比较耗时的过程:
在这里插入图片描述

在这里插入图片描述


在新增登录日志的时候,获取用户的ip。
在这里插入图片描述

在这里插入图片描述


具体干了啥不重要,重要的是发了一个http请求,并且是串行的,所以这个请求比较耗时的可能是很大的,并且具备不确定性因素。
在这里插入图片描述

在这里插入图片描述

反思

TransactionRollbackException的文档注释为:

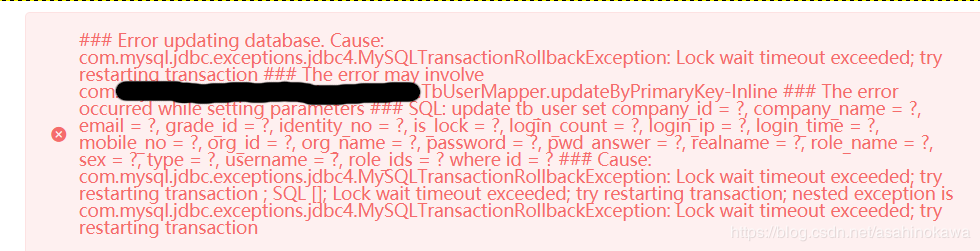
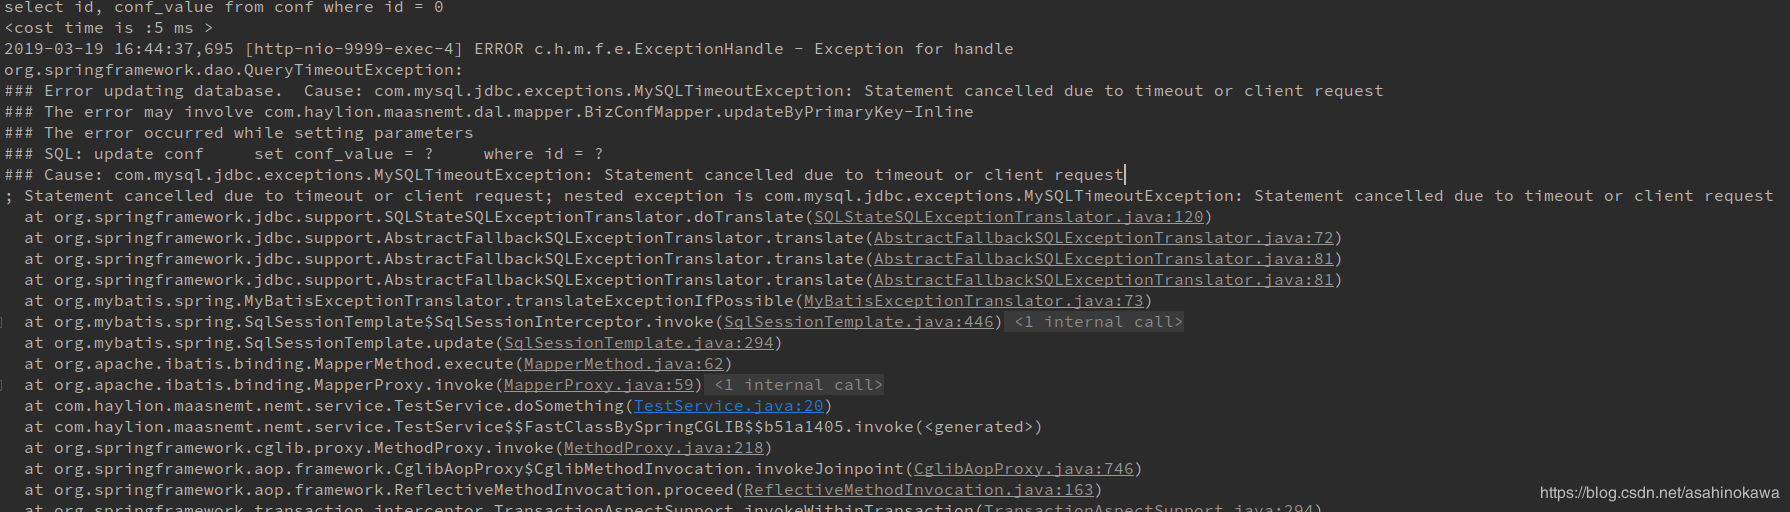
This exception indicates that the transaction associated with processing of the request has been rolled back, or marked to roll back. Thus the requested operation either could not be performed or was not performed because further computation on behalf of the transaction would be fruitless

可能的过程为:线程1进入事务、然后进行了一次update操作,获得了一个排他锁,然后被卡在了获取ip的那个地方,即此事务持有着排他锁,然后还长时间不结束(50s+),然后线程2也进入了事务,此时在进行update的时候,需要等待线程1释放排它锁,在50秒过后,仍未获取到锁,此时获取锁时间超过了预设,抛出上述异常。

解决

规避潜在的耗时操作。但是由于此服务没人维护,因此通过本地编译,然后拉包替换相应class文件,再上传到服务器的方式进行修改。

复现

查看获取锁的超时阀值:

1
SHOW VARIABLES LIKE '%timeout%';

输出如下:

1
2
3
4
5
6
7
8
9
10
11
12
13
14
15
16
17
18
+-----------------------------+----------+
| Variable_name | Value |
+-----------------------------+----------+
| connect_timeout | 10 |
| delayed_insert_timeout | 300 |
| have_statement_timeout | YES |
| innodb_flush_log_at_timeout | 1 |
| innodb_lock_wait_timeout | 50 |
| innodb_rollback_on_timeout | OFF |
| interactive_timeout | 28800 |
| lock_wait_timeout | 31536000 |
| net_read_timeout | 30 |
| net_write_timeout | 60 |
| rpl_stop_slave_timeout | 31536000 |
| slave_net_timeout | 60 |
| wait_timeout | 28800 |
+-----------------------------+----------+
13 rows in set (0.01 sec)

代码如下:

1
2
3
4
5
6
7
8
9
10
11
12
13
14
15
16
17
18
19
20
21
22
23
24
25
// --------------------------Controller------------
/**
* 测试web端登录锁表
*/
@GetMapping("/hotline/test")
public void testSomeThing() throws InterruptedException {
testService.doSomething();
}
// ----------------------------Service----------------
@Service
public class TestService {

@Autowired
private BizConfMapper confMapper;

@Transactional(rollbackFor = Exception.class)
public void doSomething() throws InterruptedException {
// 共享锁
BizConf conf = confMapper.selectByPrimaryKey(0);
// 排它锁
confMapper.updateByPrimaryKey(conf);
// 等待让下个线程超时,最起码要大于50
Thread.sleep(60000);
}
}

日志输出与项目中出现的错误信息基本一致,如下:
在这里插入图片描述

在这里插入图片描述


@Transactional注解中加入timeout后,报错不一样,但是阔以理解为spring框架为我们抛出了异常。如下:
在这里插入图片描述

在这里插入图片描述

后记

其中对我理解这种现象有很大帮助的资料为这一张图,它让我明白了锁与事务之间的关系。
在这里插入图片描述

在这里插入图片描述


参考:
https://segmentfault.com/a/1190000014133576

【转载-摘要】彻底搞懂 Git-Rebase

原文链接:http://jartto.wang/2018/12/11/git-rebase/?hmsr=toutiao.io&utm_medium=toutiao.io&utm_source=toutiao.io

rebase的主要功能就是改变commit历史,在这篇文章中,场景一是改变未push的commit历史,场景二是在合并分支时,改变当前分支的历史,从而达到简化commit历史的目的,让历史一目了然。对强迫症患者来说简直就是福音。

Rebase 场景一:如何合并多次提交纪录?

1.我们来合并最近的 4 次提交纪录,执行:
git rebase -i HEAD~4
2.这时候,会自动进入 vi 编辑模式:

1
2
3
4
5
6
7
8
9
10
11
12
13
14
15
16
17
18
19
20
21
s cacc52da add: qrcode
s f072ef48 update: indexeddb hack
s 4e84901a feat: add indexedDB floder
s 8f33126c feat: add test2.js
# Rebase 5f2452b2..8f33126c onto 5f2452b2 (4 commands)
#
# Commands:
# p, pick = use commit
# r, reword = use commit, but edit the commit message
# e, edit = use commit, but stop for amending
# s, squash = use commit, but meld into previous commit
# f, fixup = like "squash", but discard this commit's log message
# x, exec = run command (the rest of the line) using shell
# d, drop = remove commit
#
# These lines can be re-ordered; they are executed from top to bottom.
#
# If you remove a line here THAT COMMIT WILL BE LOST.
#
# However, if you remove everything, the rebase will be aborted.
#

有几个命令需要注意一下:

1
2
3
4
5
6
7
p, pick = use commit
r, reword = use commit, but edit the commit message
e, edit = use commit, but stop for amending
s, squash = use commit, but meld into previous commit
f, fixup = like “squash”, but discard this commit’s log message
x, exec = run command (the rest of the line) using shell
d, drop = remove commit

按照如上命令来修改你的提交纪录:

1
2
3
4
s cacc52da add: qrcode
s f072ef48 update: indexeddb hack
s 4e84901a feat: add indexedDB floder
p 8f33126c feat: add test2.js

3.如果保存的时候,你碰到了这个错误:
error: cannot 'squash' without a previous commit
注意不要合并先前提交的东西,也就是已经提交远程分支的纪录。

4.如果你异常退出了 vi 窗口,不要紧张:

git rebase --edit-todo
这时候会一直处在这个编辑的模式里,我们可以回去继续编辑,修改完保存一下:

git rebase --continue
5.查看结果

git log
在这里插入图片描述

在这里插入图片描述


三次提交合并成了一次,减少了无用的提交信息。

Rebase 场景二:分支合并

1.我们先从 master 分支切出一个 dev 分支,进行开发:

git:(master) git checkout -b feature1git1

git1


2.这时候,你的同事完成了一次 hotfix,并合并入了 master 分支,此时 master 已经领先于你的 feature1 分支了:
git2

git2


3.恰巧,我们想要同步 master 分支的改动,首先想到了 merge,执行:

git:(feature1) git merge master
git3

git3


图中绿色的点就是我们合并之后的结果,执行:

git:(feature1) git log
就会在记录里发现一些 merge 的信息,但是我们觉得这样污染了 commit 记录,想要保持一份干净的 commit,怎么办呢?这时候,git rebase 就派上用场了。

4.让我们来试试 git rebase ,先回退到同事 hotfix 后合并 master 的步骤:
git4

git4


5.使用 rebase 后来看看结果:

git:(feature1) git rebase master
这里补充一点:rebase 做了什么操作呢?

首先,git 会把 feature1 分支里面的每个 commit 取消掉;
其次,把上面的操作临时保存成 patch 文件,存在 .git/rebase 目录下;
然后,把 feature1 分支更新到最新的 master 分支;
最后,把上面保存的 patch 文件应用到 feature1 分支上;
git5

git5


commit 记录我们可以看出来,feature1 分支是基于 hotfix 合并后的 master ,自然而然的成为了最领先的分支,而且没有 mergecommit 记录,是不是感觉很舒服了。

6.在 rebase 的过程中,也许会出现冲突 conflict。在这种情况,git 会停止 rebase 并会让你去解决冲突。在解决完冲突后,用 git add 命令去更新这些内容。

注意,你无需执行 git-commit,只要执行 continue

git rebase --continue
这样 git 会继续应用余下的 patch 补丁文件。

7.在任何时候,我们都可以用 –abort 参数来终止 rebase 的行动,并且分支会回到 rebase 开始前的状态。

git rebase —abort

不足

只要你的分支上需要 rebase 的所有 commits 历史还没有被 push 过,就可以安全地使用 git-rebase来操作。

因为push到远程仓库后,你再次提交时,git对比会发现两个仓库的历史不一致。

一种基于redis的分布式锁的实现(当前项目中在使用)

主要思想是利用redis执行命令时的单线程特性。

1
2
3
4
5
6
7
8
9
10
11
12
13
14
15
16
17
18
19
20
21
22
23
24
25
26
27
28
29
30
31
32
33
34
35
36
37
38
39
40
41
42
43
44
45
46
47
48
49
50
51
52
53
54
55
56
57
58
59
60
61
62
63
64
65
66
67
68
69
70
71
72
73
74
75
76
77
78
79
80
81
82
83
84
85
86
87
88
89
90
91
92
93
94
95
96
97
98
99
100
101
102
103
104
105
106
107
108
109
110
111
112
113
114
115
116
117
118
119
120
121
122
123
124
125
126
127
128
129
130
131
132
133
134
135
136
137
138
139
140
141
142
143
144
145
146
147
/**
* 分布式锁
*/
@Component
public class DistributedLock {

public static final Logger logger = LoggerFactory.getLogger(DistributedLock.class);
/**
* 加锁默认超时时间
*/
private static final long DEFAULT_TIMEOUT_SECOND = 5;
/**
* 获取所等待的时间
*/
private static final long DEFAULT_WAITE_TIMEOUT_SECOND = 5;
/**
* 加锁循环等待时间
*/
private static final long LOOP_WAIT_TIME_MILLISECOND = 30;
@Autowired
@Qualifier("redisCacheService")
private BaseCacheService cacheService;

/**
* 有超时等待的加锁
*
* @param timeoutSecond 如果为null,使用默认超时时间
* @param waiteTimeoutSecond 若果为null,使用默认超时时间
* @return 加锁的值(超时时间:-1表示获取失败,超时)
*/
public long lock(String key, Long timeoutSecond, Long waiteTimeoutSecond) {

logger.info("Thread:" + Thread.currentThread().getName() + " start lock");
long beganTime = System.currentTimeMillis() / 1000;
//如果参数错误
if (timeoutSecond != null && timeoutSecond <= 0) {
timeoutSecond = DEFAULT_TIMEOUT_SECOND;
}
timeoutSecond = timeoutSecond == null ? DEFAULT_TIMEOUT_SECOND : timeoutSecond;
if (waiteTimeoutSecond != null && waiteTimeoutSecond <= 0) {
waiteTimeoutSecond = DEFAULT_WAITE_TIMEOUT_SECOND;
}
waiteTimeoutSecond =
waiteTimeoutSecond == null ? DEFAULT_WAITE_TIMEOUT_SECOND : waiteTimeoutSecond;
while (true) {
//等待超时判断
long endTime = System.currentTimeMillis() / 1000;
if ((endTime - beganTime) >= waiteTimeoutSecond) {
return -1l;
}
//超时时间点
long timeoutTimeMilli = cacheService.getCurrentTimeMilliForCache() + timeoutSecond * 1000;

//如果设置成功
if (cacheService.setIfAbsent(key, timeoutTimeMilli)) {
logger.info("Thread:" + Thread.currentThread().getName() + " lock success");
return timeoutTimeMilli;
}

//如果已经超时
Long value = cacheService.getVal(key, Long.class);
if (value != null && value.longValue() < cacheService.getCurrentTimeMilliForCache()) {

//设置新的超时时间
Long oldValue = cacheService.getAndSet(key, timeoutTimeMilli);

//多个线程同时getset,只有第一个才可以获取到锁
if (value.equals(oldValue)) {
logger.info("Thread:" + Thread.currentThread().getName() + " lock success");
return timeoutTimeMilli;
}
}

//延迟一定毫秒,防止请求太频繁
try {
Thread.sleep(LOOP_WAIT_TIME_MILLISECOND);
} catch (InterruptedException e) {
logger.error("DistributedLock lock sleep error", e);
}
}
}

/**
* 无超时等待的加锁
*
* @param timeoutSecond 如果为null,使用默认超时时间
* @return 加锁的值(超时时间)
*/
public long lock(String key, Long timeoutSecond) {

logger.info("Thread:" + Thread.currentThread().getName() + " start lock");

//如果参数错误
if (timeoutSecond != null && timeoutSecond <= 0) {
timeoutSecond = DEFAULT_TIMEOUT_SECOND;
}
timeoutSecond = timeoutSecond == null ? DEFAULT_TIMEOUT_SECOND : timeoutSecond;
while (true) {
//超时时间点
long timeoutTimeMilli = cacheService.getCurrentTimeMilliForCache() + timeoutSecond * 1000;

//如果设置成功
// 若在redis中、没有相应的key值,那么可以认为,当前线程即或得该锁。
if (cacheService.setIfAbsent(key, timeoutTimeMilli)) {
logger.info("Thread:" + Thread.currentThread().getName() + " lock success");
return timeoutTimeMilli;
}

//如果已经超时
// 此时该key在redis已存在,获取该key的值
Long value = cacheService.getVal(key, Long.class);
if (value != null && value.longValue() < cacheService.getCurrentTimeMilliForCache()) {

//设置新的超时时间
// 如果此时获取到的oldValue,与前面获取的value相同,则说明该线程可以获得锁
// 获得锁后,set进新值。
Long oldValue = cacheService.getAndSet(key, timeoutTimeMilli);

//多个线程同时getset,只有第一个才可以获取到锁
if (value.equals(oldValue)) {
logger.info("Thread:" + Thread.currentThread().getName() + " lock success");
return timeoutTimeMilli;
}
}

//延迟一定毫秒,防止请求太频繁
try {
Thread.sleep(LOOP_WAIT_TIME_MILLISECOND);
} catch (InterruptedException e) {
logger.error("DistributedLock lock sleep error", e);
}
}
}

/**
* 释放锁
*/
public void unLock(String key, long lockValue) {

logger.info("Thread:" + Thread.currentThread().getName() + " start unlock");
Long value = cacheService.getVal(key, Long.class);
if (value != null && value.equals(lockValue)) {//如果是本线程加锁
cacheService.deleteVal(key);
logger.info("Thread:" + Thread.currentThread().getName() + " unlock success");
}
}
}

LeetCode 罗马字相关

https://leetcode.com/problems/integer-to-roman/

1
2
3
4
5
6
7
8
9
10
11
12
13
14
15
16
17
18
19
20
21
22
23
24
25
26
27
28
29
30
31
32
33
34
35
36
37
38
39
40
41
42
43
44
45
46
47
48
49
50
51
52
53
54
55
56
57
char ONE[5] = {' ', 'I', 'X', 'C', 'M'};
char FIVE[4] = {' ', 'V', 'L', 'D'};
char strr[100];
int judgeByte(int num, int * byte) {
int ten = 10, tmp = 1;
while (1) {
if (num / ten == 0) {
*byte = tmp;
return ten;
} else {
ten *= 10;
tmp ++;
}
}
}
void produceRomanSymbol(int num, int ten, int byte, char * result) {
if (byte == 0) {
//sprintf(result + strlen(result), "\n");
return ;
}
int target = num / (ten/10);
//printf("num = %d, ten = %d, target = %d, byte = %d\n", num, ten, target, byte);
if (target == 5) {
sprintf(result + strlen(result), "%c", FIVE[byte]);
}
else if (target > 5) {
if (target == 9) {
sprintf(result + strlen(result), "%c%c", ONE[byte], ONE[byte + 1]);
}
else {
int i = 1;
sprintf(result + strlen(result), "%c", FIVE[byte]);
for (; i <= (target - 5); i ++) {
sprintf(result + strlen(result), "%c", ONE[byte]);
}
}
}
else {
if (target == 4) {
sprintf(result + strlen(result), "%c%c", ONE[byte], FIVE[byte]);
}
else {
int i = 1;
for (; i <= target; i ++) {
sprintf(result + strlen(result), "%c", ONE[byte]);
}
}
}
produceRomanSymbol(num % (ten/10), ten / 10, byte - 1, result);
}
char* intToRoman(int num) {
int byte;
int ten = judgeByte(num, &byte);
memset(strr, 0, 100);
produceRomanSymbol(num, ten, byte, strr);
return strr;
}

https://leetcode.com/problems/roman-to-integer/

1
2
3
4
5
6
7
8
9
10
11
12
13
14
15
16
17
18
19
20
21
22
23
24
25
26
27
28
29
30
31
32
33
34
35
36
37
38
39
40
41
int getRomanValue(char ch) {
switch (ch) {
case 'I': return 1;
case 'V': return 5;
case 'X': return 10;
case 'L': return 50;
case 'C': return 100;
case 'D': return 500;
case 'M': return 1000;
}
return -1;
}

int romanToInt(char* s) {
int cnt = 0, tmp = 0, i;
for (i = 0; i < strlen(s); i ++) {
// printf("i = %d, ", i);
if (i == 0) {
tmp = getRomanValue(s[i]);
} else {
int diff = getRomanValue(s[i]) - getRomanValue(s[i - 1]);
if (diff == 0) {
tmp += getRomanValue(s[i]);
// printf("** tmp = %d, pos = %c\n", tmp, s[i]);
//cnt += tmp;
} else if(diff > 0) {
cnt += (getRomanValue(s[i]) - tmp);
// printf("cnt = %d, pos = %c\n", cnt, s[i]);
tmp = 0;
} else {
cnt += tmp;
tmp = 0;
tmp += getRomanValue(s[i]);
// printf("tmp = %d, pos = %c\n", tmp, s[i]);
}
}
}
if (tmp != 0)
cnt += tmp;
return cnt;
}

nginx中的root与alias的差别

格式

nginx指定文件路径有两种方式root和alias,指令的使用方法和作用域:
[root]
语法:root path
默认值:root html
配置段:http、server、location、if
[alias]
语法:alias path
配置段:location

root与alias主要区别

在于nginx如何解释location后面的uri,这会使两者分别以不同的方式将请求映射到服务器文件上。
root的处理结果是:root路径 + location路径
alias的处理结果是:使用alias路径替换location路径
alias是一个目录别名的定义,root则是最上层目录的定义。
还有一个重要的区别是alias后面必须要用“/”结束,否则会找不到文件的,而root则可有可无。

例:

1
2
3
4
5
6
7
8
9
10
# 如果一个请求的URI是/t/a.html时,web服务器将会返回服务器上的/www/root/html/t/a.html的文件。
location ^~ /t/ {
root /www/root/html/;
}

# 如果一个请求的URI是/t/a.html时,web服务器将会返回服务器上的/www/root/html/new_t/a.html的文件。
# 注意这里是new_t,因为alias会把location后面配置的路径丢弃掉,把当前匹配到的目录指向到指定的目录。
location ^~ /t/ {
alias /www/root/html/new_t/;
}

注意

  1. 使用alias时,目录名后面一定要加”/“。
  2. alias在使用正则匹配时,必须捕捉要匹配的内容并在指定的内容处使用。
  3. alias只能位于location块中。(root可以不放在location中)

搬运工:
文章为: nginx.cn原创,转载请注明本文地址: http://www.nginx.cn/4658.html

EXT4中的inode的简易再理解

之前在鸟哥的linux上面,了解过inode相关的内容。最近被要求出一个面试题,想到了这个,然后自己复习了一下inode相关的内容,简短地描述如下认识文件系统是数据组织方式,定义数据在磁盘上的保存、读取和更新方法。不同的文件系统可以根据存储设备的不同进行优化,提高效率。可以为每个磁盘分区设置一个或多
阅读更多

linux中free命令背后的故事

available当应用程序需要内存时,如果没有足够的 free 内存可以用,内核就会从 buffer 和 cache 中回收内存来满足应用程序的请求。所以从应用程序的角度来说,available = free + buffer + cache。请注意,这只是一个很理想的计算方式,实际中的数据往往
阅读更多

Java进程周期性自动退出的原因排查

一个java -jar服务在被CI启动后,过一段时间,进程就被消失了,不见了。日志没有关于出错的相关信息。对日志中记录的最后一条请求,进行压力测试,但该进程却没有自己消失。个人觉得这个问题很有意思,但是我也明白,找到这其中的原因可能需要很长的时间。

Update(2019-3-15 )

最近公司的其他项目上,又遇到了一个进程老是无缘无故就挂的现象,按照之前的那种场景来排查,并没有发现有那种CI的出现。顿时又陷入了困境之中。不过我还是按部就班的做了三件事:

  • 用root权限启动改服务
  • 做好对jvm的监控
  • 用strace对进程做好监控
    顺便了解了一下strace的含义,发现其中的字段确实是有很大的意义。
    监控命令如下:
    1
    nohup strace -T -tt -e trace=all -p \`pgrep -f algorithm-work-1.0.0.jar\ ` > trace.\`pgrep -f algorithm-work-1.0.0.jar\`.log &\
    监控日志如下:
    1
    2
    3
    4
    5
    6
    7
    8
    webapp@ecs-f1c4-0003:/opt/webapp/logs$ cat trace.26077.log 
    strace: Process 26077 attached
    11:22:43.117920 futex(0x7f631a5fb9d0, FUTEX_WAIT, 26078, NULL) = ? ERESTARTSYS (To be restarted if SA_RESTART is set) <1238.653416>
    11:43:21.776222 --- SIGTERM {si_signo=SIGTERM, si_code=SI_USER, si_pid=26158, si_uid=0} ---
    11:43:21.777278 futex(0x7f63199c0540, FUTEX_WAKE_PRIVATE, 1) = 1 <0.004217>
    11:43:21.786583 rt_sigreturn({mask=[]}) = 202 <0.005049>
    11:43:21.796220 futex(0x7f631a5fb9d0, FUTEX_WAIT, 26078, NULL <unfinished ...>
    11:43:23.605244 +++ exited with 143 +++
    从上面看来,uid=0说明操作者是root,但是kill -9不一定有,不过至少是可以看出来是什么时候被干掉的。

转机
发现是被别人用来挖矿了==
在这里插入图片描述

在这里插入图片描述


详细的情况与下面链接的描述一模一样。本来还有一个进程叫做crond64,在top中看到占用的CPU非常高,各个核的都占到了90%+。执行的挖矿脚本的目录在~/.ttp下,打包好了,准备研究研究。
https://askubuntu.com/questions/1115770/crond64-tsm-virus-in-ubuntu

压力测试

首先想到的是:是不是某一个接口出现了问题,所以根据日志中所记录的最后一条请求,对其进行压力测试。脚本如下:

1
2
3
4
5
6
7
#!/bin/bash
# 获取工单详情
for i in {1..100000}
do
curl --header "token:71e8e4dd40dd65f645ceb214397f578e" --url "192.168.31.117:9997/workorder/mine/orders?id=79" &
echo ""
done

结果被认为遭到了ddos攻击,囧!
在这里插入图片描述

在这里插入图片描述


该服务进程扛过了这些请求,没有死亡。

排查CI

因为整个项目通过gitlab管理,而gitlab中有一项叫做CI,可以通过ci脚本来执行一些脚本达到发布、部署最新的服务到相应服务器上。这里面可能会存在问题,比如说,另外一个ci脚本在执行的时候,会把该服务的进程kill掉,只是会有这种可能,因为CI脚本大部分是通过copy的,但是可能性不高,因为所有的CI脚本都能够顺利执行,所以kill掉的肯定是自身服务的进程,不然CI脚本对应的服务可能起不来,但目前所有的CI脚本都能顺利执行完。但是还是去排查一下CI脚本,没毛病

是谁kill掉了该进程?

这个进程消失的原因,可以想到的情况为:jvm崩溃、被操作系统的oom_killer杀掉、被某个脚本杀掉?

是否为操作系统所终结?

由于outofmemory被kill掉的进程,会在/var/log下的某个文件中留下最终的遗迹。但是在整个/var/log下、都没有搜索kill的痕迹,如下:
在这里插入图片描述

在这里插入图片描述


在这里插入图片描述

在这里插入图片描述


如果没有/var/log/messages这个文件,可以通过设置,将这个log文件开启。

  1. root身份打开 /etc/rsyslog.d/50-default.conf

  2. 把注释#去掉

    1
    2
    3
    4
    #*.=info;*.=notice;*.=warn;\
    # auth,authpriv.none;\
    # cron,daemon.none;\
    # mail,news.none -/var/log/messages
  3. 重启后ok
    sudo restart rsyslog

并没有发现这个oom_killer的痕迹

JVM自己崩溃?

在该服务的启动参数中加入了对崩溃日志的指定:
java -jar -Xms512m -Xmx512m -XX:MaxPermSize=126m -XX:+HeapDumpOnOutOfMemoryError -XX:HeapDumpPath=/opt/webapp/xxx-server/ -XX:ErrorFile=/opt/webapp/xxx-server/hs_err_pid_%p.log xxx-server.jar
但是在该进程被终结后,并没有发现相应目录下的日志文件。所以这种情况下,同样也没有对其进行内存分析的先决条件、jdk自带的一系列工具并没有发挥出作用的余地。

到底是谁杀掉了这个进程?

使用nohup strace -T -tt -e trace=all -p 21715 > trace.log &监控该pid的情况,如果是被kill -9,会出现一个log,大致如下:
在这里插入图片描述

在这里插入图片描述

结果

通过strace命令的跟踪、最终发现trace.log的内容如下所示:
在这里插入图片描述

在这里插入图片描述


出现这个的原因基本上是两个、一个是人为的kill -9、或者就是被系统kill -9。系统杀掉该进程的原因、被逐一排除,结果只剩下人为的因素。关于人为的因素、首先查看命令,并没有相关的kill记录。然后发现开发环境与测试环境的该进程基本上同时挂掉、并且都点了这两个环境的某个CI,然后这两个环境上的该进程都挂掉了,因此基本断定是CI操作杀掉了该进程。
被杀掉的进程名字为:java -jar workorder-server.jar,通过CI发布&启动的进程名字为:java -jar order-server.jar。然后在点击order相关的CI时会执行如下操作:

1
2
3
4
5
script:
- mvn clean package -pl order-server -am -Dmaven.test.skip=true
- scp order-server/target/order-server.jar ${user_dev}@${nemt_host_dev}:/opt/webapp/order-server/.
- ssh ${user_dev}@${nemt_host_dev} 'kill -9 `pgrep -f order-server\.jar` ; echo 1'
- ssh ${user_dev}@${nemt_host_dev} '. /etc/profile ; cd /opt/webapp/order-server/ ; nohup java -jar order-server.jar >> /dev/null 2>&1 &'

问题就在kill -9上面,pgrep查出来的进程号有两个,所以执行order相关的CI时,顺带也把workorder干掉了。
在这里插入图片描述

在这里插入图片描述

解决办法

修改shell语句,让pgrep order-server时,只显示出order-server的进程号即可。

SpringMVC源码探索之RequestBody的工作原理

遇到一个很奇怪的问题,后面发现了问题所在,原因是自己太过匆忙、连快捷键都被复制粘贴省略了。虽然出现问题的原因有点傻逼,但是之所以出现这种问题的原因却更加引人入胜。问题现象描述Controller中没有逻辑,只有一个@RequestBody注释的form表单然而这个TestBean有点特殊,非一般的g
阅读更多