Certified Calico Operator: Level 1 笔记
证书课程地址:Course | CCO-L1 | Tigera
还有一份可能有用的电子书:
Tigera_eBook_Intro_to_Kubernetes_Networking.pdf
Kubernetes Network Model
- 每个 Pod 都有一个 IP 地址;
- 同一个 Pod 中的容器共享同一 IP 地址,并能通过该地址相互通信;
- Pod 与 Pod 之间可以通过 IP 通信(无需地址转换);
- 网络隔离可以限制哪里 Pod 可以访问哪些不可以。

安装测试集群
1 | curl https://raw.githubusercontent.com/tigera/ccol1/main/control-init.yaml | multipass launch -n control -m 2048M 20.04 --cloud-init - |
重启系统后,可能需要启动所有的虚拟机
1 | multipass start --all |
安装 Calico
4 种安装方式
- Manifest
- Operator
- Managed Kubernetes Services
- Kubernetes Distros and Installers
Operator 方式安装
可参考:Quickstart for Calico on Kubernetes
注意事项:
- Pod 的网段
- calico 版本与 kubernetes 版本之间的兼容关系(最好就用教程里面的安装命令)删除 tigera-operator 命名空间
1
2
3
4
5
6
7
8
9
10
11
12
13
14kubectl create -f https://docs.projectcalico.org/archive/v3.21/manifests/tigera-operator.yaml
cat <<EOF | kubectl apply -f -
apiVersion: operator.tigera.io/v1
kind: Installation
metadata:
name: default
spec:
calicoNetwork:
containerIPForwarding: Enabled
ipPools:
- cidr: 198.19.16.0/20
natOutgoing: Enabled
encapsulation: None
EOF相关 Pod 的工作内容:1
2
3
4curl -H "Content-Type: application/json" \
-XPUT \
-d '{"apiVersion":"v1","kind":"Namespace","metadata":{"name":"tigera-operator"},"spec":{"finalizers":[]}}' \
http://localhost:8001/api/v1/namespaces/tigera-operator/finalize
tigera-operator/tigera-operator-xxxx-xxx
监听 Installation CR,并按照配置安装 calico CNI。
- calico-system/calico-node
DaemonSet,网络策略实现;设置Node节点上的路由;为 IPIP、VXLAN、WireGuard 管理虚拟接口。
- calico-system/calico-typha
StatefulSet,作为 calico-node 用来查询、监听 api-server 时的缓存层,避免直接访问 api-server。它由 tigera-operator 来随着 node 的变化,进行扩缩容。
- calico-system/calico-controller
calico 的各种 controller 集合,用于自动同步资源状态。
Service: This directs the traffic to a pod.
TargetPort: This is the actual port on which your application is running inside the container.
Port: Some times your application inside container serves different services on a different port.
Example: The actual application can run 8080 and health checks for this application can run on 8089 port of the container. So if you hit the service without port it doesn’t know to which port of the container it should redirect the request. Service needs to have a mapping so that it can hit the specific port of the container.
1 | kind: Service |
if you hit the my-service:8089 the traffic is routed to 8080 of the container(targetPort). Similarly, if you hit my-service:8443 then it is redirected to 8085 of the container(targetPort). But this myservice:8089 is internal to the kubernetes cluster and can be used when one application wants to communicate with another application. So to hit the service from outside the cluster someone needs to expose the port on the host machine on which kubernetes is running so that the traffic is redirected to a port of the container. This is node port(port exposed on the host machine). From the above example, you can hit the service from outside the cluster(Postman or any rest-client) by host_ip:nodePort
Say your host machine ip is 10.10.20.20 you can hit the http, metrics, health services by 10.10.20.20:30475, 10.10.20.20:31261, 10.10.20.20:30013.
Edits: Edited as per Raedwald comment.
浏览器访问服务 502 发现服务挂了 但是 docker 状态看起来还正常着服务跑在 Docker 容器里面
启动方式为:shell (pid -> 1) -> java ( pid != 1)
docker ps能看见xxx的 STATUS 为 Up 4 daysdocker top xxx显示出来无进程docker exec -it xxx bash显示 cannot exec in a stopped state: unknown

docker logs 能看见日志 可以看见最后一行日志为 killed
docker stop 需要等待一段时间才能结束
Docker 版本:Docker Engine - Community 20.10.1
1 | # ubuntu @ ucloud-hk in ~ [10:55:49] |
必要的工具安装
- cfssl
- cfssljson
- kubectl
证书与CA

配置和生成kubeconfig
- kubelet 配置文件
worker-n.kubeconfig,分发到所有 worker 节点上。
- kube-proxy 配置文件
kube-proxy.kubeconfig,分发到所有 worker 节点上。
- kube-controller-manager 配置文件
kube-controller-manager.kubeconfig,分发到所有 控制节点 上。
- kube-scheduler 配置文件
kube-scheduler.kubeconfig,分发到所有 控制节点 上。
- Admin 配置文件
admin.kubeconfig,分发到所有 控制节点 上。
配置加密k8s secrets的秘钥
encryption-config.yaml,分发到所有 控制节点 上。
配置&部署etcd
前置要求:etcd & etcdctl 二进制
将 ca.pem、kubernetes-key.pem、kubernetes.pem 拷贝到 etcd 所在节点上,其中 kubernetes-key.pem、kubernetes.pem 作为 etcd https 服务的 TLS 证书。
配置&部署控制节点服务
前置要求:kube-apiserver & kube-controller-manager & kube-scheduler & kubectl 二进制
api-server
在其启动参数中,需要
- 指定 CA 为
ca.pem - 指定 etcd 的 CA 证书
ca.pem,公私钥为kubernetes-key.pem、kubernetes.pem、及 etcd 的访问地址 - 指定 k8s secrets 的秘钥为
encryption-config.yaml - 指定 kubelet 的 CA 证书
ca.pem,公私钥为kubernetes-key.pem、kubernetes.pem - 指定 api-server https 服务所用的 TLS 证书为
kubernetes-key.pem、kubernetes.pem - 指定 service account 的证书为
service-account.pem
controller-manager
在其启动参数中,需要
- 指定 cluster 所使用的 CA 的公私钥为
ca.pem、ca-key.pem - 指定 kubeconfig 使用 kube-controller-manager.kubeconfig
- 指定 root CA 为
ca.pem - 指定 service account 的私钥为
service-account-key.pem
scheduler
在启动参数中,指定配置文件 kube-scheduler.yaml,然后在 kube-scheduler.yaml 中指定 kubeconfig 为 kube-scheduler.kubeconfig。
启动控制面服务 & 验证
给 kubelet 添加数据处理权限
创建 system:kube-apiserver-to-kubelet ClusterRole 及 system:kube-apiserver ClusterRoleBinding 以允许请求 Kubelet API 和执行大部分来管理 Pods 的任务
配置&部署worker节点
- 安装 OS 依赖的组件:socat conntrack ipset
- 安装 CRI
- 安装 worker 节点所需的二进制:
kubectl、kube-proxy、kubelet、默认提供的 CNI plugins
配置kubelet
创建 kubelet-config.yaml 文件,在该文件中指定
- CA 证书
- TLS 公私钥分别使用
worker-1.pem、worker-1-key.pem。好家伙,kubelet 又是一个 https 服务。
并在 kubelet.service 指定
- 配置文件使用文件
- 指定 kubelet 所使用的 kubeconfig 为 worker-n.kubeconfig
配置kube-proxy
创建 kube-proxy-config.yaml 文件,在该文件中指定所用的 kubeconfig 为 kube-proxy.kubeconfig;再在 kubelet.service 指定使用此配置文件。
启动控制面服务
配置 kubectl 所使用的 kubeconfig
使用 admin.pem 和 admin-key.pem 生成 kubeconfig。
验证
1 | kubectl get componentstatuses |
安装其他重要的组件
- 安装 CNI
- DNS
- 验证
1
2
3kubectl run busybox --image=busybox:1.28.3 --command -- sleep 3600
kubectl get pods -l run=busybox
kubectl exec -ti $POD_NAME -- nslookup kubernetes
烟雾测试
- 数据加密
- Deployment
- 创建
- 端口转发
- 容器日志
- 在容器中执行命令
- Service
- 创建
- 访问
为何如此设计
- 解耦对存储的使用与维护
- 拓展不同的存储需求
定义
PV 描述的是持久化存储数据卷。这个 API 对象主要定义的是⼀个持久化存储在宿主机上的⽬录,⽐如⼀个 NFS 的挂载⽬录。通常情况下,PV 对象是由运维⼈员事先创建在 Kubernetes 集群⾥待⽤的。_类似于接口的具体实现,干活的打工人。
PVC 描述的是 Pod 所希望使⽤的持久化存储的属性。PVC 对象通常由开发⼈员创建;或者以 PVC 模板的⽅式成为 StatefulSet 的⼀部分,然后由 StatefulSet 控制器负责创建带编号的 PVC。类似于接口,不提供具体实现_。
PV与PVC匹配绑定
规则
- 两者的 spec 字段匹配
- 两者的 storageClassName 字段必须相同
过程
通过 operator 机制,为每个未处于 Bound 状态的 PVC,遍历所有可用的 PV,来匹配到合适的 PV。
结果
在 PVC 的 spec.volumeName 字段上填写上 PV 的名称
两阶段处理
- Attach 调用存储系统的 API 将存储挂载到 Pod 将要调度到的 Node 上;
由 AttachDetachController 管理。它不断地检查每⼀个 Pod 对应的 PV,和 这个 Pod 所在宿主机之间挂载情况。从⽽决定,是否需要对这个 PV 进⾏ Attach(或者 Dettach)操作。
作为⼀个 Kubernetes 内置的控制器,Volume Controller ⾃然是 kube-controller-manager 的⼀部分。所以,AttachDetachController 也⼀定是运⾏在 Master 节点上的。当然,Attach 操作只需要调⽤公有云或者具体存储项⽬的 API,并不需要在具体的宿主机上执⾏操作。
- Mount
- 格式化存储设备
- 绑定挂载到 Pod 中
由 VolumeManagerReconciler 管理。它必须发⽣在 Pod 对应的宿主机上,所以必须是 kubelet 组件的⼀部分。它运⾏起来之后,是⼀个独⽴于 kubelet 主循环的 Goroutine(不堵塞 kubelet 主控循环)。
PV 管理方式
- Static Provisioning
创建 PVC 之后,由运维人员手动创建 PV 的方式
- Dynamic Provisioning
创建 PVC 时指定 StorageClass,由 StorageClass 中指定的 provisioner 来创建对应的 PV。
StorageClass
当 PVC 中指定的 StorageClass 存在时,调用对应的 provisioner 来创建 PV;否则去匹配带有相同 StorageClass 的 PV。
如果 PVC 中未指定 StorageClass,当集群已经开启了名叫 DefaultStorageClass 的 Admission Plugin时,它就会为 PVC 和 PV ⾃动添加⼀个默认的 StorageClass;否则,PVC 的 storageClassName 的值就是“”,这也意味着它只能够跟 storageClassName 也是“”的 PV 进⾏绑定。
本地持久化卷的实现
延迟绑定:当使用本地存储后,需要延迟 PV 与 PVC 之间的绑定时机到 Pod 调度时,避免出现 PV 与 Pod 不在同一节点上面的问题。
1 | kind: StorageClass |
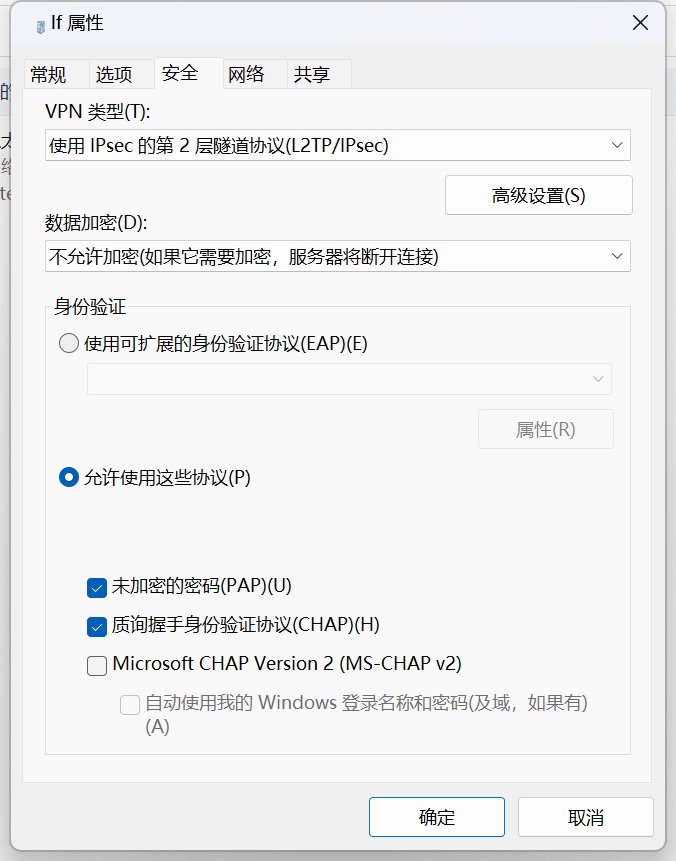
Windows系统默认不支持连接在防火墙NAT后的L2TP/IPSec协议VPN,但是可以通过修改注册表解决。
修改方法如下:
- 定位注册表 :
HKEY_LOCAL_MACHINE\SYSTEM\CurrentControlSet\Services\PolicyAgent - 新建DWORD (32位)值,名称:
AssumeUDPEncapsulationContextOnSendRule - 值填
2 - 重启系统
In order to disable IPSec on Windows 7/Vista
- Click Start, then in search box type: run ENTER
- In the Run dialog type:
regeditENTER - In Registry Editor: Locate and then click the following registry subkey:
HKEY_LOCAL_MACHINE\System\CurrentControlSet\Services\Rasman\Parameters - On the Edit menu, click
New>DWORD - As the name of the new key enter:
ProhibitIpSec - Double click the key to edit the value.
- In the Value data field, enter:
1 - Quit Registry Editor, and then
restart the computer.
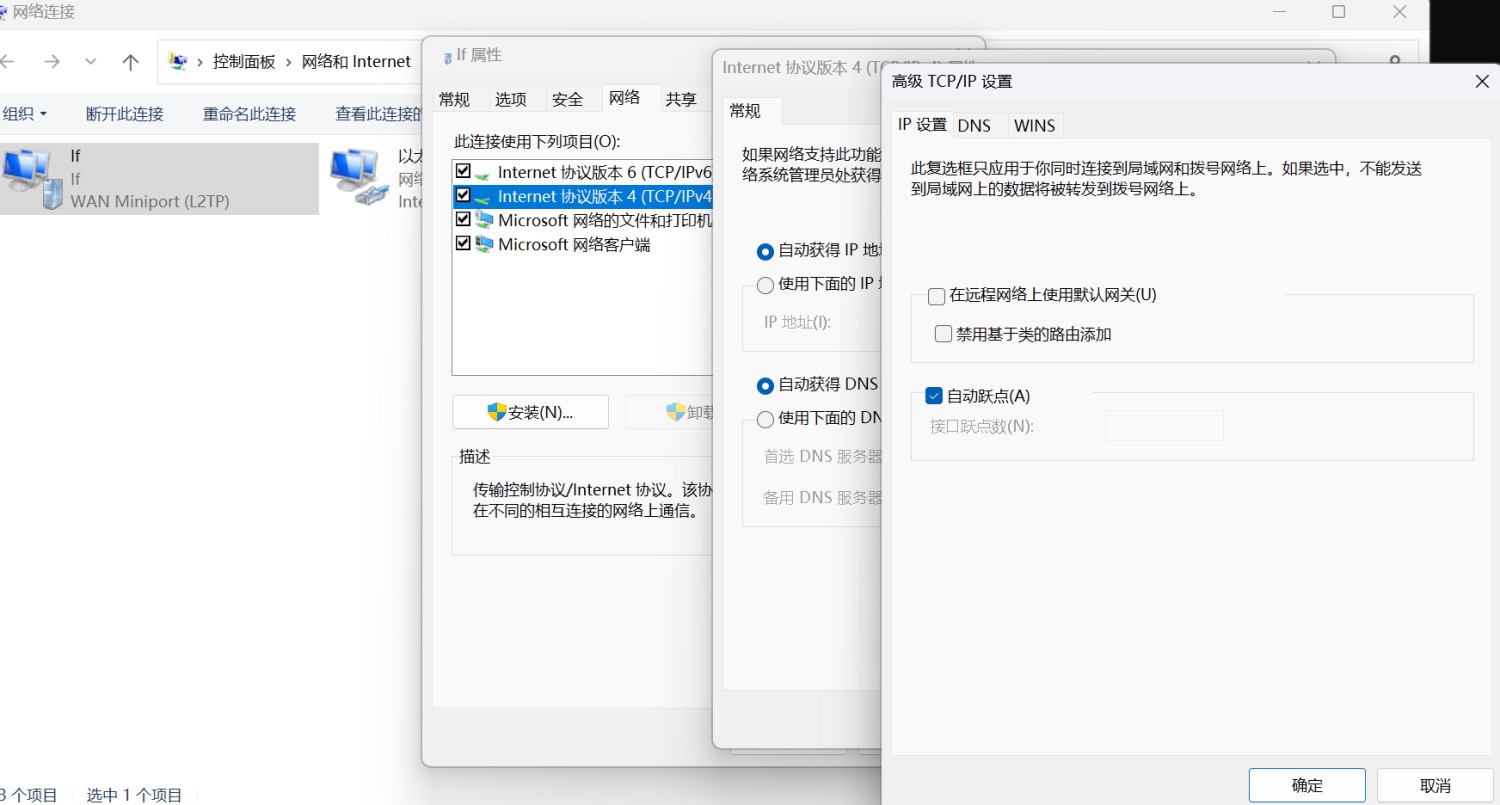
当VPN启动后,还需要修改两项与路由相关的配置

解决自研CSI启动后无法使用且CSINode无驱动信息的问题


