Service 中的几个 port 的区别

Service: This directs the traffic to a pod.
TargetPort: This is the actual port on which your application is running inside the container.
Port: Some times your application inside container serves different services on a different port.

Example: The actual application can run 8080 and health checks for this application can run on 8089 port of the container. So if you hit the service without port it doesn’t know to which port of the container it should redirect the request. Service needs to have a mapping so that it can hit the specific port of the container.

1
2
3
4
5
6
7
8
9
10
11
12
13
14
15
16
17
18
19
20
21
22
23
kind: Service
apiVersion: v1
metadata:
name: my-service
spec:
selector:
app: MyApp
ports:
- name: http
nodePort: 30475
port: 8089
protocol: TCP
targetPort: 8080
- name: metrics
nodePort: 31261
port: 5555
protocol: TCP
targetPort: 5555
- name: health
nodePort: 30013
port: 8443
protocol: TCP
targetPort: 8085

if you hit the my-service:8089 the traffic is routed to 8080 of the container(targetPort). Similarly, if you hit my-service:8443 then it is redirected to 8085 of the container(targetPort). But this myservice:8089 is internal to the kubernetes cluster and can be used when one application wants to communicate with another application. So to hit the service from outside the cluster someone needs to expose the port on the host machine on which kubernetes is running so that the traffic is redirected to a port of the container. This is node port(port exposed on the host machine). From the above example, you can hit the service from outside the cluster(Postman or any rest-client) by host_ip:nodePort

Say your host machine ip is 10.10.20.20 you can hit the http, metrics, health services by 10.10.20.20:30475, 10.10.20.20:31261, 10.10.20.20:30013.

Edits: Edited as per Raedwald comment.

深入理解Kubernetes中Service的实现

iptables 是 Kubernetes 中 Service 的默认实现,了解 iptables 是理解 Service 工作原理不可缺少的一步。iptables 的构成在对包处理的过程中,内核添加了对包自定义处理的操作,这些自定义操作以链的形式存在,而链由表组成;每条链由不同的表组成,每个表由若
阅读更多

Service使用笔记

看过好几回了,但是还是好像每次都忘,可能是用得少,但是工作中看的一些源代码中用的太多了,可是每次用的时候都看一遍,有点浪费时间,还是自己做一个简单的总结,这样可能以后会快一些。

这篇在草稿箱里实在是存太久了。。。


Service的分类

  • 启动型
    通过调用startService() 启动,一旦启动,服务即可在后台无限期运行,即使启动服务的组件已被销毁也不受影响。 已启动的服务通常是执行单一操作,而且不会将结果返回给调用方。

  • 绑定型
    通过调用bindService() 绑定到服务,服务即处于“绑定”状态。绑定服务提供了一个客户端-服务器接口,允许组件与服务进行交互、发送请求、获取结果,甚至是利用进程间通信 (IPC) 跨进程执行这些操作。 仅当与另一个应用组件绑定时,绑定服务才会运行; 多个组件可以同时绑定到该服务,但全部取消绑定后,该服务即会被销毁

服务在其托管进程的主线程中运行,它既不创建自己的线程,也不在单独的进程中运行(除非另行指定)。

Service的生命周期

因为其分两类,所以它的生命周期也有两种:
图片1

左边为启动型, 右边为绑定型.

Service在清单文件中的属性

  • android:exported: 顾名思义,是否可以被导出,即是否可以被绑定用做服务端.
    false:确保服务仅适用于您的应用.
    true: 与false相反.

请始终使用显式 Intent 启动或绑定 Service,且不要为服务声明 Intent 过滤器

启动型Service

继承Service

若使用这种方法,则需要注意一个问题,那就是**Service默认的线程是主线程**, 不要在其中做耗时的事情.

继承IntentService

使用这种方法, 就不需要担心线程的问题.因为其做为一个对Service的简单封装,它内部已经将所有的事件都放在了子线程中.不妨对其做一个简单的分析来加深对Service的理解.

1
2
3
4
5
6
7
8
9
10
@Override
public void onCreate() {
super.onCreate();
HandlerThread thread =
new HandlerThread("IntentService[" + mName + "]");
thread.start();

mServiceLooper = thread.getLooper();
mServiceHandler = new ServiceHandler(mServiceLooper);
}

在其onCreate()中,将开启一个初始化好Looper的子线程. 并为这个Looper的消息队列添加一个Handler.

1
2
3
4
5
6
7
8
9
10
11
12
13
14
15
//IntentService.java
private final class ServiceHandler extends Handler {
public ServiceHandler(Looper looper) {
super(looper);
}
@Override
public void handleMessage(Message msg) {
onHandleIntent((Intent)msg.obj);
stopSelf(msg.arg1);
}
}

@WorkerThread
protected abstract void onHandleIntent(
@Nullable Intent intent);

其中的Handler用来处理在这个子线程中的事务,其中的onHandleIntent()正是我们在继承IntentService时所需要实现的一个方法, 也就是说我们在其中写的方法都是在子线程中执行.

1
2
3
4
5
6
7
8
9
10
11
12
13
14
15
16
17
18
19
@Override
public void onStart(@Nullable Intent intent, int startId) {
Message msg = mServiceHandler.obtainMessage();
msg.arg1 = startId;
msg.obj = intent;
mServiceHandler.sendMessage(msg);
}

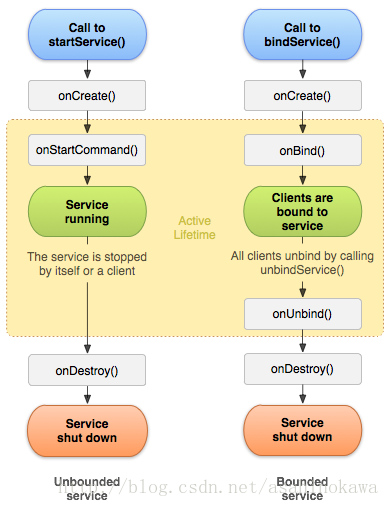
/**
* You should not override this method for your IntentService. Instead,
* override {@link #onHandleIntent}, which the system calls when the IntentService
* receives a start request.
* @see android.app.Service#onStartCommand
*/
@Override
public int onStartCommand(@Nullable Intent intent, int flags, int startId) {
onStart(intent, startId);
return mRedelivery ? START_REDELIVER_INTENT : START_NOT_STICKY;
}

onStart()并没有太大的意义,只是一个普通的函数,重要的是它里面做的事情。它将从onStartCommand()里面得到的intent,通过message传递给handler,然后再是自己,对不同intent的处理。

onStartCommand()的返回值,有下面三种:

  • START_NOT_STICKY
    如果系统在 onStartCommand() 返回后终止服务,则除非有挂起 Intent 要传递,否则系统不会重建服务。这是最安全的选项,可以避免在不必要时以及应用能够轻松重启所有未完成的作业时运行服务。
  • START_STICKY
    如果系统在 onStartCommand() 返回后终止服务,则会重建服务并调用 onStartCommand(),但不会重新传递最后一个 Intent。相反,除非有挂起 Intent 要启动服务(在这种情况下,将传递这些 Intent ),否则系统会通过空 Intent 调用 onStartCommand()。这适用于不执行命令、但无限期运行并等待作业的媒体播放器(或类似服务)。
  • START_REDELIVER_INTENT
    如果系统在 onStartCommand() 返回后终止服务,则会重建服务,并通过传递给服务的最后一个 Intent 调用 onStartCommand()。任何挂起 Intent 均依次传递。这适用于主动执行应该立即恢复的作业(例如下载文件)的服务。

如何停止

启动服务必须管理自己的生命周期。也就是说,除非系统必须回收内存资源,否则系统不会停止或销毁服务,而且服务在 onStartCommand() 返回后会继续运行。
因此,服务必须通过调用stopSelf() 自行停止运行,或者由另一个组件通过调用 stopService() 来停止它。一旦请求使用 stopSelf() 或 stopService() 停止服务,系统就会尽快销毁服务。

http://blog.csdn.net/baidu_31405631/article/details/52469093

绑定型Service

对于此种类型的,感觉自己用得到的地方并不是很多,但是要能够看得懂这这种类型的Service的代码,尤其是AIDL,在Android中非常常见。

AIDL的大致使用步骤如下:

  1. 编写包含接口的aidl文件,make project,生成同名的java文件
  2. AIDL是一种可跨进程的,就是说可以在进程A中,调用进程B中的方法,所以要首先要实现该方法类。实现其中的方法,只需要继承同名java文件中的Stub类,并实现其中的方法,即可。