从CSDN迁移到Github Pages
打算将CSDN上的博客迁移到GitHub Pages上去,怕有一天所有的博客都不见了的时候,自己会有一个备份. 其中,上传到CSDN网站上的图片,是必须要自己有一个备份的。所以,便有了这一篇记录博客。
了解Scrapy Scrapy是一个Python包,是一个爬取网页的框架。顾名思义,可以理解成Java中的抽象类。它负责流程性的逻辑,我们自己编写具体的处理逻辑。经过此次的使用,发现它确实是一个比较厉害的框架。首先,在爬取网页的过程中,你可能会遇到的问题,网上都有相应的解答;其次,我们只需要编写处理网页的逻辑和小的流程逻辑,这样我们可以更加专注爬取这件事本身,而不用关注使用什么技术来怎么爬。
简易使用
网上的使用方法很多,这里只写一些关键性的步骤以及自己遇到的问题、解决办法。
初始化项目:scrapy startproject CSDNBlogMover
各个文件及目录的作用:
items.py
1 2 3 4 5 6 7 8 9 10 11 class CsdnblogmoverItem (scrapy.Item): link = scrapy.Field() title = scrapy.Field() time = scrapy.Field() tags = scrapy.Field() categories = scrapy.Field() content = scrapy.Field() comments = scrapy.Field()
pipelines.py
1 2 3 4 5 6 7 8 9 10 11 12 13 14 15 16 17 class CsdnblogmoverPipeline (object ): def open_spider (self, spider ): self .myconn = mysql_connection() def close_spider (self, spider ): self .myconn.conn.close() def process_item (self, item, spider ): self .myconn.reconnect() sql = 'INSERT INTO wp_posts(post_author, post_excerpt, to_ping, pinged, post_content_filtered, post_date, post_date_gmt, post_content, post_title, post_modified, post_modified_gmt) VALUES (1, " "," ", " ", "", %s, %s, %s, %s, %s, %s)' vars = (get_uniformed_datetime(item['time' ], DATE_FORMAT_CN), get_gmt_datetime(item['time' ], DATE_FORMAT_CN), '<!-- wp:html -->\n' +item['content' ] + item['comments' ] + '\n<!-- /wp:html -->' , item['title' ], get_now_datetime(), get_gmt_datetime(get_now_datetime())) self .myconn.cursor.execute(sql, vars ) self .myconn.conn.commit() print (item) return item
middlewares.py
这个文件的作用在此次爬取博客中未使用到,但是也了解了部分内容,其实就是可以在这里面加上selenium,来处理动态加载的数据 。
settings.py
这是一个配置类,里面有很多项,并且都有相应的注释,可以仔细看看。
1
2
3
4
5
6
7
8
9
10
11
BOT_NAME = 'CSDNBlogMover' SPIDER_MODULES = ['CSDNBlogMover.spiders' ] NEWSPIDER_MODULE = 'CSDNBlogMover.spiders' FEED_EXPORT_ENCODING = 'utf-8' ROBOTSTXT_OBEY = True ITEM_PIPELINES = { 'CSDNBlogMover.pipelines.CsdnblogmoverPipeline' : 300 , }
爬取的关键:spiders/CSDNBlogSpider.py
1
2
3
4
5
6
7
8
9
10
11
12
13
14
15
16
17
18
19
20
21
22
23
24
25
26
27
28
29
30
31
32
33
34
35
36
37
38
39
40
41
42
43
44
45
46
47
48
49
50
51
52
53
54
55
56
57
58
59
60
61
62
63
64
65
66
67
68
69
70
71
72
73
74
75
76
77
78
79
80
81
82
83
84
85
86
87
88
89
90
91
92
93
94
95
96
97
98
99
100
101
102
103
104
105
106
107
108
109
110
111
112
113
114
115
116
117
118
119
120
121
122
123
124
125
126
127
128
129
130
131
132
133
134
135
136
137
138
139
140
141
142
143
144
import jsonimport mathimport scrapyraw_cookie = 'xxx' items = raw_cookie.split('; ' ) cookies = {} for item in items: kv = item.split('=' ) cookies[kv[0 ]] = kv[1 ] print (cookies)class CSDNBlogSpider (scrapy.Spider): name = 'csdn_spider' allowed_domains = ['blog.csdn.net' , 'mp.csdn.net' ] author = '' def __init__ (self ): pass def closed (self, spider ): print ("spider closed" ) def start_requests (self ): urls = [ 'https://blog.csdn.net/asahinokawa' ] for url in urls: self .author = url.split('/' )[-1 ] yield scrapy.Request(url=url, callback=self .parse) def parse (self, response ): total_blog_cnt = response.xpath( '//*[@id="mainBox"]/aside/div[@id="asideProfile"]/div[2]/dl[1]/dd/a/span/text()' ).get() if total_blog_cnt is None or total_blog_cnt == '' : raise Exception('total blog number parse error' ) else : total_blog_cnt = int (total_blog_cnt) if response.status == 200 : links = response.xpath('//*[@id="mainBox"]/main/div[2]/div[@data-articleid]/h4/a/@href' ) raw_links = [] for link in links: if link.get().__contains__(self .author): raw_links.append(link.get()) else : print ('%s not belong to author %s' % (link, self .author)) first_page_blog_cnt = len (raw_links) if first_page_blog_cnt <= total_blog_cnt: pages = int (math.ceil(total_blog_cnt / first_page_blog_cnt)) + 1 for idx in range (1 , int (pages)): page_url = '%s/article/list/%d' % (response.url, idx) print (page_url) yield scrapy.Request(url=page_url, callback=self .parse_page) else : self .parse_page(self , response) else : print ('对CSDN主页访问的响应异常,请检查URL' ) def parse_page (self, response ): if response.status == 200 : links = response.xpath('//*[@id="mainBox"]/main/div[2]/div[@data-articleid]/h4/a/@href' ) for link in links: if link.get().__contains__(self .author): yield scrapy.Request(url=link.get(), callback=self .parse_content) else : print ('%s not belong to author %s, skipped' % (link.get(), self .author)) else : print ('对CSDN中某页访问出错' ) @staticmethod def parse_content (self, response ): if response.status == 200 : data = { 'link' : response.url, 'title' : response.xpath( '//*[@id="mainBox"]/main/div[@class="blog-content-box"]/div[@class="article-header-box"]/div[@class="article-header"]/div[@class="article-title-box"]/h1/text()' ).get(), 'time' : response.xpath( '//*[@id="mainBox"]/main/div[@class="blog-content-box"]/div[@class="article-header-box"]/div[@class="article-header"]/div[@class="article-info-box"]/div[@class="article-bar-top"]/span[@class="time"]/text()' ).get(), 'tags' : response.xpath( '//*[@id="mainBox"]/main/div[@class="blog-content-box"]/div[@class="article-header-box"]/div[@class="article-header"]/div[@class="article-info-box"]/div[@class="article-bar-top"]/span[@class="tags-box artic-tag-box"]/a/text()' ).get(), 'categories' : response.xpath( '//*[@id="mainBox"]/main/div[@class="blog-content-box"]/div[@class="article-header-box"]/div[@class="article-header"]/div[@class="article-info-box"]/div[@class="article-bar-top"]/div[@class="tags-box space"]/a/text()' ).get(), 'content' : response.xpath('//*[@id="mainBox"]/main/div[@class="blog-content-box"]/article' ).get(), 'comments' : response.xpath( '//*[@id="mainBox"]/main/div[@class="comment-box"]/div[@class="comment-list-container"]' ).get() } mark_down_url = 'https://mp.csdn.net/mdeditor/getArticle?id=' + str (response.url.split('/' )[-1 ]) yield scrapy.Request(url=mark_down_url, callback=self .get_markdown_content, meta=data, headers={ 'accept-encoding' : 'gzip, deflate, br' , 'accept' : '*/*' , 'accept-language' : 'zh,en;q=0.9,ja;q=0.8,zh-TW;q=0.7,fr;q=0.6,zh-CN;q=0.5' , 'user-agent' : 'Mozilla/5.0 (Windows NT 10.0; Win64; x64) AppleWebKit/537.36 (KHTML, like Gecko) Chrome/73.0.3683.103 Safari/537.36' , }, cookies=cookies) else : print ('对CSDN中某篇文章访问出错' ) @staticmethod def get_markdown_content (response ): content = json.loads(response.body_as_unicode()) data = content['data' ] if 'markdowncontent' in data: content = data['markdowncontent' ] response.meta['content' ] = content response.meta['tags' ] = data['tags' ] response.meta['categories' ] = data['categories' ] return response.meta else : print ('获取失败 : ' +response.meta['link' ])
关键性的API获取 在上面的处理中,对于Hexo来说,最为关键的API是获取markdown的API,这里记录一下发现的过程。此处要求原文是markdown格式,否则得到的markdown数据为空。
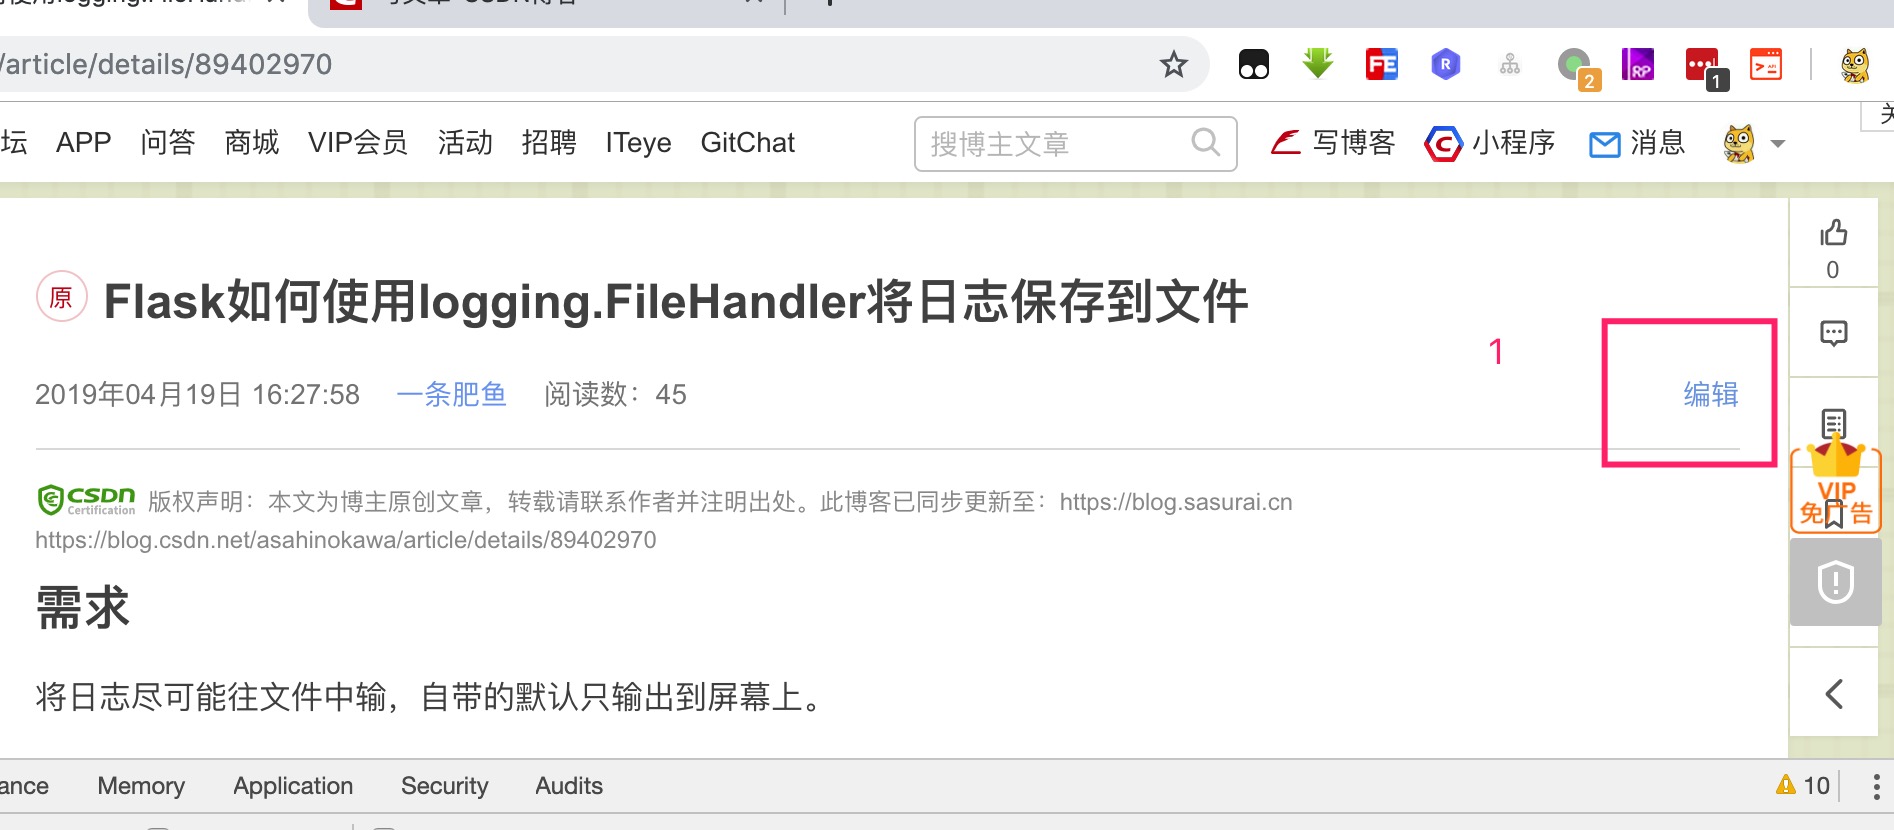
第一步、在登录状态下,点开编辑
观察API
链接:https://mp.csdn.net/mdeditor/getArticle?id=89402970
入参为一个id加一些Headers(这里选择与浏览器保持一致),返回的参数为一个JSON串,里面的数据如下:
1
2
3
4
5
6
7
8
9
10
11
12
13
14
15
16
17
18
19
{ "data" : { "id" : "89402970" , "title" : "Flask如何使用logging.FileHandler将日志保存到文件" , "articleedittype" : 1 , "description" : "需求\n将日志尽可能往文件中输,自带的默认只输出到屏幕上。\n代码\n获取文件名\ndef get_custom_file_name():\n def make_dir(make_dir_path):\n path = make_dir_path.strip()\n if not os.path.exists(path):\n os.makedirs(pat..." , "content" : "<h2><a id=\"_0\"></a>需求</h2>\n<p>将日志尽可能往文件中输,自带的默认只输出到屏幕上。</p>\n<h2><a id=\"_3\"></a>代码</h2>\n<p>获取文件名</p>\n...." , "markdowncontent" : "## 需求\n将日志尽可能往文件中输,自带的默认只输出到屏幕上。\n\n## 代码\n获取文件名\n```python\ndef get_custom_file_name():\n def make_dir(make_dir_path):\n path = make_dir_path.strip()\n if not os.path.exists(path):\n os.makedirs(path)\n return path\n log_dir = \"ac_logs\"\n file_name = 'logger-' + time.strftime('%Y-%m-%d', time.localtime(time.time())) + '.log'\n file_folder = os.path.abspath(os.path.dirname(__file__)) + os.sep + log_dir\n make_dir(file_folder)\n return file_folder + os.sep + file_name\n```\n配置logging\n\n```python\ndictConfig({\n 'version': 1,\n 'formatters': {'default': {\n 'format': '%(asctime)s - %(levelname)s - %(filename)s - %(funcName)s - %(lineno)s - %(message)s',\n }},\n 'handlers': {\n 'default': {\n 'class': 'logging.StreamHandler',\n 'stream': 'ext://flask.logging.wsgi_errors_stream',\n 'formatter': 'default'\n },\n 'custom': {\n 'class' : 'logging.FileHandler',\n 'formatter': 'default',\n 'filename' : get_custom_file_name(),\n 'encoding' : 'utf-8'\n },\n },\n 'root': {\n 'level': 'INFO',\n 'handlers': ['custom']\n }\n})\n```\n## 代码分析..." , "private" : 0 , "tags" : "Flask,日志" , "categories" : "Python" , "channel" : "31" , "type" : "original" , "status" : 1 , "read_need_vip" : 0 } , "error" : "" , "status" : true }
对图片的处理 至此,所有格式为markdown的CSDN博客都被抓取下来,接下来就是对其中图片的处理。对于图片,初步的想法是,先把markdown中的图片下载下来,再随机命名,然后把原来markdown中的图片链接修改成改名之后的,图片的baseUrl使用gitee前缀,也就是说,把所有下载下来的图片都存到一个仓库中,(也算是作为一种备份吧)然后通过如下形式的地址,来访问该图片:/images/pics/xxx.jpg。处理代码:
1
2
3
4
5
6
7
8
9
10
11
12
13
14
15
16
17
18
19
20
21
22
23
24
25
26
27
28
29
30
31
32
33
34
35
36
37
38
39
40
41
42
43
44
45
46
47
48
49
50
51
52
53
54
55
56
57
58
59
60
61
62
63
64
65
66
67
68
69
70
71
72
73
74
75
76
77
import osimport randomimport reimport stringimport filetype as filetypedir = "C:\\Users\\yangyu\\sasuraiu.github.io\\source\\_posts" img_dir = "C:\\Users\\yangyu\\sasuraiu.github.io\\source\\_posts\\images" mds = os.listdir(dir ) pattern = re.compile ('!\[.*\]\(([^\)]+)\)' ) def get_file_content (path ): content = '' if not os.path.isdir(path): with open (path, 'r' , encoding='utf-8' ) as f: for line in f: content = content + line return content else : return None def parse_content (content ): changed = False for pic in pattern.findall(content): new_pic_link = download_pic(pic, img_dir, random_name()) if new_pic_link is not None : content = content.replace(pic, '/images/pics/' + new_pic_link) changed = True return changed, content def random_name (): return '' .join(random.sample(string.ascii_letters + string.digits, 32 )).upper() def download_pic (url, path, name ): import requests r = requests.get(url) if r.status_code == 200 : filepath = path + '\\' + name with open (filepath, 'wb' ) as f: f.write(r.content) kind = filetype.guess(filepath) if kind is None : print ('Cannot guess file type!' ) os.remove(filepath) return None else : os.rename(filepath, filepath+'.' +kind.extension) return name+'.' +kind.extension else : print (url) print ('下载图片失败,请手动确认\n\n' ) return None def write_back_file (filepath, content ): with open (filepath, 'w' , encoding='utf-8' ) as f: f.write(content) if __name__ == '__main__' : for md in mds: print ('当前正在处理的文件为:' + md) filepath = dir + "\\" + md content = get_file_content(filepath) if content is not None and content != '' : changed, content = parse_content(content) if changed: write_back_file(filepath, content) print ('replaced original file with the latest link' )
后记 至此,大部分重复性质的工作已经完成了,剩下就是对每一个篇文章进行格式检查。此爬虫的代码地址为(欢迎fork):https://github.com/sasuraiu/CSDNBlogMover
wordpress添加https访问
docker中的wordpress
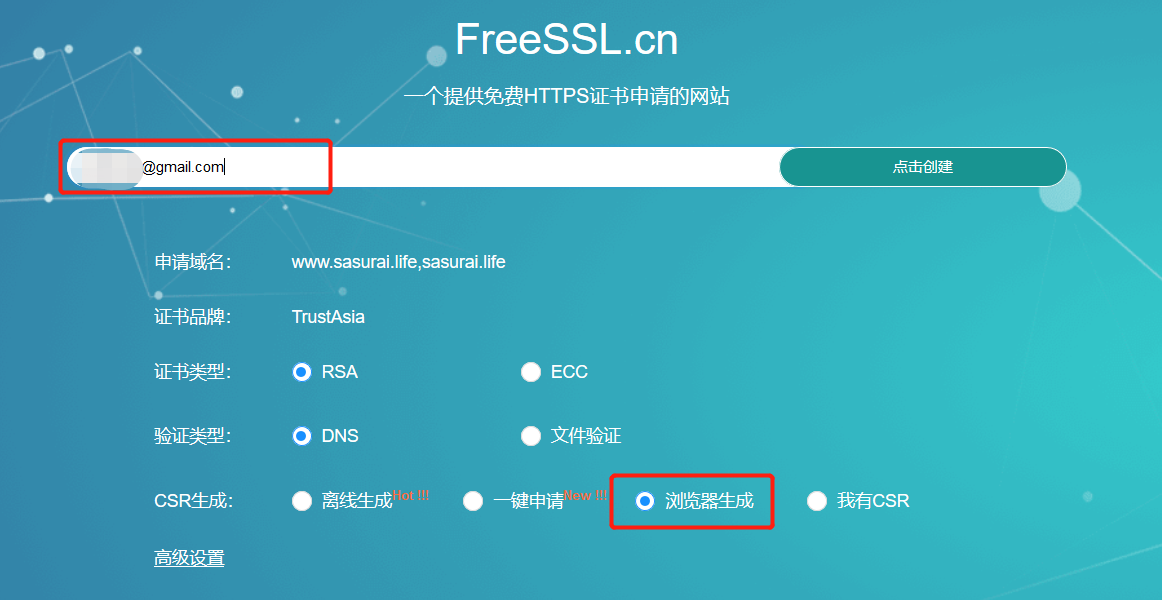
申请证书 可以从freessl.cn 免费申请。免费的SSL证书时间长度为1年,但是只能对单个域名,不支持多域名通配符,选择的话以个人需求为准。
选择浏览器生成
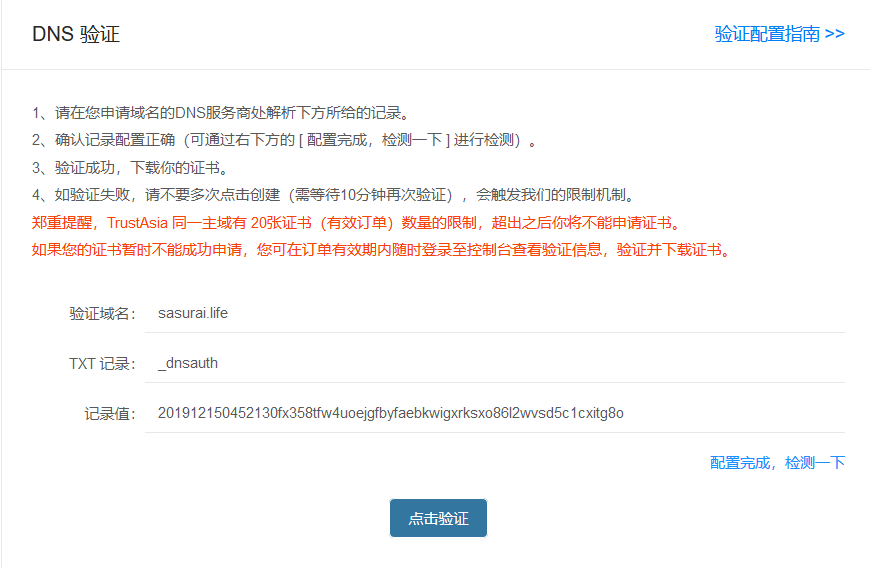
点击确认创建后,得到如下信息:
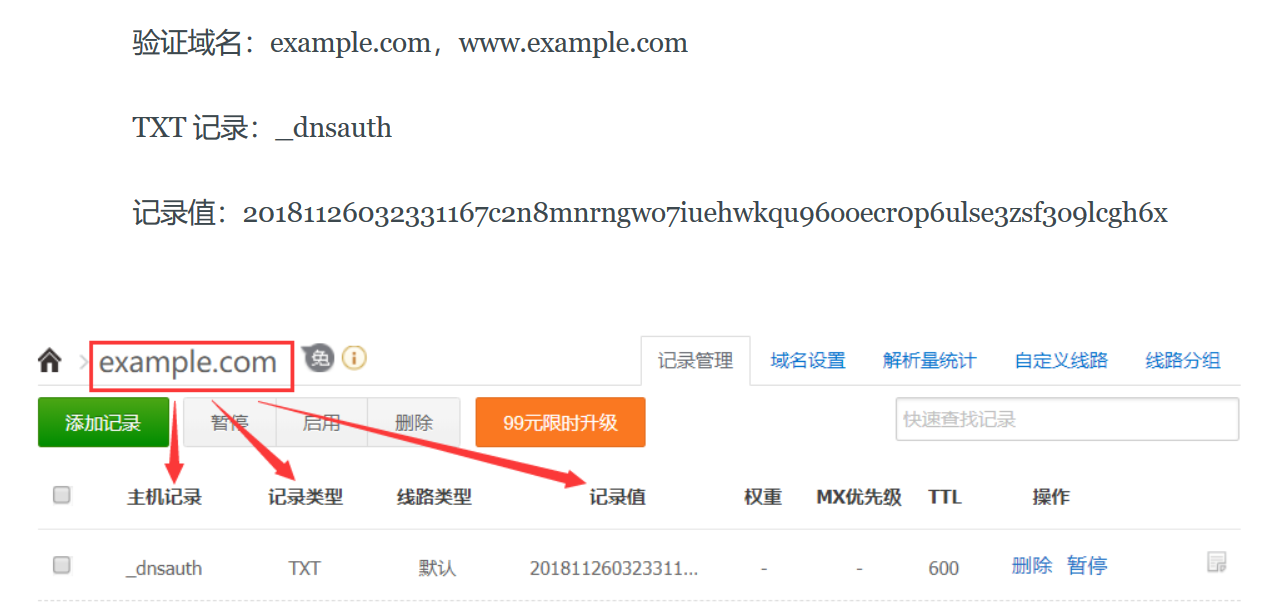
接下来到域名管理里面,按上述信息配置域名的信息,可以参考上面的验证配置指南 ,如下:
配置完了之后,不一定会立马生效,取决于配置改解析项的TTL。
apache配置
将容器里面的443端口映射到宿主机的443端口。如果已启动了容器,可能需要重新创建。
将申请好的证书和私钥上传到宿主机中,并将其挂载到容器中。
1
2
3
4
5
6
7
8
9
docker run --name wp \ -p 80:80 \ -p 443:443 \ -e WORDPRESS_DB_HOST=host \ -e WORDPRESS_DB_USER=user \ -e WORDPRESS_DB_PASSWORD="" \ -v /root/wordpress:/var/www/html \ -v /root/ssl:/ssl \ -d wordpress
先进入容器中
1 docker container exec -it wp bash
加载apache的ssl模块
修改证书和私钥路径
1 vim /etc/apache2/sites-available/default-ssl.conf
找到SSLCertificateFile和SSLCertificateKeyFile这两个配置项,改成把私钥和证书挂载进容器里面后的路径,这里都在/ssl/目录下。修改后为:
让ssl配置被apache加载
1 ln -s /etc/apache2/sites-available/default-ssl.conf /etc/apache2/sites-enabled/default-ssl.conf
退出容器,并重启容器。docker container restart wp
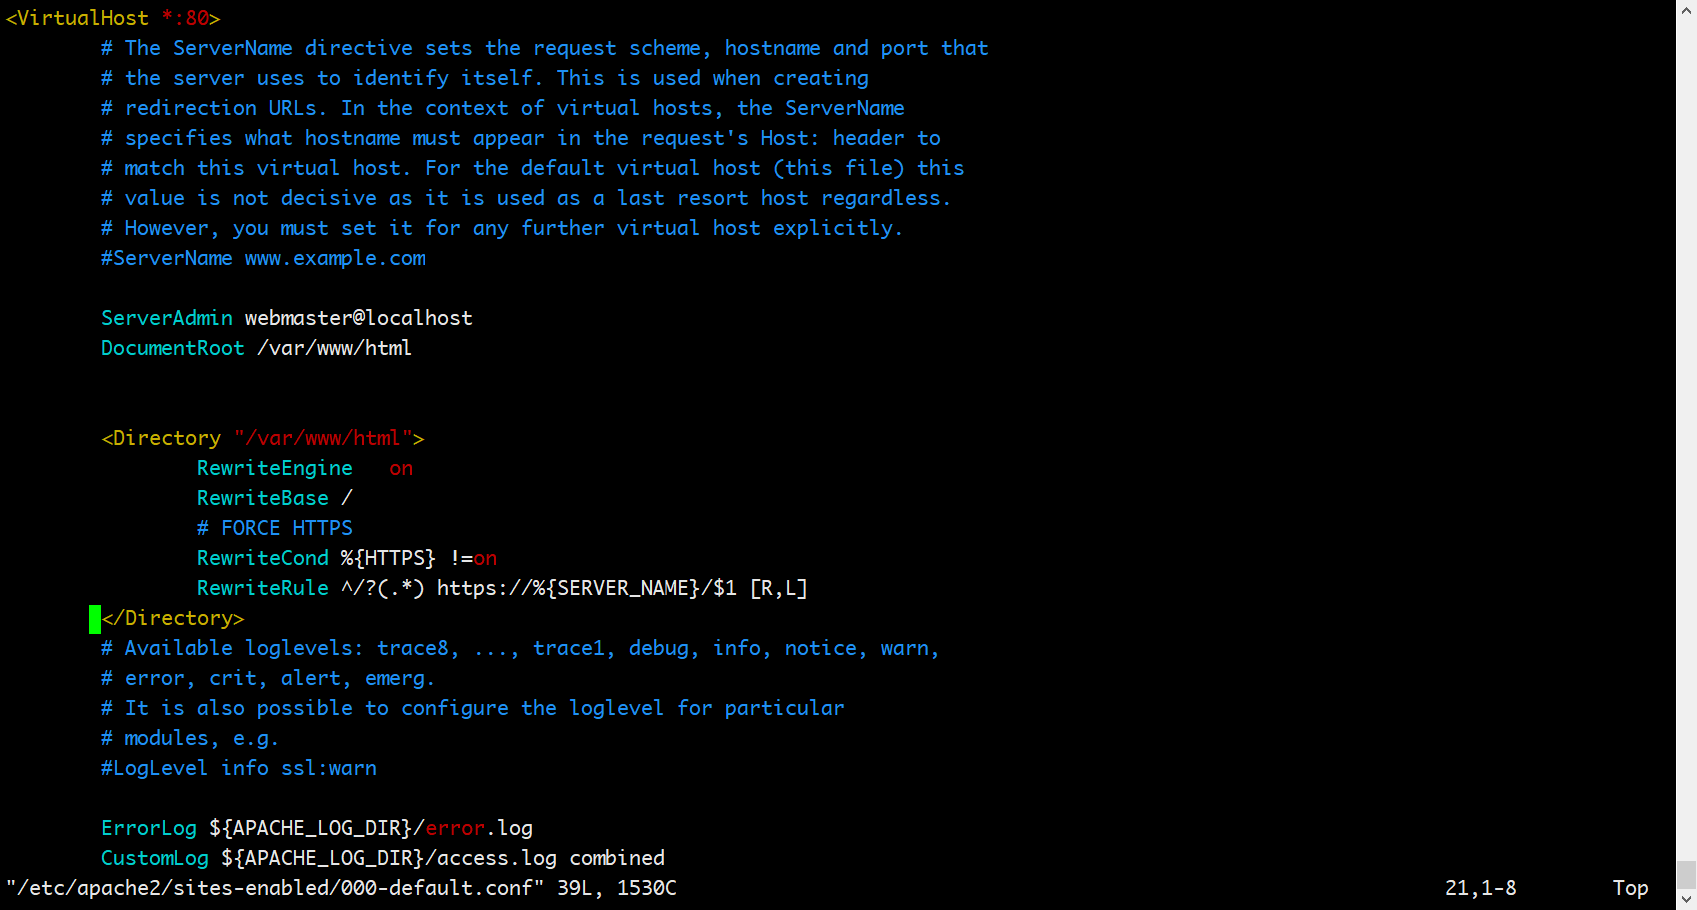
强制http请求转到https/etc/apache2/sites-available/000-default.conf,找到<VirtualHost *:80> </VirtualHost>标签中增加下面的配置:
1 2 3 4 5 6 7 <Directory "/var /www /html "> RewriteEngine on RewriteBase / # FORCE HTTPS RewriteCond %{HTTPS} !=on RewriteRule ^/?(.*) https://%{SERVER_NAME}/$1 [R,L] </Directory >
如下:
退出容器,并重启容器。docker container restart wp
检验 如果不能访问,可以往如下两方面考虑:
查看容器的日志,看报什么错误信息:
1 docker container logs -f wp
看宿主机的443端口是否开放
参考:https://blog.csdn.net/yori_chen/article/details/88577249
从hexo批量迁移到wordpress
感觉”业务”有扩展,hexo不能动态添加文章有点不太适应
wordpress添加markdown支持 选择了WP Editor.md这个插件,新增post,测试markdown能够生效。
获取hexo博客的md文档 在source/_posts下有所有的markdown文件,全都是博客的内容,并且是有一定的格式规律的。这里我需要的关于博客的数据有标题、发布日期、标签以及目录,当然还有博客正文。非常好解析。
读取所有md文件的代码如下:
1
2
3
4
5
6
7
8
9
10
11
12
13
14
15
dir = "/xxxxx/blog-source/source/_posts" files = os.listdir(dir ) count = 0 if __name__ == '__main__' : files = os.listdir(dir ) can_go_on = False for file in files: full_path = dir + '/' + file print (full_path) parse_md_file(full_path) count = count + 1 print ("Count: " , count) print (count)
解析每个md文档 首先,是文件最开始有两个---,在这两个---之间的全部是文章的属性,之外的全是文章的内容。解析文章属性的时候,需要对文章的标签、目录做可能存在多个处理,所以用list存储。其中post_meta_data_status的各值的含义如下:
post_meta_data_status
含义
0
初始状态,刚开始解析md文件
1
正在解析文章属性状态
2
文章属性解析完成,正在解析文章内容
解析md文件的代码如下:
1
2
3
4
5
6
7
8
9
10
11
12
13
14
15
16
17
18
19
20
21
22
23
24
25
26
27
28
29
30
31
32
33
34
35
36
37
38
39
40
41
42
43
44
45
46
47
48
def get_property (line, splitter=':' ): items = line.split(splitter) item = items[len (items) - 1 ].strip() return item def parse_md_file (file_path, print_content=False ): title = "" tag = [] category = [] last_item = [] date = "" post_content = "" with open (file_path, encoding='utf8' ) as f: post_meta_data_status = 0 for line in f: if post_meta_data_status == 2 : post_content += line else : if line.__contains__("---" ): if post_meta_data_status == 0 : post_meta_data_status = 1 else : post_meta_data_status = 2 else : if line.__contains__("title" ): title = get_property(line).strip() elif line.__contains__("date" ): date = get_property(line, ': ' ).strip() elif line.__contains__("tags" ): item = get_property(line) if item!='' : tag.append(item) last_item = tag elif line.__contains__("categories" ): item = get_property(line) if item != '' : category.append(item) last_item = category elif line.__contains__('-' ): item = get_property(line, '-' ) if item != '' : last_item.append(item) print ("title: " , title) print ("date: " , date) print ("tags: " , tag) print ("categories: " , category) date=datetime.datetime.strptime(date, "%Y-%m-%d %H:%M:%S" )
将解析后的数据上传到wordpress 上传主要用到了wordpress-xmlrpc 。其基本操作可参看该官网上的用例 。
安装方式:pip install python-wordpress-xmlrpc
1
2
3
4
5
6
7
8
9
10
11
12
13
14
15
16
17
18
19
from wordpress_xmlrpc import Client, WordPressPostfrom wordpress_xmlrpc.methods.posts import GetPosts, NewPostfrom wordpress_xmlrpc.methods.users import GetUserInfowp = Client('http://www.wordpress.site/xmlrpc.php' , 'username' , 'password' ) def add_post (title, date, content, tag, category ): post = WordPressPost() post.title = title post.content = content post.post_status = 'publish' post.date = date post.terms_names = { 'post_tag' : tag, 'category' : category, } post_id = wp.call(NewPost(post)) print (post_id)
如果需要更新更多的post相关的信息,可参看WordPressPost文档 。
从halo迁移到hexo
今年年初由 wordpress 迁移到 halo,主要是觉得懂点 Java,有什么定制化的需求,自己改代码会方便一些。但是也没有什么特别的需求需要定制,反而被这种东西折腾得忘记了写博客的初心。技术博客就应该简简单单,只写技术,博客怎么好看、怎么炫酷,都不重要。
配置说明&前置条件
在 Halo 中,数据库使用的是 MySQL 5.7,并将 halo 服务所用数据库,内容导入到本地的数据库中,这样速度会快一些。
hexo 所用主题是 Icarus
编码 总体思路:将 halo 的数据,导出成 hexo 所需要的格式。总体分为下面几个步骤:
halo 字段与 hexo 字段对比hexo 文档 ,与之一一对应即可。后续根据 Icarus 的几个配置,又在 front-matter 里面添加了几个属性。
参数
描述
默认值
layout布局
title标题
文章的文件名
date建立日期
文件建立日期
updated更新日期
文件更新日期
comments开启文章的评论功能
true
tags标签(不适用于分页)
categories分类(不适用于分页)
permalink覆盖文章网址
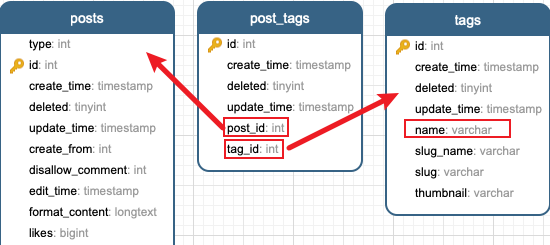
将 halo 的 tags、categories 转化成 hexo 里面的 tags、categories
转化文章预览
在 front-matter 中添加 excerpt 属性
如果原文章(halo)中存在 summary,直接赋值给 excerpt
没有 summary,则先将 markdown 转化成 HTML,然后获取 HTML 中的前几个 dom 元素。
文章属性
1
2
3
4
5
6
7
8
9
10
11
12
type Post struct { Title string Content string Password string Date string Updated string Thumbnail string Tags []string Categories []string Summary string Priority string }
主流程
1
2
3
4
5
6
7
8
9
10
11
12
13
14
15
16
17
18
19
20
21
22
23
24
25
26
27
28
29
30
31
32
33
34
35
36
37
38
39
40
41
42
43
44
45
46
47
48
49
50
51
52
53
54
55
56
57
58
59
60
61
62
63
64
65
66
67
68
69
70
71
72
73
74
75
76
77
78
package mainimport ( "fmt" _ "github.com/go-sql-driver/mysql" "github.com/gomarkdown/markdown" "html" "io/ioutil" "path" "regexp" "strings" "xorm.io/xorm" ) func main () basePath := "/Users/akina/hexo-blog/source/_posts" db, _ := xorm.NewEngine("mysql" , "root:root@tcp(localhost:3306)/halodb-tmp" ) db.ShowSQL(true ) queriedPosts, _ := db.Query("select * from posts" ) for _, qp := range queriedPosts { pid := qp["id" ] post := Post{ Title: string (qp["title" ]), Content: html.UnescapeString(string (qp["original_content" ])), Password: string (qp["password" ]), Date: string (qp["create_time" ]), Updated: string (qp["update_time" ]), Thumbnail: string (qp["thumbnail" ]), Summary: string (qp["summary" ]), Priority: string (qp["top_priority" ]), } queriedTagIds, _ := db.Query("select tag_id from post_tags where post_id = " + string (pid)) if len (queriedTagIds) > 0 { tagIds := make ([]string , 0 ) for _, tagId := range queriedTagIds { tagIds = append (tagIds, string (tagId["tag_id" ])) } queriedTagNames, _ := db.Query(fmt.Sprintf("select name from tags where id in (%s)" , strings.Join(tagIds, "," ))) tagNames := make ([]string , 0 ) for _, tagName := range queriedTagNames { tagNames = append (tagNames, string (tagName["name" ])) } post.Tags = tagNames } queriedCategoryIds, _ := db.Query("select category_id from post_categories where post_id = " + string (pid)) if len (queriedCategoryIds) > 0 { categoryIds := make ([]string , 0 ) for _, categoryId := range queriedCategoryIds { categoryIds = append (categoryIds, string (categoryId["category_id" ])) } queriedCategoryNames, _ := db.Query(fmt.Sprintf("select name from categories where id in (%s)" , strings.Join(categoryIds, "," ))) categoryNames := make ([]string , 0 ) for _, categoryName := range queriedCategoryNames { categoryNames = append (categoryNames, "- [" +string (categoryName["name" ])+"]" ) } post.Categories = categoryNames } postHexoData := strings.Join([]string { "---" , "title: \"" + post.Title + "\"" , "date: " + post.Date, "updated: " + post.Updated, "tags: [" + strings.Join(post.Tags, "," ) + "]" , "categories: \n" + strings.Join(post.Categories, "\n" ), "thumbnail: " + post.Thumbnail, "password: " + post.Password, "excerpt: \"" + getPostSummary(post) + "\"" , "top: " + post.Priority, "toc: true" , "---" , post.Content, }, "\n" ) ioutil.WriteFile(path.Join(basePath, post.Title+".md" ), []byte (postHexoData), 0666 ) } }
获取文章的预览
1
2
3
4
5
6
7
8
9
10
11
12
13
14
15
16
17
18
19
20
21
22
23
24
25
26
27
28
29
30
31
32
33
34
35
func getPostSummary (post Post) string { var res string if post.Summary != "" { res = post.Summary } else { htmlContent := string (markdown.ToHTML([]byte (post.Content), nil , nil )) for i := 1 ; i <= 4 ; i++ { re := regexp.MustCompile("<.*?>.*?</.*?>" ) label := string (re.Find([]byte (htmlContent))) if label == "" { break } res = res + label htmlContent = strings.ReplaceAll(htmlContent, label, "" ) if htmlContent == "" { break } } } for _, ch := range []string { "\n" , } { res = strings.ReplaceAll(res, ch, " " ) } res = strings.ReplaceAll(res, "\"" , "'" ) res = strings.TrimPrefix(res, " " ) res = strings.TrimSuffix(res, " " ) fmt.Println(res) return res }
Conclusion 后续有几个需要改一下预览的内容,貌似不能通过 hexo g,原因是转义符的问题、单、双引号的问题等,只有少量,手动改了改,还算可以接受。
