如何下载并导入Android系统源代码到Android Studio

下载源代码对于下载源代码这种操作,官方给的说明确实也是很详细。但是奈何GFW。所以用国内的源跑得比什么都快。网上也有很多教程,但是这些感觉是copy——因为它们都比不上国内源的网站上给的操作说明。国内有哪些Android的镜像源1. 中国科技大学2. 清华大学从上面的两个链接直接点进去便是帮助文档,
阅读更多

Ubuntu爬坑指南

从接触Ubuntu以来,就在不断地爬坑,也有过一些记录,但是都不集中,现在都找不到了,这着实是一个不小的遗憾。为了让自己不再遗憾,能够更快地提升自己,写下这往篇博客。Ubuntu开启root用户登录系统以及关闭guest用户开启root用户登录打开/usr/share/lightdm/lightdm
阅读更多

Android开发工具系之ADB

ADB的相关概念&工作原理通过WLAN使用ADB感觉这个挺有意思,但是又在情理之中。1、电脑与设备连入同一个局域网,并能连通。2、将设备接上电脑,设置端口。λ adb tcpip 5555restarting in TCP mode port: 55553、断开设备4、找出设备的IP地址5、
阅读更多

StringBuffer与StringBuilder源代码分析

背景想了解StringBuffer与StringBuilder之间的差别以及他们是通过何种方式去实现其功能的。差别大致了解,线程安全与不安全。更感兴趣的是其实现方式。AbstractStringBuilder两者都继承自此抽象类。该类提供了一些StringBuffer与StringBuilder公用
阅读更多

了解Gradle之groovy概览

def的用途

用def定义的变量时无类型的变量,这里所说的无类型的变量,并不表示该变量就不属于某一个类型了,def修饰变量正是Groovy为动态语言的标记,大概def修饰变量就相当于Java中Object来修饰变量吧。如果通过使用def关键字使用可选类型,那么整数的类型将是可变的:它取决于这个类型实际包含的值。

1
2
3
4
5
assert a instanceof Integer
//assert a instanceof Long//错误

def b = 2147483648
assert b instanceof Long

关于函数的定义

如果所定义的函数没有参数,那么必须在调用的时候加上括号。

要有返回值的类型声明,如def、void、String等。

可以使用return返回值,若不写,则默认返回最后一行的值,没有则为null。

闭包是什么?

A closure in Groovy is an open, anonymous, block of code that can take arguments, return a value and be assigned to a variable. A closure may reference variables declared in its surrounding scope. In opposition to the formal definition of a closure, Closure in the Groovy language can also contain free variables which are defined outside of its surrounding scope.Apache Groovy Doc

语法与用法

1
2
3
4
5
6
7
8
9
10
11
12
13
14
15
16
17
18
19
20
21
22
23
24
25
26
{ println 'hi' }

{ name -> println name }

{ String x, int y ->
println "hey ${x} the value is ${y}"
}

{ reader ->
def line = reader.readLine()
line.trim()
}
// as an object
def listener = { e -> println "Clicked on $e.source" }
assert listener instanceof Closure

Closure callback = { println 'Done!' }

Closure<Boolean> isTextFile = {
File it -> it.name.endsWith('.txt')
}
//闭包是有返回值的,默认最后一行语句就是该闭包的返回值,如果最后一行语句没有不输入任何类型,闭包将返回null。
// 调用闭包
def code = { 123 }
assert code() == 123
assert code.call() == 123

访问外部变量

1
2
3
4
5
def str='hello world'
def closure={
println str
}
closure()

语法糖

  • .闭包可作为一个参数传给另一个闭包,也可在闭包中返回一个闭包。
1
2
3
4
5
6
7
8
9
10
11
12
13
14
15
def timesThree = {
num -> num * 3
}
def runTwice = {
num, func -> func(func(num))
}
println runTwice(10,timesThree)

def times = {
x -> {
y -> x * y
}
}

println times(3)(4)
  • 闭包的一些快捷写法.
    • 当闭包作为闭包或方法的最后一个参数,可以将闭包从参数圆括号中提取出来接在最后。
    • 如果闭包中不包含闭包,则闭包或方法参数所在的圆括号也可以省略。
    • 对于有多个闭包参数的,只要是在参数声明最后的,均可以按上述方式省略。

闭包的Delegation代理

  • this 指闭包所在的最近的类 .class
  • owner 指定义闭包的宿主,不仅仅是类,还可能是一个闭包
  • delegate 代理,默认使用的是owner
  • delegate strategy 代理的代理策略
1
2
3
4
5
6
7
8
9
10
11
12
13
14
15
16
17
18
def p = new Person(name:'Jessica', age:42)
def t = new Thing(name:'Printer')
def cl = p.fetchAge
cl.delegate = p //设置代理
assert cl() == 42
cl.delegate = t
assert cl() == 42 //owner优先,fetchAge是一个闭包,它的owner是Person

cl.resolveStrategy = Closure.DELEGATE_ONLY //修改策略
cl.delegate = p
assert cl() == 42
cl.delegate = t
try {
cl()
assert false //呵呵,delegate上面没有该属性,报错
} catch (MissingPropertyException ex) {
// "age" is not defined on the delegate //没有定义
}

至此基本的东西差不多解决了。

Android中的apk打包

前言

使用友盟对应用进行信息收集时,其中包含有一个渠道名。渠道姑且可以认为是一个商店吧,如果应用要在很多个商店上面上架的话,一直改太麻烦了。有一个叫做多渠道打包的东西自然而然地走了过来。

多渠道打包实现

1
2
3
4
5
6
<meta-data
android:name="UMENG_APPKEY"
android:value="xxxxxxxxxxxxxxxxxxxxxx" />
<meta-data
android:name="UMENG_CHANNEL"
android:value="Google Play Store" />

如上所示,如果需要换一个渠道的话,重新改的话就特别麻烦了。先将其中的value替换成占位符${UMENG_CHANNEL_VALUE}。接下来到模块下的build.gradle中进行相应的修改。修改大致如下:

1
2
3
<meta-data
android:name="UMENG_CHANNEL"
android:value="${UMENG_CHANNEL_NAME}" />

接下来配置build.gradle

1
2
3
4
5
6
7
8
9
10
11
12
13
14
15
16
17
18
19
20
defaultConfig {
...
// 默认是umeng的渠道
manifestPlaceholders = [UMENG_CHANNEL_VALUE: "umeng"]
}

// 友盟多渠道打包
flavorDimensions "wtf"
productFlavors{
google {
dimension "wtf"
}
coolapk {
dimension "wtf"
}
}

productFlavors.all { flavor ->
flavor.manifestPlaceholders = [UMENG_CHANNEL_VALUE: name]
}

自动设置应用签名

在buildType{}前添加下段,并在buildType的release中添加signingConfig signingConfigs.release

1
2
3
4
5
6
7
8
9
10
11
12
signingConfigs {
debug {
// No debug config
}

release {
storeFile file("../yourapp.keystore")
storePassword "your password"
keyAlias "your alias"
keyPassword "your password"
}
}

打release版本的包时就会使用其中所配置的签名了。

修改AS生成的apk默认名

不同gradle版本间存在一些差异,如果报错了,google修改一下。

1
2
3
4
5
6
7
8
9
10
11
12
13
14
applicationVariants.all { variant ->
variant.outputs.all { output ->
// outputFileName = new File(
// "JPreader-" + ${variant.productFlavors[0].name} +
// buildType.name + "-v" +
// defaultConfig.versionName + "-" +
// defaultConfig.versionCode + ".apk" )
if (outputFile != null && outputFile.name.endsWith('.apk')) {
// 输出apk名称为ruijie_v1.0_wandoujia.apk
def fileName = "JPreader_v${defaultConfig.versionName}_${variant.productFlavors[0].name}.apk"
outputFileName = new File(fileName)
}
}
}

小结

build.gradle真的是神奇,有一些用法还是可以去学学。当前的build.gradle文件的整体如下所示:

1
2
3
4
5
6
7
8
9
10
11
12
13
14
15
16
17
18
19
20
21
22
23
24
25
26
27
28
29
30
31
32
33
34
35
36
37
38
39
40
41
42
43
44
45
46
47
48
49
50
51
52
53
54
55
56
57
58
59
60
61
62
63
64
65
66
67
68
69
70
71
72
73
74
75
76
android {
compileSdkVersion 26
buildToolsVersion '26.0.2'
defaultConfig {
applicationId "cn.xuchuanjun.nhknews"
minSdkVersion 19
targetSdkVersion 26
versionCode 2
versionName "1.1"
testInstrumentationRunner "android.support.test.runner.AndroidJUnitRunner"
// jackOptions {
// enabled true
// }
//multiDexEnable true //突破应用方法数65535的一个限制
manifestPlaceholders=[UMENG_CHANNEL_NAME:"Google Play Store"]
}

signingConfigs {
debug {

}
myReleaseConfig {
storeFile file("xxxxxxxxxxxxxxxxx.jks")
storePassword "xxxxxxxx"
keyAlias "xxxxxx"
keyPassword "xxxxxxxx"
}
}

buildTypes {
release {
minifyEnabled false
proguardFiles getDefaultProguardFile('proguard-android.txt'), 'proguard-rules.pro'
signingConfig signingConfigs.myReleaseConfig

applicationVariants.all { variant ->
variant.outputs.all { output ->
// outputFileName = new File(
// "JPreader-" + ${variant.productFlavors[0].name} +
// buildType.name + "-v" +
// defaultConfig.versionName + "-" +
// defaultConfig.versionCode + ".apk" )
if (outputFile != null && outputFile.name.endsWith('.apk')) {
// 输出apk名称为ruijie_v1.0_wandoujia.apk
def fileName = "JPreader_v${defaultConfig.versionName}_${variant.productFlavors[0].name}.apk"
outputFileName = new File(fileName)
}
}

}
}
}
flavorDimensions "wtf"
productFlavors{
google {
dimension "wtf"
}
coolapk {
dimension "wtf"
}
}

productFlavors.all{
flavor -> flavor.manifestPlaceholders = [UMENG_CHANNEL_NAME:name]
}

compileOptions {
targetCompatibility 1.8
sourceCompatibility 1.8
}
repositories {
flatDir {
dirs 'libs'
}
}
}

Android中的签名

签名,顾名思义与生活中的签名类似,为某个东西签了名,那么这个东西就与所签的名字产生了某种关系,如归属等。

为什么要为Android应用签名?

这是因为Android系统的要求就是这样,Android系统要求每一个Android应用程序必须要经过数字签名才能够安装到系统中,也就是说如果一个Android应用程序没有经过数字签名,就无法安装到系统中。

为什么在AS中直接RUN可以安装到系统上?
因为这种方式会使用Android Studio默认生成的debug签名,去给应用进行签名。

签名不同会怎样

如果同一应用使用不同的签名,那么将不能覆盖安装,必须先卸载之前的,然后再安装。

1)两个程序的入口Activity是否相同。两个程序如果包名不一样,即使其它所有代码完全一样,也不会被视为同一个程序的不同版本; 2)两个程序所采用的签名是否相同。如果两个程序所采用的签名不同,即使包名相同,也不会被视为同一个程序的不同版本,不能覆盖安装。

所以这也是为什么,同样一份代码,由不同的机器RUN,然后安装到同一台设备上时,需要先卸载之前的应用,而后再安装此次的。

原因就是每台机器默认生成的debug签名都不一样!

结论

应用商城不接受用debug签名签的应用,必须使用自己的签名。

使用自己的签名可以避免应用不具备升级功能。

关于final修饰符的一点思考

背景在看HashMap的源代码的时候,发现其中的每个键值对的类型为一个Node<K, V>,其中包含了一个成员变量hash,被final修饰符修饰,但是并没有被初始化。这就有点奇怪了。为什么可以在声明时不直接赋值?是因为不是所有的被final修饰的值都要在声明时马上赋值吗?之前看到的关于
阅读更多

分清堆和栈

其实关于堆栈的问题在脑海中盘旋了挺久的了。从C语言开始,到数据结构,再到现在的Java,它一直在!现在就让我们从头开始吧。

明确概念

首先应该明确堆和栈是不同的东西,其次数据结构中的堆和栈与编程语言中的堆和栈不是同一个概念。

从数据结构说起

栈:即Stack,是一个LIFO队列。对它的操作有pop(),push(),peek()等。
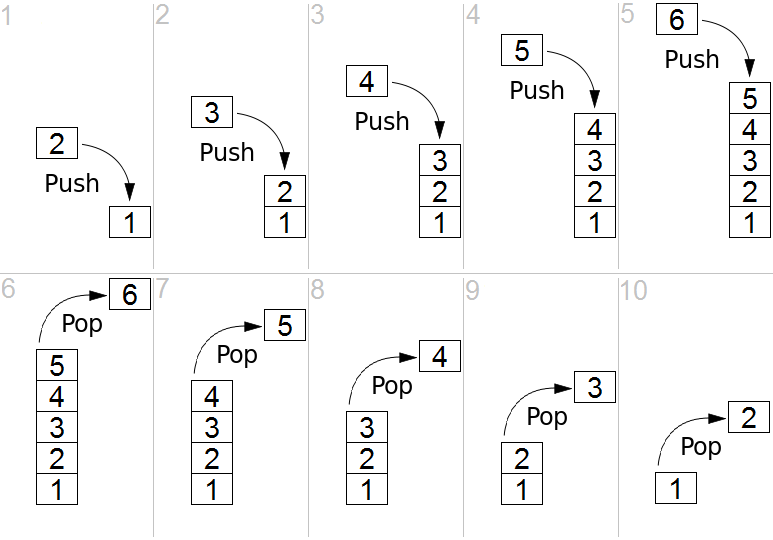
示意图
堆:即Heap,是一棵完全二叉树(heap的某一种),它的特点是父节点的值大于(小于)两个子节点的值(分别称为大顶堆和小顶堆)。

具体内容可以参考后续关于数据结构的系列博客。

再到C语言

1
2
3
4
5
6
7
8
9
10
11
12
int a = 0; //全局初始化区 
char *p1; //全局未初始化区
main()
{
int b; //栈
char s[] = "abc"; //栈
char *p2; //栈
char *p3 = "123456"; //123456\0在常量区,p3在栈上。
static int c =0//全局(静态)初始化区
p1 = (char *)malloc(10); //堆
p2 = (char *)malloc(20); //堆
}

一个比较直观的感受就是使用malloc()函数分配出来的空间在堆上,其它经过系统初始化的在栈上。堆上的不能自己回收,栈上的会随着函数结束后自动回收。

Java中的堆和栈

堆区:存放所有new出来的对象本身

栈区:存放基本类型的变量数据和对象的引用

静态域:存放静态成员(由static定义)

常量池:存放字符串常量和基本类型常量(public static final)

Android中的looper与handler

前言

为什么会有这么一篇网上有很多种解说版本的博客?因为我看懂了很多次,都没有把自己的想法记下来,然后就忘了。那样不仅浪费时间、而且还有点伤积极性。

从一个异常出发开始

在《第一行代码》中看到了关于异步处理消息的用法时,有没有想过可以在子线程中去new一个Handler?现在就开始着手,从一个子线程中去new一个Handler,看看会有什么发生。

1
2
3
4
5
6
new Thread(new Runnable() {
@Override
public void run() {
new Handler();
}
}).start();

结果就出现了RuntimeException异常,仔细看它的信息说明。

java.lang.RuntimeException: Can't create handler inside thread that has not called Looper.prepare()

那么可知,在每个线程new Handler()时,都必须先调用Looper.prepare()或者调用一个能够达到相同效果的函数。那么在主线程中可以new Handler()的原因,想必就是已经调用过了。以下代码位于AcitivityThread.java中,是一段初始化主线程的内容。

1
2
3
4
5
6
7
8
9
10
11
12
13
14
15
16
17
Looper.prepareMainLooper();

ActivityThread thread = new ActivityThread();
thread.attach(false);

if (sMainThreadHandler == null) {
sMainThreadHandler = thread.getHandler();
}

if (false) {
Looper.myLooper().setMessageLogging(
new LogPrinter(Log.DEBUG, "ActivityThread"));
}

// End of event ActivityThreadMain.
Trace.traceEnd(Trace.TRACE_TAG_ACTIVITY_MANAGER);
Looper.loop();

其它的都忽略,就看Looper相关的。Looper.prepareMainLooper()想必是达到了相同的效果吧。那么,这个效果到底是什么呢?让我们慢慢拨开云雾。

寻找那个异常

于是,我们很自然地在子线程中加入了Looper.prepare(),并随手按着Ctrl,左键点击鼠标,进入了prepare()函数中。

1
2
3
4
5
6
7
8
9
10
11
12
13
14
15
16
17
18
/*
Initialize the current thread as a looper. This gives you a chance to create handlers that then reference this looper, before actually starting the loop. Be sure to call {@link #loop()} after calling this method, and end it by calling{@link #quit()}.
*/
public static void prepare() {
prepare(true);
}

private static void prepare(boolean quitAllowed) {
if (sThreadLocal.get() != null) {
throw new RuntimeException("Only one Looper may be created per thread");
}
sThreadLocal.set(new Looper(quitAllowed));
}
...
private Looper(boolean quitAllowed) {
mQueue = new MessageQueue(quitAllowed);
mThread = Thread.currentThread();
}

当初的那个异常不就在眼前?但是,这sThreadLocal又是什么?它是什么暂时抛开,这时我们知道了我们的线程中已经有了一个Looper,并且为这个Looper设置好了一个MessageQueue。因为一个线程只能有一个Looper,所以一个Looper也就只能拥有一个MessageQueue。但是AcitivityThread中,经过Looper.loop()后就再也没有下文了?所以,这个loop()又是干啥的呢?

繁忙的loop()

1
2
3
4
5
6
7
8
9
10
11
12
13
14
15
16
17
18
19
20
21
22
23
24
25
26
27
28
29
30
31
32
33
34
35
/** Return the Looper object associated with the current thread.  Returns null if the calling thread is not associated with a Looper.*/
public static @Nullable Looper myLooper() {
return sThreadLocal.get();
}

/**
* Run the message queue in this thread. Be sure to call
* {@link #quit()} to end the loop.
*/
public static void loop() {
final Looper me = myLooper();
if (me == null) {
throw new RuntimeException("No Looper; Looper.prepare() wasn't called on this thread.");
}
final MessageQueue queue = me.mQueue;
...
for (;;) {
Message msg = queue.next(); // might block
if (msg == null) {
// No message indicates that the message queue is quitting.
return;
}
...
try {
msg.target.dispatchMessage(msg);
end = (slowDispatchThresholdMs == 0) ? 0 : SystemClock.uptimeMillis();
} finally {
if (traceTag != 0) {
Trace.traceEnd(traceTag);
}
}
...
msg.recycleUnchecked();
}
}

因为其中一个大大的死循环,所以调用了loop()之后,其后就没有实际代码了。这个死循环就是用来处理Message,不断地从队列中取,然后不断地进行分发到相应的Handler,进行处理。此时,这个for(;;)所处的线程,就是你调用Looper.loop()时所在的线程。因此,它分发msg给了相应的Handler的handleMessage之后,还是在此线程中执行。然后,在想想,发送Message时所处在的线程,就焕然大悟这个异步操作了。

1
2
3
4
5
6
7
8
9
10
11
12
13
14
15
/**
* Handle system messages here.
*/
public void dispatchMessage(Message msg) {
if (msg.callback != null) {
handleCallback(msg);
} else {
if (mCallback != null) {
if (mCallback.handleMessage(msg)) {
return;
}
}
handleMessage(msg);
}
}

handleMessage(msg)不正是我们创建Handler时候,所覆盖的方法吗?

进一步思考,如果我只在主线程中new Handler,那么Looper就是主线程,所有的msg都会在主线程中被处理;那如果我想让msg在子线程中被处理呢?当然可以Looper.prepare()巴拉巴拉,然后Looper.loop()。但是Android还为我们提供了一个更为便捷的封装。那就是HandlerThread

子线程处理msg的封装HandlerThread

1
2
3
4
5
6
7
8
9
10
11
12
13
@Override
public void run() {
mTid = Process.myTid();
Looper.prepare();
synchronized (this) {
mLooper = Looper.myLooper();
notifyAll();
}
Process.setThreadPriority(mPriority);
onLooperPrepared();
Looper.loop();
mTid = -1;
}

源代码比较短。它继承自Thread,并在run方法中初始化好了Looper,可以通过其getThreadHandler()方法,获取到与该Looper所绑定的Handler,然后sendMessage(),最后在该线程中处理msg。

小结

因此,一个Thread可以有一个Looper和一个MessageQueue,一个Looper却可以与多个Handler绑定,但是一个Handler只能与一个Looper绑定。原因可以从Handler的构造方法中寻找的。