1
2
3
4
5
6
7
8
9
10
11
12
13
14
15
16
17
18
19
20
21
22
23
24
25
26
27
28
29
30
31
32
33
34
35
36
37
38
39
40
41
42
43
44
45
46
47
48
49
50
51
52
53
54
55
56
57
58
59
60
61
62
63
64
65
66
67
68
69
70
71
72
73
74
75
76
77
78
79
80
81
82
83
84
85
86
87
88
89
90
91
92
93
94
95
96
97
98
99
100
101
102
103
104
105
106
107
108
109
110
111
112
113
114
115
116
117
118
119
120
121
122
123
124
125
126
127
128
129
130
131
132
133
134
135
136
137
138
139
140
141
142
143
144
145
146
147
148
149
150
151
152
153
154
155
156
157
158
159
160
161
162
163
164
165
166
167
168
169
170
171
172
173
174
175
176
177
178
179
180
181
182
183
184
185
186
187
188
189
190
191
192
193
194
195
196
197
198
199
200
201
202
203
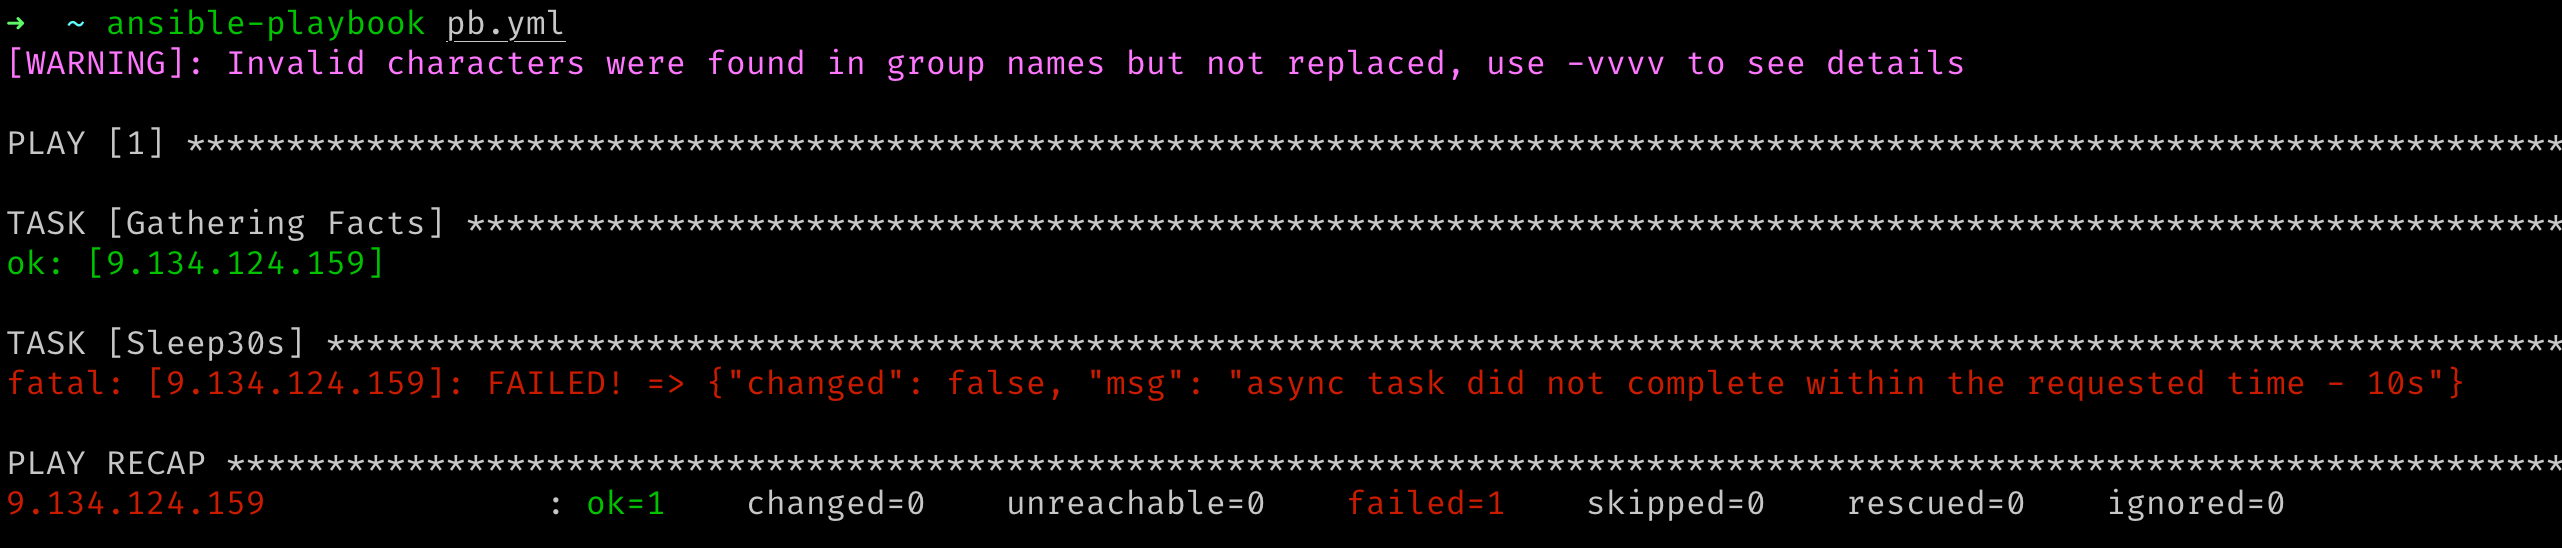
| TASK [Sleep30s] ****************************************************************
task path: /Users/yangyu/pb.yml:8
<9.134.124.159> ESTABLISH SSH CONNECTION FOR USER: root
<9.134.124.159> SSH: EXEC ssh -C -o ControlMaster=auto -o ControlPersist=60s -o Port=36000 -o KbdInteractiveAuthentication=no -o PreferredAuthentications=gssapi-with-mic,gssapi-keyex,hostbased,publickey -o PasswordAuthentication=no -o 'User="root"' -o ConnectTimeout=10 -o ControlPath=/Users/yangyu/.ansible/cp/4846fe66a5 9.134.124.159 '/bin/sh -c '"'"'echo ~root && sleep 0'"'"''
<9.134.124.159> (0, b'/root\n', b'')
<9.134.124.159> ESTABLISH SSH CONNECTION FOR USER: root
<9.134.124.159> SSH: EXEC ssh -C -o ControlMaster=auto -o ControlPersist=60s -o Port=36000 -o KbdInteractiveAuthentication=no -o PreferredAuthentications=gssapi-with-mic,gssapi-keyex,hostbased,publickey -o PasswordAuthentication=no -o 'User="root"' -o ConnectTimeout=10 -o ControlPath=/Users/yangyu/.ansible/cp/4846fe66a5 9.134.124.159 '/bin/sh -c '"'"'( umask 77 && mkdir -p "` echo /root/.ansible/tmp `"&& mkdir "` echo /root/.ansible/tmp/ansible-tmp-1600333356.414965-42861-191307013081145 `" && echo ansible-tmp-1600333356.414965-42861-191307013081145="` echo /root/.ansible/tmp/ansible-tmp-1600333356.414965-42861-191307013081145 `" ) && sleep 0'"'"''
<9.134.124.159> (0, b'ansible-tmp-1600333356.414965-42861-191307013081145=/root/.ansible/tmp/ansible-tmp-1600333356.414965-42861-191307013081145\n', b'')
Using module file /Users/yangyu/projects/ansible/lib/ansible/modules/command.py
<9.134.124.159> PUT /Users/yangyu/.ansible/tmp/ansible-local-42839upbl7lkg/tmp_66m3nen TO /root/.ansible/tmp/ansible-tmp-1600333356.414965-42861-191307013081145/AnsiballZ_command.py
<9.134.124.159> SSH: EXEC sftp -b - -C -o ControlMaster=auto -o ControlPersist=60s -o Port=36000 -o KbdInteractiveAuthentication=no -o PreferredAuthentications=gssapi-with-mic,gssapi-keyex,hostbased,publickey -o PasswordAuthentication=no -o 'User="root"' -o ConnectTimeout=10 -o ControlPath=/Users/yangyu/.ansible/cp/4846fe66a5 '[9.134.124.159]'
<9.134.124.159> (0, b'sftp> put /Users/yangyu/.ansible/tmp/ansible-local-42839upbl7lkg/tmp_66m3nen /root/.ansible/tmp/ansible-tmp-1600333356.414965-42861-191307013081145/AnsiballZ_command.py\n', b'')
<9.134.124.159> PUT /Users/yangyu/.ansible/tmp/ansible-local-42839upbl7lkg/tmplmizhdvg TO /root/.ansible/tmp/ansible-tmp-1600333356.414965-42861-191307013081145/async_wrapper.py
<9.134.124.159> SSH: EXEC sftp -b - -C -o ControlMaster=auto -o ControlPersist=60s -o Port=36000 -o KbdInteractiveAuthentication=no -o PreferredAuthentications=gssapi-with-mic,gssapi-keyex,hostbased,publickey -o PasswordAuthentication=no -o 'User="root"' -o ConnectTimeout=10 -o ControlPath=/Users/yangyu/.ansible/cp/4846fe66a5 '[9.134.124.159]'
<9.134.124.159> (0, b'sftp> put /Users/yangyu/.ansible/tmp/ansible-local-42839upbl7lkg/tmplmizhdvg /root/.ansible/tmp/ansible-tmp-1600333356.414965-42861-191307013081145/async_wrapper.py\n', b'')
<9.134.124.159> ESTABLISH SSH CONNECTION FOR USER: root
<9.134.124.159> SSH: EXEC ssh -C -o ControlMaster=auto -o ControlPersist=60s -o Port=36000 -o KbdInteractiveAuthentication=no -o PreferredAuthentications=gssapi-with-mic,gssapi-keyex,hostbased,publickey -o PasswordAuthentication=no -o 'User="root"' -o ConnectTimeout=10 -o ControlPath=/Users/yangyu/.ansible/cp/4846fe66a5 9.134.124.159 '/bin/sh -c '"'"'chmod u+x /root/.ansible/tmp/ansible-tmp-1600333356.414965-42861-191307013081145/ /root/.ansible/tmp/ansible-tmp-1600333356.414965-42861-191307013081145/AnsiballZ_command.py /root/.ansible/tmp/ansible-tmp-1600333356.414965-42861-191307013081145/async_wrapper.py && sleep 0'"'"''
<9.134.124.159> (0, b'', b'')
<9.134.124.159> ESTABLISH SSH CONNECTION FOR USER: root
<9.134.124.159> SSH: EXEC ssh -C -o ControlMaster=auto -o ControlPersist=60s -o Port=36000 -o KbdInteractiveAuthentication=no -o PreferredAuthentications=gssapi-with-mic,gssapi-keyex,hostbased,publickey -o PasswordAuthentication=no -o 'User="root"' -o ConnectTimeout=10 -o ControlPath=/Users/yangyu/.ansible/cp/4846fe66a5 -tt 9.134.124.159 '/bin/sh -c '"'"'ANSIBLE_ASYNC_DIR='"'"'"'"'"'"'"'"'~/.ansible_async'"'"'"'"'"'"'"'"' /usr/bin/python /root/.ansible/tmp/ansible-tmp-1600333356.414965-42861-191307013081145/async_wrapper.py 48991476669 10 /root/.ansible/tmp/ansible-tmp-1600333356.414965-42861-191307013081145/AnsiballZ_command.py _ && sleep 0'"'"''
<9.134.124.159> (0, b'{"started": 1, "_ansible_suppress_tmpdir_delete": true, "finished": 0, "results_file": "/root/.ansible_async/48991476669.20840", "ansible_job_id": "48991476669.20840"}\r\n', b'Shared connection to 9.134.124.159 closed.\r\n')
<9.134.124.159> ESTABLISH SSH CONNECTION FOR USER: root
<9.134.124.159> SSH: EXEC ssh -C -o ControlMaster=auto -o ControlPersist=60s -o Port=36000 -o KbdInteractiveAuthentication=no -o PreferredAuthentications=gssapi-with-mic,gssapi-keyex,hostbased,publickey -o PasswordAuthentication=no -o 'User="root"' -o ConnectTimeout=10 -o ControlPath=/Users/yangyu/.ansible/cp/4846fe66a5 9.134.124.159 '/bin/sh -c '"'"'echo ~root && sleep 0'"'"''
<9.134.124.159> (0, b'/root\n', b'')
<9.134.124.159> ESTABLISH SSH CONNECTION FOR USER: root
<9.134.124.159> SSH: EXEC ssh -C -o ControlMaster=auto -o ControlPersist=60s -o Port=36000 -o KbdInteractiveAuthentication=no -o PreferredAuthentications=gssapi-with-mic,gssapi-keyex,hostbased,publickey -o PasswordAuthentication=no -o 'User="root"' -o ConnectTimeout=10 -o ControlPath=/Users/yangyu/.ansible/cp/4846fe66a5 9.134.124.159 '/bin/sh -c '"'"'( umask 77 && mkdir -p "` echo /root/.ansible/tmp `"&& mkdir "` echo /root/.ansible/tmp/ansible-tmp-1600333358.847193-42861-146017266031103 `" && echo ansible-tmp-1600333358.847193-42861-146017266031103="` echo /root/.ansible/tmp/ansible-tmp-1600333358.847193-42861-146017266031103 `" ) && sleep 0'"'"''
<9.134.124.159> (0, b'ansible-tmp-1600333358.847193-42861-146017266031103=/root/.ansible/tmp/ansible-tmp-1600333358.847193-42861-146017266031103\n', b'')
Using module file /Users/yangyu/projects/ansible/lib/ansible/modules/async_status.py
<9.134.124.159> PUT /Users/yangyu/.ansible/tmp/ansible-local-42839upbl7lkg/tmpgapz8kyp TO /root/.ansible/tmp/ansible-tmp-1600333358.847193-42861-146017266031103/AnsiballZ_async_status.py
<9.134.124.159> SSH: EXEC sftp -b - -C -o ControlMaster=auto -o ControlPersist=60s -o Port=36000 -o KbdInteractiveAuthentication=no -o PreferredAuthentications=gssapi-with-mic,gssapi-keyex,hostbased,publickey -o PasswordAuthentication=no -o 'User="root"' -o ConnectTimeout=10 -o ControlPath=/Users/yangyu/.ansible/cp/4846fe66a5 '[9.134.124.159]'
<9.134.124.159> (0, b'sftp> put /Users/yangyu/.ansible/tmp/ansible-local-42839upbl7lkg/tmpgapz8kyp /root/.ansible/tmp/ansible-tmp-1600333358.847193-42861-146017266031103/AnsiballZ_async_status.py\n', b'')
<9.134.124.159> ESTABLISH SSH CONNECTION FOR USER: root
<9.134.124.159> SSH: EXEC ssh -C -o ControlMaster=auto -o ControlPersist=60s -o Port=36000 -o KbdInteractiveAuthentication=no -o PreferredAuthentications=gssapi-with-mic,gssapi-keyex,hostbased,publickey -o PasswordAuthentication=no -o 'User="root"' -o ConnectTimeout=10 -o ControlPath=/Users/yangyu/.ansible/cp/4846fe66a5 9.134.124.159 '/bin/sh -c '"'"'chmod u+x /root/.ansible/tmp/ansible-tmp-1600333358.847193-42861-146017266031103/ /root/.ansible/tmp/ansible-tmp-1600333358.847193-42861-146017266031103/AnsiballZ_async_status.py && sleep 0'"'"''
<9.134.124.159> (0, b'', b'')
<9.134.124.159> ESTABLISH SSH CONNECTION FOR USER: root
<9.134.124.159> SSH: EXEC ssh -C -o ControlMaster=auto -o ControlPersist=60s -o Port=36000 -o KbdInteractiveAuthentication=no -o PreferredAuthentications=gssapi-with-mic,gssapi-keyex,hostbased,publickey -o PasswordAuthentication=no -o 'User="root"' -o ConnectTimeout=10 -o ControlPath=/Users/yangyu/.ansible/cp/4846fe66a5 -tt 9.134.124.159 '/bin/sh -c '"'"'/usr/bin/python /root/.ansible/tmp/ansible-tmp-1600333358.847193-42861-146017266031103/AnsiballZ_async_status.py && sleep 0'"'"''
<9.134.124.159> (0, b'\r\n{"started": 1, "invocation": {"module_args": {"jid": "48991476669.20840", "mode": "status", "_async_dir": "/root/.ansible_async"}}, "finished": 0, "ansible_job_id": "48991476669.20840"}\r\n', b'Shared connection to 9.134.124.159 closed.\r\n')
ASYNC POLL on 9.134.124.159: jid=48991476669.20840 started=1 finished=0
Using module file /Users/yangyu/projects/ansible/lib/ansible/modules/async_status.py
<9.134.124.159> PUT /Users/yangyu/.ansible/tmp/ansible-local-42839upbl7lkg/tmpph94rjs7 TO /root/.ansible/tmp/ansible-tmp-1600333358.847193-42861-146017266031103/AnsiballZ_async_status.py
<9.134.124.159> SSH: EXEC sftp -b - -C -o ControlMaster=auto -o ControlPersist=60s -o Port=36000 -o KbdInteractiveAuthentication=no -o PreferredAuthentications=gssapi-with-mic,gssapi-keyex,hostbased,publickey -o PasswordAuthentication=no -o 'User="root"' -o ConnectTimeout=10 -o ControlPath=/Users/yangyu/.ansible/cp/4846fe66a5 '[9.134.124.159]'
<9.134.124.159> (0, b'sftp> put /Users/yangyu/.ansible/tmp/ansible-local-42839upbl7lkg/tmpph94rjs7 /root/.ansible/tmp/ansible-tmp-1600333358.847193-42861-146017266031103/AnsiballZ_async_status.py\n', b'')
<9.134.124.159> ESTABLISH SSH CONNECTION FOR USER: root
<9.134.124.159> SSH: EXEC ssh -C -o ControlMaster=auto -o ControlPersist=60s -o Port=36000 -o KbdInteractiveAuthentication=no -o PreferredAuthentications=gssapi-with-mic,gssapi-keyex,hostbased,publickey -o PasswordAuthentication=no -o 'User="root"' -o ConnectTimeout=10 -o ControlPath=/Users/yangyu/.ansible/cp/4846fe66a5 9.134.124.159 '/bin/sh -c '"'"'chmod u+x /root/.ansible/tmp/ansible-tmp-1600333358.847193-42861-146017266031103/ /root/.ansible/tmp/ansible-tmp-1600333358.847193-42861-146017266031103/AnsiballZ_async_status.py && sleep 0'"'"''
<9.134.124.159> (0, b'', b'')
<9.134.124.159> ESTABLISH SSH CONNECTION FOR USER: root
<9.134.124.159> SSH: EXEC ssh -C -o ControlMaster=auto -o ControlPersist=60s -o Port=36000 -o KbdInteractiveAuthentication=no -o PreferredAuthentications=gssapi-with-mic,gssapi-keyex,hostbased,publickey -o PasswordAuthentication=no -o 'User="root"' -o ConnectTimeout=10 -o ControlPath=/Users/yangyu/.ansible/cp/4846fe66a5 -tt 9.134.124.159 '/bin/sh -c '"'"'/usr/bin/python /root/.ansible/tmp/ansible-tmp-1600333358.847193-42861-146017266031103/AnsiballZ_async_status.py && sleep 0'"'"''
<9.134.124.159> (0, b'\r\n{"started": 1, "invocation": {"module_args": {"jid": "48991476669.20840", "mode": "status", "_async_dir": "/root/.ansible_async"}}, "finished": 0, "ansible_job_id": "48991476669.20840"}\r\n', b'Shared connection to 9.134.124.159 closed.\r\n')
ASYNC POLL on 9.134.124.159: jid=48991476669.20840 started=1 finished=0
Using module file /Users/yangyu/projects/ansible/lib/ansible/modules/async_status.py
<9.134.124.159> PUT /Users/yangyu/.ansible/tmp/ansible-local-42839upbl7lkg/tmpia9_huhw TO /root/.ansible/tmp/ansible-tmp-1600333358.847193-42861-146017266031103/AnsiballZ_async_status.py
<9.134.124.159> SSH: EXEC sftp -b - -C -o ControlMaster=auto -o ControlPersist=60s -o Port=36000 -o KbdInteractiveAuthentication=no -o PreferredAuthentications=gssapi-with-mic,gssapi-keyex,hostbased,publickey -o PasswordAuthentication=no -o 'User="root"' -o ConnectTimeout=10 -o ControlPath=/Users/yangyu/.ansible/cp/4846fe66a5 '[9.134.124.159]'
<9.134.124.159> (0, b'sftp> put /Users/yangyu/.ansible/tmp/ansible-local-42839upbl7lkg/tmpia9_huhw /root/.ansible/tmp/ansible-tmp-1600333358.847193-42861-146017266031103/AnsiballZ_async_status.py\n', b'')
<9.134.124.159> ESTABLISH SSH CONNECTION FOR USER: root
<9.134.124.159> SSH: EXEC ssh -C -o ControlMaster=auto -o ControlPersist=60s -o Port=36000 -o KbdInteractiveAuthentication=no -o PreferredAuthentications=gssapi-with-mic,gssapi-keyex,hostbased,publickey -o PasswordAuthentication=no -o 'User="root"' -o ConnectTimeout=10 -o ControlPath=/Users/yangyu/.ansible/cp/4846fe66a5 9.134.124.159 '/bin/sh -c '"'"'chmod u+x /root/.ansible/tmp/ansible-tmp-1600333358.847193-42861-146017266031103/ /root/.ansible/tmp/ansible-tmp-1600333358.847193-42861-146017266031103/AnsiballZ_async_status.py && sleep 0'"'"''
<9.134.124.159> (0, b'', b'')
<9.134.124.159> ESTABLISH SSH CONNECTION FOR USER: root
<9.134.124.159> SSH: EXEC ssh -C -o ControlMaster=auto -o ControlPersist=60s -o Port=36000 -o KbdInteractiveAuthentication=no -o PreferredAuthentications=gssapi-with-mic,gssapi-keyex,hostbased,publickey -o PasswordAuthentication=no -o 'User="root"' -o ConnectTimeout=10 -o ControlPath=/Users/yangyu/.ansible/cp/4846fe66a5 -tt 9.134.124.159 '/bin/sh -c '"'"'/usr/bin/python /root/.ansible/tmp/ansible-tmp-1600333358.847193-42861-146017266031103/AnsiballZ_async_status.py && sleep 0'"'"''
<9.134.124.159> (0, b'\r\n{"started": 1, "invocation": {"module_args": {"jid": "48991476669.20840", "mode": "status", "_async_dir": "/root/.ansible_async"}}, "finished": 0, "ansible_job_id": "48991476669.20840"}\r\n', b'Shared connection to 9.134.124.159 closed.\r\n')
ASYNC POLL on 9.134.124.159: jid=48991476669.20840 started=1 finished=0
Using module file /Users/yangyu/projects/ansible/lib/ansible/modules/async_status.py
<9.134.124.159> PUT /Users/yangyu/.ansible/tmp/ansible-local-42839upbl7lkg/tmp0dw1l581 TO /root/.ansible/tmp/ansible-tmp-1600333358.847193-42861-146017266031103/AnsiballZ_async_status.py
<9.134.124.159> SSH: EXEC sftp -b - -C -o ControlMaster=auto -o ControlPersist=60s -o Port=36000 -o KbdInteractiveAuthentication=no -o PreferredAuthentications=gssapi-with-mic,gssapi-keyex,hostbased,publickey -o PasswordAuthentication=no -o 'User="root"' -o ConnectTimeout=10 -o ControlPath=/Users/yangyu/.ansible/cp/4846fe66a5 '[9.134.124.159]'
<9.134.124.159> (0, b'sftp> put /Users/yangyu/.ansible/tmp/ansible-local-42839upbl7lkg/tmp0dw1l581 /root/.ansible/tmp/ansible-tmp-1600333358.847193-42861-146017266031103/AnsiballZ_async_status.py\n', b'')
<9.134.124.159> ESTABLISH SSH CONNECTION FOR USER: root
<9.134.124.159> SSH: EXEC ssh -C -o ControlMaster=auto -o ControlPersist=60s -o Port=36000 -o KbdInteractiveAuthentication=no -o PreferredAuthentications=gssapi-with-mic,gssapi-keyex,hostbased,publickey -o PasswordAuthentication=no -o 'User="root"' -o ConnectTimeout=10 -o ControlPath=/Users/yangyu/.ansible/cp/4846fe66a5 9.134.124.159 '/bin/sh -c '"'"'chmod u+x /root/.ansible/tmp/ansible-tmp-1600333358.847193-42861-146017266031103/ /root/.ansible/tmp/ansible-tmp-1600333358.847193-42861-146017266031103/AnsiballZ_async_status.py && sleep 0'"'"''
<9.134.124.159> (0, b'', b'')
<9.134.124.159> ESTABLISH SSH CONNECTION FOR USER: root
<9.134.124.159> SSH: EXEC ssh -C -o ControlMaster=auto -o ControlPersist=60s -o Port=36000 -o KbdInteractiveAuthentication=no -o PreferredAuthentications=gssapi-with-mic,gssapi-keyex,hostbased,publickey -o PasswordAuthentication=no -o 'User="root"' -o ConnectTimeout=10 -o ControlPath=/Users/yangyu/.ansible/cp/4846fe66a5 -tt 9.134.124.159 '/bin/sh -c '"'"'/usr/bin/python /root/.ansible/tmp/ansible-tmp-1600333358.847193-42861-146017266031103/AnsiballZ_async_status.py && sleep 0'"'"''
<9.134.124.159> (0, b'\r\n{"started": 1, "invocation": {"module_args": {"jid": "48991476669.20840", "mode": "status", "_async_dir": "/root/.ansible_async"}}, "finished": 0, "ansible_job_id": "48991476669.20840"}\r\n', b'Shared connection to 9.134.124.159 closed.\r\n')
ASYNC POLL on 9.134.124.159: jid=48991476669.20840 started=1 finished=0
Using module file /Users/yangyu/projects/ansible/lib/ansible/modules/async_status.py
<9.134.124.159> PUT /Users/yangyu/.ansible/tmp/ansible-local-42839upbl7lkg/tmp640778bz TO /root/.ansible/tmp/ansible-tmp-1600333358.847193-42861-146017266031103/AnsiballZ_async_status.py
<9.134.124.159> SSH: EXEC sftp -b - -C -o ControlMaster=auto -o ControlPersist=60s -o Port=36000 -o KbdInteractiveAuthentication=no -o PreferredAuthentications=gssapi-with-mic,gssapi-keyex,hostbased,publickey -o PasswordAuthentication=no -o 'User="root"' -o ConnectTimeout=10 -o ControlPath=/Users/yangyu/.ansible/cp/4846fe66a5 '[9.134.124.159]'
<9.134.124.159> (0, b'sftp> put /Users/yangyu/.ansible/tmp/ansible-local-42839upbl7lkg/tmp640778bz /root/.ansible/tmp/ansible-tmp-1600333358.847193-42861-146017266031103/AnsiballZ_async_status.py\n', b'')
<9.134.124.159> ESTABLISH SSH CONNECTION FOR USER: root
<9.134.124.159> SSH: EXEC ssh -C -o ControlMaster=auto -o ControlPersist=60s -o Port=36000 -o KbdInteractiveAuthentication=no -o PreferredAuthentications=gssapi-with-mic,gssapi-keyex,hostbased,publickey -o PasswordAuthentication=no -o 'User="root"' -o ConnectTimeout=10 -o ControlPath=/Users/yangyu/.ansible/cp/4846fe66a5 9.134.124.159 '/bin/sh -c '"'"'chmod u+x /root/.ansible/tmp/ansible-tmp-1600333358.847193-42861-146017266031103/ /root/.ansible/tmp/ansible-tmp-1600333358.847193-42861-146017266031103/AnsiballZ_async_status.py && sleep 0'"'"''
<9.134.124.159> (0, b'', b'')
<9.134.124.159> ESTABLISH SSH CONNECTION FOR USER: root
<9.134.124.159> SSH: EXEC ssh -C -o ControlMaster=auto -o ControlPersist=60s -o Port=36000 -o KbdInteractiveAuthentication=no -o PreferredAuthentications=gssapi-with-mic,gssapi-keyex,hostbased,publickey -o PasswordAuthentication=no -o 'User="root"' -o ConnectTimeout=10 -o ControlPath=/Users/yangyu/.ansible/cp/4846fe66a5 -tt 9.134.124.159 '/bin/sh -c '"'"'/usr/bin/python /root/.ansible/tmp/ansible-tmp-1600333358.847193-42861-146017266031103/AnsiballZ_async_status.py && sleep 0'"'"''
<9.134.124.159> (0, b'\r\n{"started": 1, "invocation": {"module_args": {"jid": "48991476669.20840", "mode": "status", "_async_dir": "/root/.ansible_async"}}, "finished": 0, "ansible_job_id": "48991476669.20840"}\r\n', b'Shared connection to 9.134.124.159 closed.\r\n')
ASYNC POLL on 9.134.124.159: jid=48991476669.20840 started=1 finished=0
Using module file /Users/yangyu/projects/ansible/lib/ansible/modules/async_status.py
<9.134.124.159> PUT /Users/yangyu/.ansible/tmp/ansible-local-42839upbl7lkg/tmp_snd1eu9 TO /root/.ansible/tmp/ansible-tmp-1600333358.847193-42861-146017266031103/AnsiballZ_async_status.py
<9.134.124.159> SSH: EXEC sftp -b - -C -o ControlMaster=auto -o ControlPersist=60s -o Port=36000 -o KbdInteractiveAuthentication=no -o PreferredAuthentications=gssapi-with-mic,gssapi-keyex,hostbased,publickey -o PasswordAuthentication=no -o 'User="root"' -o ConnectTimeout=10 -o ControlPath=/Users/yangyu/.ansible/cp/4846fe66a5 '[9.134.124.159]'
<9.134.124.159> (0, b'sftp> put /Users/yangyu/.ansible/tmp/ansible-local-42839upbl7lkg/tmp_snd1eu9 /root/.ansible/tmp/ansible-tmp-1600333358.847193-42861-146017266031103/AnsiballZ_async_status.py\n', b'')
<9.134.124.159> ESTABLISH SSH CONNECTION FOR USER: root
<9.134.124.159> SSH: EXEC ssh -C -o ControlMaster=auto -o ControlPersist=60s -o Port=36000 -o KbdInteractiveAuthentication=no -o PreferredAuthentications=gssapi-with-mic,gssapi-keyex,hostbased,publickey -o PasswordAuthentication=no -o 'User="root"' -o ConnectTimeout=10 -o ControlPath=/Users/yangyu/.ansible/cp/4846fe66a5 9.134.124.159 '/bin/sh -c '"'"'chmod u+x /root/.ansible/tmp/ansible-tmp-1600333358.847193-42861-146017266031103/ /root/.ansible/tmp/ansible-tmp-1600333358.847193-42861-146017266031103/AnsiballZ_async_status.py && sleep 0'"'"''
<9.134.124.159> (0, b'', b'')
<9.134.124.159> ESTABLISH SSH CONNECTION FOR USER: root
<9.134.124.159> SSH: EXEC ssh -C -o ControlMaster=auto -o ControlPersist=60s -o Port=36000 -o KbdInteractiveAuthentication=no -o PreferredAuthentications=gssapi-with-mic,gssapi-keyex,hostbased,publickey -o PasswordAuthentication=no -o 'User="root"' -o ConnectTimeout=10 -o ControlPath=/Users/yangyu/.ansible/cp/4846fe66a5 -tt 9.134.124.159 '/bin/sh -c '"'"'/usr/bin/python /root/.ansible/tmp/ansible-tmp-1600333358.847193-42861-146017266031103/AnsiballZ_async_status.py && sleep 0'"'"''
<9.134.124.159> (0, b'\r\n{"started": 1, "invocation": {"module_args": {"jid": "48991476669.20840", "mode": "status", "_async_dir": "/root/.ansible_async"}}, "finished": 0, "ansible_job_id": "48991476669.20840"}\r\n', b'Shared connection to 9.134.124.159 closed.\r\n')
ASYNC POLL on 9.134.124.159: jid=48991476669.20840 started=1 finished=0
Using module file /Users/yangyu/projects/ansible/lib/ansible/modules/async_status.py
<9.134.124.159> PUT /Users/yangyu/.ansible/tmp/ansible-local-42839upbl7lkg/tmpk13c6mm6 TO /root/.ansible/tmp/ansible-tmp-1600333358.847193-42861-146017266031103/AnsiballZ_async_status.py
<9.134.124.159> SSH: EXEC sftp -b - -C -o ControlMaster=auto -o ControlPersist=60s -o Port=36000 -o KbdInteractiveAuthentication=no -o PreferredAuthentications=gssapi-with-mic,gssapi-keyex,hostbased,publickey -o PasswordAuthentication=no -o 'User="root"' -o ConnectTimeout=10 -o ControlPath=/Users/yangyu/.ansible/cp/4846fe66a5 '[9.134.124.159]'
<9.134.124.159> (0, b'sftp> put /Users/yangyu/.ansible/tmp/ansible-local-42839upbl7lkg/tmpk13c6mm6 /root/.ansible/tmp/ansible-tmp-1600333358.847193-42861-146017266031103/AnsiballZ_async_status.py\n', b'')
<9.134.124.159> ESTABLISH SSH CONNECTION FOR USER: root
<9.134.124.159> SSH: EXEC ssh -C -o ControlMaster=auto -o ControlPersist=60s -o Port=36000 -o KbdInteractiveAuthentication=no -o PreferredAuthentications=gssapi-with-mic,gssapi-keyex,hostbased,publickey -o PasswordAuthentication=no -o 'User="root"' -o ConnectTimeout=10 -o ControlPath=/Users/yangyu/.ansible/cp/4846fe66a5 9.134.124.159 '/bin/sh -c '"'"'chmod u+x /root/.ansible/tmp/ansible-tmp-1600333358.847193-42861-146017266031103/ /root/.ansible/tmp/ansible-tmp-1600333358.847193-42861-146017266031103/AnsiballZ_async_status.py && sleep 0'"'"''
<9.134.124.159> (0, b'', b'')
<9.134.124.159> ESTABLISH SSH CONNECTION FOR USER: root
<9.134.124.159> SSH: EXEC ssh -C -o ControlMaster=auto -o ControlPersist=60s -o Port=36000 -o KbdInteractiveAuthentication=no -o PreferredAuthentications=gssapi-with-mic,gssapi-keyex,hostbased,publickey -o PasswordAuthentication=no -o 'User="root"' -o ConnectTimeout=10 -o ControlPath=/Users/yangyu/.ansible/cp/4846fe66a5 -tt 9.134.124.159 '/bin/sh -c '"'"'/usr/bin/python /root/.ansible/tmp/ansible-tmp-1600333358.847193-42861-146017266031103/AnsiballZ_async_status.py && sleep 0'"'"''
<9.134.124.159> (0, b'\r\n{"started": 1, "invocation": {"module_args": {"jid": "48991476669.20840", "mode": "status", "_async_dir": "/root/.ansible_async"}}, "finished": 0, "ansible_job_id": "48991476669.20840"}\r\n', b'Shared connection to 9.134.124.159 closed.\r\n')
ASYNC POLL on 9.134.124.159: jid=48991476669.20840 started=1 finished=0
Using module file /Users/yangyu/projects/ansible/lib/ansible/modules/async_status.py
<9.134.124.159> PUT /Users/yangyu/.ansible/tmp/ansible-local-42839upbl7lkg/tmpfjdhm2l7 TO /root/.ansible/tmp/ansible-tmp-1600333358.847193-42861-146017266031103/AnsiballZ_async_status.py
<9.134.124.159> SSH: EXEC sftp -b - -C -o ControlMaster=auto -o ControlPersist=60s -o Port=36000 -o KbdInteractiveAuthentication=no -o PreferredAuthentications=gssapi-with-mic,gssapi-keyex,hostbased,publickey -o PasswordAuthentication=no -o 'User="root"' -o ConnectTimeout=10 -o ControlPath=/Users/yangyu/.ansible/cp/4846fe66a5 '[9.134.124.159]'
<9.134.124.159> (0, b'sftp> put /Users/yangyu/.ansible/tmp/ansible-local-42839upbl7lkg/tmpfjdhm2l7 /root/.ansible/tmp/ansible-tmp-1600333358.847193-42861-146017266031103/AnsiballZ_async_status.py\n', b'')
<9.134.124.159> ESTABLISH SSH CONNECTION FOR USER: root
<9.134.124.159> SSH: EXEC ssh -C -o ControlMaster=auto -o ControlPersist=60s -o Port=36000 -o KbdInteractiveAuthentication=no -o PreferredAuthentications=gssapi-with-mic,gssapi-keyex,hostbased,publickey -o PasswordAuthentication=no -o 'User="root"' -o ConnectTimeout=10 -o ControlPath=/Users/yangyu/.ansible/cp/4846fe66a5 9.134.124.159 '/bin/sh -c '"'"'chmod u+x /root/.ansible/tmp/ansible-tmp-1600333358.847193-42861-146017266031103/ /root/.ansible/tmp/ansible-tmp-1600333358.847193-42861-146017266031103/AnsiballZ_async_status.py && sleep 0'"'"''
<9.134.124.159> (0, b'', b'')
<9.134.124.159> ESTABLISH SSH CONNECTION FOR USER: root
<9.134.124.159> SSH: EXEC ssh -C -o ControlMaster=auto -o ControlPersist=60s -o Port=36000 -o KbdInteractiveAuthentication=no -o PreferredAuthentications=gssapi-with-mic,gssapi-keyex,hostbased,publickey -o PasswordAuthentication=no -o 'User="root"' -o ConnectTimeout=10 -o ControlPath=/Users/yangyu/.ansible/cp/4846fe66a5 -tt 9.134.124.159 '/bin/sh -c '"'"'/usr/bin/python /root/.ansible/tmp/ansible-tmp-1600333358.847193-42861-146017266031103/AnsiballZ_async_status.py && sleep 0'"'"''
<9.134.124.159> (0, b'\r\n{"started": 1, "invocation": {"module_args": {"jid": "48991476669.20840", "mode": "status", "_async_dir": "/root/.ansible_async"}}, "finished": 0, "ansible_job_id": "48991476669.20840"}\r\n', b'Shared connection to 9.134.124.159 closed.\r\n')
ASYNC POLL on 9.134.124.159: jid=48991476669.20840 started=1 finished=0
Using module file /Users/yangyu/projects/ansible/lib/ansible/modules/async_status.py
<9.134.124.159> PUT /Users/yangyu/.ansible/tmp/ansible-local-42839upbl7lkg/tmpzqpsa6hl TO /root/.ansible/tmp/ansible-tmp-1600333358.847193-42861-146017266031103/AnsiballZ_async_status.py
<9.134.124.159> SSH: EXEC sftp -b - -C -o ControlMaster=auto -o ControlPersist=60s -o Port=36000 -o KbdInteractiveAuthentication=no -o PreferredAuthentications=gssapi-with-mic,gssapi-keyex,hostbased,publickey -o PasswordAuthentication=no -o 'User="root"' -o ConnectTimeout=10 -o ControlPath=/Users/yangyu/.ansible/cp/4846fe66a5 '[9.134.124.159]'
<9.134.124.159> (0, b'sftp> put /Users/yangyu/.ansible/tmp/ansible-local-42839upbl7lkg/tmpzqpsa6hl /root/.ansible/tmp/ansible-tmp-1600333358.847193-42861-146017266031103/AnsiballZ_async_status.py\n', b'')
<9.134.124.159> ESTABLISH SSH CONNECTION FOR USER: root
<9.134.124.159> SSH: EXEC ssh -C -o ControlMaster=auto -o ControlPersist=60s -o Port=36000 -o KbdInteractiveAuthentication=no -o PreferredAuthentications=gssapi-with-mic,gssapi-keyex,hostbased,publickey -o PasswordAuthentication=no -o 'User="root"' -o ConnectTimeout=10 -o ControlPath=/Users/yangyu/.ansible/cp/4846fe66a5 9.134.124.159 '/bin/sh -c '"'"'chmod u+x /root/.ansible/tmp/ansible-tmp-1600333358.847193-42861-146017266031103/ /root/.ansible/tmp/ansible-tmp-1600333358.847193-42861-146017266031103/AnsiballZ_async_status.py && sleep 0'"'"''
<9.134.124.159> (0, b'', b'')
<9.134.124.159> ESTABLISH SSH CONNECTION FOR USER: root
<9.134.124.159> SSH: EXEC ssh -C -o ControlMaster=auto -o ControlPersist=60s -o Port=36000 -o KbdInteractiveAuthentication=no -o PreferredAuthentications=gssapi-with-mic,gssapi-keyex,hostbased,publickey -o PasswordAuthentication=no -o 'User="root"' -o ConnectTimeout=10 -o ControlPath=/Users/yangyu/.ansible/cp/4846fe66a5 -tt 9.134.124.159 '/bin/sh -c '"'"'/usr/bin/python /root/.ansible/tmp/ansible-tmp-1600333358.847193-42861-146017266031103/AnsiballZ_async_status.py && sleep 0'"'"''
<9.134.124.159> (0, b'\r\n{"started": 1, "invocation": {"module_args": {"jid": "48991476669.20840", "mode": "status", "_async_dir": "/root/.ansible_async"}}, "finished": 0, "ansible_job_id": "48991476669.20840"}\r\n', b'Shared connection to 9.134.124.159 closed.\r\n')
ASYNC POLL on 9.134.124.159: jid=48991476669.20840 started=1 finished=0
Using module file /Users/yangyu/projects/ansible/lib/ansible/modules/async_status.py
<9.134.124.159> PUT /Users/yangyu/.ansible/tmp/ansible-local-42839upbl7lkg/tmp_66e23_9 TO /root/.ansible/tmp/ansible-tmp-1600333358.847193-42861-146017266031103/AnsiballZ_async_status.py
<9.134.124.159> SSH: EXEC sftp -b - -C -o ControlMaster=auto -o ControlPersist=60s -o Port=36000 -o KbdInteractiveAuthentication=no -o PreferredAuthentications=gssapi-with-mic,gssapi-keyex,hostbased,publickey -o PasswordAuthentication=no -o 'User="root"' -o ConnectTimeout=10 -o ControlPath=/Users/yangyu/.ansible/cp/4846fe66a5 '[9.134.124.159]'
<9.134.124.159> (0, b'sftp> put /Users/yangyu/.ansible/tmp/ansible-local-42839upbl7lkg/tmp_66e23_9 /root/.ansible/tmp/ansible-tmp-1600333358.847193-42861-146017266031103/AnsiballZ_async_status.py\n', b'')
<9.134.124.159> ESTABLISH SSH CONNECTION FOR USER: root
<9.134.124.159> SSH: EXEC ssh -C -o ControlMaster=auto -o ControlPersist=60s -o Port=36000 -o KbdInteractiveAuthentication=no -o PreferredAuthentications=gssapi-with-mic,gssapi-keyex,hostbased,publickey -o PasswordAuthentication=no -o 'User="root"' -o ConnectTimeout=10 -o ControlPath=/Users/yangyu/.ansible/cp/4846fe66a5 9.134.124.159 '/bin/sh -c '"'"'chmod u+x /root/.ansible/tmp/ansible-tmp-1600333358.847193-42861-146017266031103/ /root/.ansible/tmp/ansible-tmp-1600333358.847193-42861-146017266031103/AnsiballZ_async_status.py && sleep 0'"'"''
<9.134.124.159> (0, b'', b'')
<9.134.124.159> ESTABLISH SSH CONNECTION FOR USER: root
<9.134.124.159> SSH: EXEC ssh -C -o ControlMaster=auto -o ControlPersist=60s -o Port=36000 -o KbdInteractiveAuthentication=no -o PreferredAuthentications=gssapi-with-mic,gssapi-keyex,hostbased,publickey -o PasswordAuthentication=no -o 'User="root"' -o ConnectTimeout=10 -o ControlPath=/Users/yangyu/.ansible/cp/4846fe66a5 -tt 9.134.124.159 '/bin/sh -c '"'"'/usr/bin/python /root/.ansible/tmp/ansible-tmp-1600333358.847193-42861-146017266031103/AnsiballZ_async_status.py && sleep 0'"'"''
<9.134.124.159> (0, b'\r\n{"started": 1, "invocation": {"module_args": {"jid": "48991476669.20840", "mode": "status", "_async_dir": "/root/.ansible_async"}}, "finished": 0, "ansible_job_id": "48991476669.20840"}\r\n', b'Shared connection to 9.134.124.159 closed.\r\n')
ASYNC POLL on 9.134.124.159: jid=48991476669.20840 started=1 finished=0
fatal: [9.134.124.159]: FAILED! => {
"changed": false,
"msg": "async task did not complete within the requested time - 10s"
}
PLAY RECAP *********************************************************************
9.134.124.159 : ok=1 changed=0 unreachable=0 failed=1 skipped=0 rescued=0 ignored=0
Process finished with exit code 2
|